| Author | Thread |
|
|
05/06/2008 05:58:15 AM · #1 |
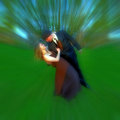
Well, after 3 hours of working on putting in a new background, recoloring all the skin and tones, saved just the basic photo. then started doing different tones, and versions, and then..... suspense moment......I saved over the origional :( now im stuck with the motion blurred one:P which dont look to bad, :) Take a look here
Original
Message edited by author 2008-05-06 05:58:44. |
|
|
|
05/06/2008 06:02:47 AM · #2 |
Hey, nice work! The motion blur actually is really effective, and the BW tones are really nice. As for saving over, I always try to remember to save under a different name first, before I do any significantly different editing like this. But hey, at least you still have the original original, so if you really have to, you can do it over.
Message edited by author 2008-05-06 06:03:30. |
|
|
|
05/06/2008 06:09:38 AM · #3 |
I like the motion blur,
Could you share how you did that? |
|
|
|
05/06/2008 06:12:46 AM · #4 |
nice work with the b&w and the blur effect, even though you should be carful on the edges to your subject, looks a little "dirty" in some parts.
if you have already deleted the original from your card you may try to recover it. here's a software that worked out very well for me one time. |
|
|
|
05/06/2008 07:01:52 AM · #5 |
I think I like it better in color
See this
Tareq
Message edited by author 2008-05-06 07:03:28. |
|
|
|
05/06/2008 08:09:50 AM · #6 |
I'm just glad I grew up when bell-bottom jeans were in style. Toques outside of winter are just too hot.
|
|
|
|
05/06/2008 09:32:20 AM · #7 |
| Way to go, Jimbo! You took a fairly blah snapshot (so-so clarity, big shadow on the subjects, ugly background) and turned it into an exciting photo. |
|
|
|
05/06/2008 12:16:55 PM · #8 |
| Thanks for the comments guys:) Outafocus, I got the motion blurr in photoshop under Filter>Blurr>Radial Blurr: used the blurr method Zoom at 10. I selected the models around there close, this time i did cheat and just used the Ellipitcal Marquee tool just as a rough up to see how i liked it, Thats why there are some Dirty parts like Mephisto sad. Normaly i would take the time and zoom in and select right where the background and the subject meet so its flush. Then Inverse the selection so the background is selected and apply the radial blurr. Then I flipped it and put it in a 10x8 frame and made three duplicates, the first one went in the center with the models in the middle, then next was streched larger to bring out the trees and another to cover any left white area around the outside of the photo. Thanks again on the comments. Jimbo |
|
Home -
Challenges -
Community -
League -
Photos -
Cameras -
Lenses -
Learn -
Help -
Terms of Use -
Privacy -
Top ^
DPChallenge, and website content and design, Copyright © 2001-2026 Challenging Technologies, LLC.
All digital photo copyrights belong to the photographers and may not be used without permission.
Current Server Time: 05/06/2026 08:34:33 PM EDT.


