| Author | Thread |
|
|
05/04/2008 08:12:18 PM · #1 |
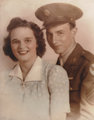
This is a scan of a portrait of my mom & dad in 1943. It is a scan from a copy of a copy. Somewhere along the way, the top left corner of the photo got bent, so the copy I scanned from had a nice crease through mom's forehead and dad's hat. I guess becasue of the bend, when it was copied, the color in that corner got thrown off. I've used the patch tool on Photoshop CS2 to remove the crease. Nice tool. I like it. But anyway, I can't get the top left corner to blend with the rest of the photo. I've tried burning at about 3%-5%, but it comes out streaky and grey.
What else can I try?

|
|
|
|
05/04/2008 08:20:58 PM · #2 |
| Have you tried a color burn with the paintbrush tool? I use it often in work like this. |
|
|
|
05/04/2008 08:21:21 PM · #3 |
| I have fixed a few of these ,It takes a lot of time...duplicate layer clone stamp and healing brush do alittle and save alot |
|
|
|
05/04/2008 08:25:13 PM · #4 |
[thumb]676092[/thumb]
Just a real quick job with the color burn tool and some healing brush after wards on her forehead only.
ETA - tweaked some more to clean up more.
Message edited by author 2008-05-04 20:34:20. |
|
|
|
05/04/2008 08:28:16 PM · #5 |
You did a nice job getting rid of the crease. Now what you want to do is:
- Duplicate the layer
- On the top layer, create a layer mask with only the washed out area open. Feather the mask edge across the boundary. Now you can adjust the washed-out area on the top layer...
- Try bringing in the black point, and adjusting curves until the tones are right. You also may have to adjust saturation slightly.
- As a final step, flatten and blend slightly across the boundary if required.
ETA: Result looks something like this:
There was a little cloning across the remaining boundary, and a little cloning at reduced opacity in darken mode across the background to even it out.
Message edited by author 2008-05-04 20:42:39. |
|
|
|
05/04/2008 08:38:55 PM · #6 |
Originally posted by kirbic:
You did a nice job getting rid of the crease. Now what you want to do is:
- Duplicate the layer
- On the top layer, create a layer mask with only the washed out area open. Feather the mask edge across the boundary. Now you can adjust the washed-out area on the top layer...
- Try bringing in the black point, and adjusting curves until the tones are right. You also may have to adjust saturation slightly.
- As a final step, flatten and blend slightly across the boundary if required. |
I need to do more of these types of images. I enjoy doing them and I think there are more poeple out there than i know that Have images they would like restored. I also appreciate hearing how others do the fixes as I just wing it. Thanks for these tips Kirbic.
Here is one I did for a friend a short while back.
[thumb]648203[/thumb] |
|
|
|
05/05/2008 10:36:23 AM · #7 |
Tim & Fritz,
Thanks. I'll give it a try. I didn't even know there was such a thing as 'color burn'. You learn something new every day.
Also, I'm getting this put on canvas for my mom's birthday (from canvasondemand). How would you guys handle the wrap edge? Since mom and dad bot pretty much hit the edge, I either have to go solid color or maybe clone my way out with the background. What would you all recommend, and if a solid color, what color?
Doing these is fun. I had to put the end of my grandfather's arm back on once!
Message edited by author 2008-05-05 10:37:10.
|
|
Home -
Challenges -
Community -
League -
Photos -
Cameras -
Lenses -
Learn -
Help -
Terms of Use -
Privacy -
Top ^
DPChallenge, and website content and design, Copyright © 2001-2026 Challenging Technologies, LLC.
All digital photo copyrights belong to the photographers and may not be used without permission.
Current Server Time: 04/30/2026 11:47:20 AM EDT.


