Full directions are at the bottom
The bracket
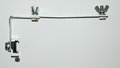
The bracket and umbrella mount stud attached to the speedring
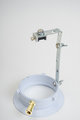
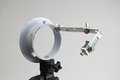
The setup mounted in an umbrella mount
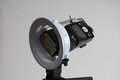
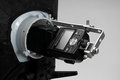
With the strobe attached
And finally with the softbox attached to the speedring
And a shot using the setup

I started with an Impact softbox but this should be adaptable to any softbox speedring.
The softbox comes with a speedring for impact Monolights which is what I set about tinkering with
If you have any questions, PM me or leave a comment here.
What you will need:
A swivel-mount umbrella bracket (I used this one: //www.bhphotovideo.com/c/product/298709-REG/Impact_3117_Umbrella_Bracket.html)
Two wing nuts
Two or three washers
Two lock-washers (the washers that look like someone cut them then twisted them)
Four bolts
Two straight brackets (strips of steel with holes drilled in them) - I used a 5"x5/8" and a 4"x5/8"
You should be able to buy all this at Home Depot for under $5 (with the exception of the umbrella bracket which you probably already have)
For this, I used 1/4 20 bolts (it means 1/4" wide and 20 threads per inch) since that's the size I needed for the female stud that came with the umbrella bracket and for the shoe-mount which also came with the bracket. I used two 1/2" long bolts and two 1" long bolts so I wouldn't have huge bolts sticking out of the contraption
First, you have to drill two holes in the speedring, one for the mounting stud and one for the bracket that will hold the strobe.
You have to be careful that where you drill the holes will not place the wing-nuts in a position that interferes with the softbox.
Make sure to start with a small drill bit, around 1/16", then step to 3/16" or so and then up to just over 1/4" so that your bolts will easily fit through. You want to start with a small bit so that it's easier to drill, but you can go straight for the final size if you like. It helps to use a center punch or a nail to put a little hole in the speedring where you're going to drill - this gives the drill bit something to sit in so that it doesn't wander all over the place. Drill the holes away from any studs or protrusions that stick off the speedring - I centered mine between the studs that would mount the speedring to an impact strobe.
Now bend the shorter straight bracket in a 90 degree angle (or buy one already bent if you can find it, the hardware store I was at didn't have them). This part is fairly crucial - you want to bend it at a point where one of the pre-drilled holes will position the strobe in the center of the speedring. It can help to put the speedring in the shoe-mount that comes with the umbrella bracket then hold it up to the speedring to estimate the distance from the female hole in the shoe-mount to the edge of the speedring where the bracket will be bolted on.
Now put it all together!
First, mount the shoe-mount to the bent bracket. You can use washers to make sure the bolt doesn't stick through the shoe-mount and into your strobe.
Use a 1/2" bolt, lock-washer, and wing-nut to attach the bent bracket to the straight bracket.
Stick a 1" bolt through each of the holes in the speedring, sticking out. Screw the female stud onto one of them and use a wing-nut and lock-washer to bolt the flash bracket to the other.
You can just use a single straight bracket (and bend one end of it) if you like. I used two because it allows me to change how far the strobe sticks into the speedring/softbox.
As a warning, you will find that you can't get the speedring into the softbox if everything is bolted to it. You can leave the stud on it, but take the flash bracket off and mount the speedring to the softbox before putting on the flash bracket.
|


