| Author | Thread |
|
|
03/02/2008 01:21:38 AM · #26 |
Day 2: A Day at the Park

I used two images taken at a park in Strathmore, Alberta.
Source Image 1:

Source Image 2:

Difference blending mode. Both at 100% opacity.
Message edited by author 2008-03-02 01:21:52. |
|
|
|
03/02/2008 01:44:48 PM · #27 |
Hi guys! Colette, I think this is the niftiest idea! I just wanted to let you know that I'm following this thread to learn about the different blending modes and "participating" in the exercises. So far I've learned that there are probably some times when difference or exclusion will provide desirable results (as several of you have already proven) but that it also provides some rather odd results.
I took two pictures of flowers (yawn....) and used those to try the difference blending mode. The first one is a simply overlay blending mode just to see what that would do, then the difference blending mode.
Very good idea and I'll keep an eye on what you guys are up to! No need to comment on these - I'm just sharing to show the results.
[thumb]653573[/thumb]
And for reference, here are the two pictures: [thumb]653572[/thumb] |
|
|
|
03/02/2008 02:19:52 PM · #28 |
Continuing from what I did yesterday I tried the same approach on the exclusion blending mode. Using the same image I copied the background layer, converted the background to black and white, then played with the brighness and contrast on the color layer until I got the final image.
Exclusion:
Difference - from yesterday
Original
Two lessons learned -
I can get some interesting almost infrared effects with the difference mode.
I can do all sorts of sky effects with both mode.
|
|
|
|
03/02/2008 06:09:12 PM · #29 |
I can't stop playing. This was another attempt at using exclusion. This time I duplicated the original and then applied a maximum Gaussian blur to the new layer. Blending layer was set to exclusion.
I won't post all the other attempts I've played around with. But duplicating the background and playing around with the photo effects and filters on the new layer does all sorts of interesting things with both difference and exclusion blending modes. This is just too much fun.
|
|
|
|
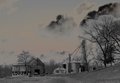
03/02/2008 07:25:23 PM · #30 |
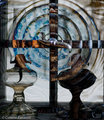
 topped with topped with 
becomes 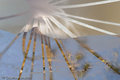 when blended with exclusion at 100%. Aliens have attacked Scotland, oh my! when blended with exclusion at 100%. Aliens have attacked Scotland, oh my!
... and if gaussian blur at max is applied to the bottom layer before blending the following is the result:
Message edited by author 2008-03-02 19:38:19. |
|
|
|
03/02/2008 09:27:11 PM · #31 |
Originally posted by fixedintime:
...This time I duplicated the original and then applied a maximum Gaussian blur to the new layer. ...This is just too much fun. |
The variations are endless, aren't they. I've just got to fool around with this idea.
Thanks for posting it.
Alice |
|
|
|
03/02/2008 11:33:23 PM · #32 |
Message edited by author 2008-03-02 23:37:58. |
|
|
|
03/02/2008 11:57:05 PM · #33 |
Originally posted by Germaine:
|
Interesting result. Welcome to the fun. |
|
|
|
03/03/2008 12:19:14 AM · #34 |
A few people have commented that difference is a very difficult blend mode. I hope I can help explain it a bit.
Difference seems very complex, but is quite simple when you look at it mathematically. The best way I can explain it is by example.
Pick a colour and fill a layer with it. Look at your RGB values. Let's say the RGB values are 100,100,100, meaning you have a fairly middle gray.
Now, put a layer on top of this and fill it with another colour. Let's say 50,100,200, which is a nice, light blue. Put this in difference mode. The resulting colour is 50,0,100, which is a nice purple.
If you look at the numbers, you can see that the colours were simply subtracted. The difference between 100 and 50 is 50 for the red channel. The difference between 100 and 100 is 0 for the green channel. The difference between 100 and 200 is 100 for the blue channel.
Simple math, but the absolute value of the difference is the key! To test this, now choose a colour of 50,100,0, which is a green. Fill the top layer, and the resulting colour doesn't change! Since the "differences" are the same, the resulting colour is the same. It doesn't matter which layer is on top of the other, since that won't change the differences between the RGB values.
Hopefully, this helps people understand this blend mode a bit more.
ETA: So what does this all mean? Well, besides being useful for aligning layers, the difference blending mode is very cool for creating hue shifts that you couldn't do any other way. Try putting a layer filled with a solid colour on top of an image in difference blending mode, and play around with which colour you're using to get interesting effects. Instead of being additive (like a hue shift in a hue/saturation adjustment layer), this will take the difference, which will cause certain colours to react quite interestingly.
Message edited by author 2008-03-03 01:09:37.
|
|
|
|
03/03/2008 12:52:18 AM · #35 |
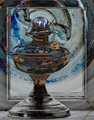
Day 3: Shriveled

I found something shriveled up near the side of the road. I then combined it with an image taken looking down a large water pipe.
Source Image 1:

Source Image 2:

Difference blending mode.
Message edited by author 2008-03-03 00:53:42.
|
|
|
|
03/03/2008 01:04:04 PM · #36 |
Just to say i will be getting into this in the next couple of days. I have being checking in every now and again and it looks very interesting and helpful :D
|
|
|
|
03/03/2008 01:12:58 PM · #37 |
Originally posted by geoffb:
A few people have commented that difference is a very difficult blend mode. I hope I can help explain it a bit.
.....
|
Thanks for posting a more detailed explanation. Even if people roll their eyes at the thought of math, this is a simple way of looking at Difference.
|
|
|
|
03/03/2008 01:25:42 PM · #38 |
Originally posted by geoffb:
A few people have commented that difference is a very difficult blend mode. I hope I can help explain it a bit.
Difference seems very complex, but is quite simple when you look at it mathematically. The best way I can explain it is by example.
Pick a colour and fill a layer with it. Look at your RGB values. Let's say the RGB values are 100,100,100, meaning you have a fairly middle gray.
Now, put a layer on top of this and fill it with another colour. Let's say 50,100,200, which is a nice, light blue. Put this in difference mode. The resulting colour is 50,0,100, which is a nice purple.
If you look at the numbers, you can see that the colours were simply subtracted. The difference between 100 and 50 is 50 for the red channel. The difference between 100 and 100 is 0 for the green channel. The difference between 100 and 200 is 100 for the blue channel.
Simple math, but the absolute value of the difference is the key! To test this, now choose a colour of 50,100,0, which is a green. Fill the top layer, and the resulting colour doesn't change! Since the "differences" are the same, the resulting colour is the same. It doesn't matter which layer is on top of the other, since that won't change the differences between the RGB values.
Hopefully, this helps people understand this blend mode a bit more.
ETA: So what does this all mean? Well, besides being useful for aligning layers, the difference blending mode is very cool for creating hue shifts that you couldn't do any other way. Try putting a layer filled with a solid colour on top of an image in difference blending mode, and play around with which colour you're using to get interesting effects. Instead of being additive (like a hue shift in a hue/saturation adjustment layer), this will take the difference, which will cause certain colours to react quite interestingly. |
thank you for this, this is very interesting and useful - can you extrapolate your explanation here to include the Exclusion mode? How does the math work with that?
[heh. "include the exclusion" - that's funny :) ]
Message edited by author 2008-03-03 13:27:51. |
|
|
|
03/03/2008 08:56:42 PM · #39 |
Originally posted by krnodil:
Can you extrapolate your explanation here to include the Exclusion mode? How does the math work with that? |
Typically, people explain the exclusion blending mode as simply being "less contrasty" than difference.
The math is a bit more complex, and might vary from program to program.
In Photoshop CS3, exclusion appears to work as follows:
Each colour has 3 values (R, G, and B). Since this works per-channel, let's consider only the red channel (this can be extrapolated to apply for the other two channels, too).
Let A be the red channel value for the top layer, and B be the red channel value for the bottom layer. Let C be the resulting colour value for the red channel.
C = A + B - 2(A * B / 255)
So, let's say that your top layer has a red value of 100 and your bottom layer has a red value of 150 (for a given pixel).
C = 100 + 150 - 2(100 * 150 / 255)
C = 250 - 2(15000 / 255)
C = 250 - 2(58.8)
C = 250 - 117.6
C = 132.4 = 132
You should get a red channel value of 132 for that pixel.
|
|
|
|
03/04/2008 12:01:49 AM · #40 |
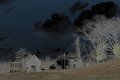
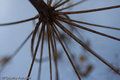
Day 4: Trees and Branches

Details are in image info. Used the difference blending mode.
|
|
|
|
03/05/2008 01:06:08 AM · #41 |
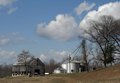
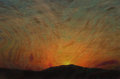
Day 5: Yearning to Roam

Details in the image info.
Is no one taking part in this anymore? There have been no comments and no posts from anyone else since two days ago. I know these side challenges usually taper off, but not at day 5!
|
|
|
|
03/05/2008 02:30:14 AM · #42 |
Geoff,
We haven't forgotten about it. We were probably sidetracked with the real challenges.
Back to commenting tomorrow.
Colette
PS. I have a couple to post but had to wait until tonite's rollover. |
|
|
|
03/05/2008 02:36:50 AM · #43 |
I definately pop in and will be participating more fully from hopefully tomorrow :)
|
|
|
|
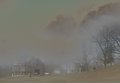
03/05/2008 02:39:44 AM · #44 |
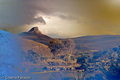
 plus plus 
produces
when blended with difference
Others with variations on my bw in colour entry:
Message edited by author 2008-03-05 02:40:58. |
|
|
|
03/05/2008 10:23:52 AM · #45 |
Originally posted by geoffb:
Originally posted by krnodil:
Can you extrapolate your explanation here to include the Exclusion mode? How does the math work with that? |
Typically, people explain the exclusion blending mode as simply being "less contrasty" than difference.
The math is a bit more complex, and might vary from program to program.
In Photoshop CS3, exclusion appears to work as follows:
Each colour has 3 values (R, G, and B). Since this works per-channel, let's consider only the red channel (this can be extrapolated to apply for the other two channels, too).
Let A be the red channel value for the top layer, and B be the red channel value for the bottom layer. Let C be the resulting colour value for the red channel.
C = A + B - 2(A * B / 255)
So, let's say that your top layer has a red value of 100 and your bottom layer has a red value of 150 (for a given pixel).
C = 100 + 150 - 2(100 * 150 / 255)
C = 250 - 2(15000 / 255)
C = 250 - 2(58.8)
C = 250 - 117.6
C = 132.4 = 132
You should get a red channel value of 132 for that pixel. |
boy, that is more complex, but thanks for the explanation!
I'm a bit swamped at the moment, so might only manage one try for this first week, which I already posted. I figured this wasn't a "post a shot a day" thing anyway, I hope I didn't get that wrong. In any case, when I next spend time at this thread (Friday evening or the weekend), it will be to review the previous posts and give comments, so actually posting new shots will be last on my list! :) |
|
|
|
03/05/2008 03:39:45 PM · #46 |
OK am starting to have a good read of the thread brfore I do some commenting and posting. Just want to ask a question I really liked geoffs explanation it makes sense to me but i just want to ask how do get a solid colour layer?
|
|
|
|
03/05/2008 03:41:08 PM · #47 |
Originally posted by joynim:
OK am starting to have a good read of the thread brfore I do some commenting and posting. Just want to ask a question I really liked geoffs explanation it makes sense to me but i just want to ask how do get a solid colour layer? |
In the layers palette, select a fill layer then choose a colour. |
|
|
|
03/05/2008 03:41:14 PM · #48 |
Originally posted by geoffb:
Originally posted by krnodil:
Can you extrapolate your explanation here to include the Exclusion mode? How does the math work with that? |
Typically, people explain the exclusion blending mode as simply being "less contrasty" than difference.
The math is a bit more complex, and might vary from program to program.
In Photoshop CS3, exclusion appears to work as follows:
Each colour has 3 values (R, G, and B). Since this works per-channel, let's consider only the red channel (this can be extrapolated to apply for the other two channels, too).
Let A be the red channel value for the top layer, and B be the red channel value for the bottom layer. Let C be the resulting colour value for the red channel.
C = A + B - 2(A * B / 255)
So, let's say that your top layer has a red value of 100 and your bottom layer has a red value of 150 (for a given pixel).
C = 100 + 150 - 2(100 * 150 / 255)
C = 250 - 2(15000 / 255)
C = 250 - 2(58.8)
C = 250 - 117.6
C = 132.4 = 132
You should get a red channel value of 132 for that pixel. |
LOL I think my head just exploded trying to understand that one!
|
|
|
|
03/05/2008 03:43:41 PM · #49 |
Originally posted by cpanaioti:
Originally posted by joynim:
OK am starting to have a good read of the thread brfore I do some commenting and posting. Just want to ask a question I really liked geoffs explanation it makes sense to me but i just want to ask how do get a solid colour layer? |
In the layers palette, select a fill layer then choose a colour. |
Thanks I never knew what that was for!
|
|
|
|
03/05/2008 07:04:33 PM · #50 |
Originally posted by joynim:
Originally posted by geoffb:
Originally posted by krnodil:
Can you extrapolate your explanation here to include the Exclusion mode? How does the math work with that? |
Typically, people explain the exclusion blending mode as simply being "less contrasty" than difference.
The math is a bit more complex, and might vary from program to program.
In Photoshop CS3, exclusion appears to work as follows:
Each colour has 3 values (R, G, and B). Since this works per-channel, let's consider only the red channel (this can be extrapolated to apply for the other two channels, too).
Let A be the red channel value for the top layer, and B be the red channel value for the bottom layer. Let C be the resulting colour value for the red channel.
C = A + B - 2(A * B / 255)
So, let's say that your top layer has a red value of 100 and your bottom layer has a red value of 150 (for a given pixel).
C = 100 + 150 - 2(100 * 150 / 255)
C = 250 - 2(15000 / 255)
C = 250 - 2(58.8)
C = 250 - 117.6
C = 132.4 = 132
You should get a red channel value of 132 for that pixel. |
LOL I think my head just exploded trying to understand that one! |
Yeah, it's a complex one!
Thanks for your comments so far, Charlie. Much appreciated!
|
|
Home -
Challenges -
Community -
League -
Photos -
Cameras -
Lenses -
Learn -
Help -
Terms of Use -
Privacy -
Top ^
DPChallenge, and website content and design, Copyright © 2001-2026 Challenging Technologies, LLC.
All digital photo copyrights belong to the photographers and may not be used without permission.
Current Server Time: 07/18/2026 06:16:33 AM EDT.


