| Author | Thread |
|
|
12/17/2007 07:54:00 AM · #1 |
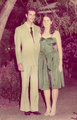
This photo is of myself and my husband when I graduated school. The photo is 23 years old and I dont have the negative. I would like to restore it back to more original colours. Some info. It was taken at night, my dress is a turquoise green and Richards suit is light/mid grey. I have been having a go myself but I just cant get that old photo look out of the picture. If you are able to help could you give me a rough list of steps so that I can recreate the procedure on my full size scanned copy. Any help would be appreciated. I am going to do a shot of us now 23 years later and print the two side by side. Cant wait! Thanks
 |
|
|
|
12/17/2007 08:03:46 AM · #2 |
My first recommendation is to scan the image as high a resolution as possible. You should be able to bring most of the colors back by adjusting the 'white balance' and colors in levels. I have found that using the eyedroppers and finding a spot that should be white, black and grey and clicking on that area with the 'droppers' can make a world of difference.
Here was a quick 10 second effort - no hue/saturation adjustments made.
I clicked on the white dropper on his shirt, clicked on the dark part of his shoes with the black dropper, and clicked on the roof with the grey all in levels.

It is not perfect, but it might be somewhere to start...
Message edited by author 2007-12-17 08:04:54. |
|
|
|
12/17/2007 09:21:14 AM · #3 |
[thumb]623218[/thumb]
Auto-Color
Selective color:
reds: magenta +12, yellow +59, black +18
yellows: magenta +15, black +12
greens: cyan -100, magenta -2, yellow -11, black +49
magentas: cyan +5, magenta -2, yellow +1, black +6
whites: magenta -3, yellow -3
greys: cyan -6, magenta +3, yellow +5, black +15
Hue/Sat:
overall hue +5, saturation +25
magenta saturation -39
protocol brush with last step for his suit
sponge tool: decreased sat on his suit and face, increased sat on your dress
hue/sat
yellow hue +54
|
|
|
|
12/17/2007 04:02:24 PM · #4 |
Originally posted by bassbone:
My first recommendation is to scan the image as high a resolution as possible. You should be able to bring most of the colors back by adjusting the 'white balance' and colors in levels. I have found that using the eyedroppers and finding a spot that should be white, black and grey and clicking on that area with the 'droppers' can make a world of difference.
Here was a quick 10 second effort - no hue/saturation adjustments made.
I clicked on the white dropper on his shirt, clicked on the dark part of his shoes with the black dropper, and clicked on the roof with the grey all in levels.
It is not perfect, but it might be somewhere to start... |
Could you explain how to use the dropper tool. I know if I use the dropper to select a colour that colour appears on my colour palette on the left but what do I do with it then?
Added: It is a 4x6 photo that I scanned at 400 resolution. Is this good enough?
Message edited by author 2007-12-17 16:06:37. |
|
|
|
12/17/2007 10:18:07 PM · #5 |
To use the eyedropper for white balance:
Open levels
Select Channel RGB
Select white dropper in levels dialog box. Click on white shirt
Select black dropper in levels dialog box. Click on shoes
Select grey dropper in levels dialog box. Click on roof.
Click OK
Message edited by author 2007-12-17 22:21:59. |
|
|
|
12/17/2007 11:15:25 PM · #6 |
|
|
|
12/18/2007 01:10:47 AM · #7 |
--to this-->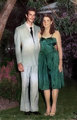
in just five easy clicks. (uh huh - yeah right)
This was a bit of a tough one.
I couldn't even begin to recite the steps, but did involve running auto color on a new layer, then fading some, erasing back out other areas, then it became a lasso job, altering sections at a time in selective color adjustments and ran match color, neutralize, fade, upping black levels in selective color adjustments, manual desaturation and hand-toning on a few problem areas. Things like the branches above their heads were overlay brushed in with brown and same with the leaves, in green.
Restoration work really helps you learn Photoshop better than anything else in my opinion. It's try this, try that, and in the process, really learn what colors really are, like want to make yellowish grass green? Don't attack the greens, go for the yellow and hue shift it, then add black to the green channel in selective colors, and finally bumping the hue/saturation green levels. Want skin color more natural? Add yellow to the reds or add a warming photo filter to the skin only (does wonders on foliage as well)
Message edited by author 2007-12-18 01:20:06. |
|
|
|
12/18/2007 01:47:33 AM · #8 |
Originally posted by Brad:
--to this-->
in just five easy clicks. (uh huh - yeah right)
This was a bit of a tough one.
I couldn't even begin to recite the steps, but did involve running auto color on a new layer, then fading some, erasing back out other areas, then it became a lasso job, altering sections at a time in selective color adjustments and ran match color, neutralize, fade, upping black levels in selective color adjustments, manual desaturation and hand-toning on a few problem areas. Things like the branches above their heads were overlay brushed in with brown and same with the leaves, in green.
Restoration work really helps you learn Photoshop better than anything else in my opinion. It's try this, try that, and in the process, really learn what colors really are, like want to make yellowish grass green? Don't attack the greens, go for the yellow and hue shift it, then add black to the green channel in selective colors, and finally bumping the hue/saturation green levels. Want skin color more natural? Add yellow to the reds or add a warming photo filter to the skin only (does wonders on foliage as well) |
I am really impressed with this result. Youn are right about learning by trying. I have realised quite a few of the ticks you have mentioned. |
|
|
|
12/18/2007 07:19:44 AM · #9 |
| Wow Brad....you never cease to amaze me... |
|
|
|
12/18/2007 07:29:55 AM · #10 |
Originally posted by Brad:
--to this-->
in just five easy clicks. (uh huh - yeah right)
This was a bit of a tough one.
I couldn't even begin to recite the steps, but did involve running auto color on a new layer, then fading some, erasing back out other areas, then it became a lasso job, altering sections at a time in selective color adjustments and ran match color, neutralize, fade, upping black levels in selective color adjustments, manual desaturation and hand-toning on a few problem areas. Things like the branches above their heads were overlay brushed in with brown and same with the leaves, in green.
Restoration work really helps you learn Photoshop better than anything else in my opinion. It's try this, try that, and in the process, really learn what colors really are, like want to make yellowish grass green? Don't attack the greens, go for the yellow and hue shift it, then add black to the green channel in selective colors, and finally bumping the hue/saturation green levels. Want skin color more natural? Add yellow to the reds or add a warming photo filter to the skin only (does wonders on foliage as well) |
gotta take my hat off to you on that restoration Brad.. inspiring stuff. |
|
|
|
12/18/2007 07:47:33 AM · #11 |
this is not as good as brad, but this is what i could come up in my 10 minutes:
[thumb]623533[/thumb] |
|
Home -
Challenges -
Community -
League -
Photos -
Cameras -
Lenses -
Learn -
Help -
Terms of Use -
Privacy -
Top ^
DPChallenge, and website content and design, Copyright © 2001-2026 Challenging Technologies, LLC.
All digital photo copyrights belong to the photographers and may not be used without permission.
Current Server Time: 05/07/2026 02:35:53 AM EDT.


