| Author | Thread |
|
|
11/07/2007 01:57:14 AM · #1 |
I thought people might be interested in an example of just how much difference Photoshop's shadow/highlight adjustment tool can make in a fairly extreme lighting situation without driving the image into wild exaggeration. The original is straight from RAW, cropped only, and the edited version uses shadow/highlight to recover shadows and mute highlights both, plus some work with a hue/saturation adjustment layer:
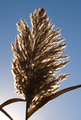 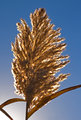
It's a hell of a tool, really.
R.
|
|
|
|
11/07/2007 02:00:57 AM · #2 |
One thing I haven't figured out about it, especially on the highlight bar is the very large effect the first 1% has on the picture. It seems the difference between 0% and 1% is as large as say 10% and 30%.
Anybody figure out why that is?
Not to hijack the thread, I agree with Robert, S/H is a great too. I use Shadow ten times more often than highlight, but still, a great tool. |
|
|
|
11/07/2007 02:13:50 AM · #3 |
Originally posted by DrAchoo:
One thing I haven't figured out about it, especially on the highlight bar is the very large effect the first 1% has on the picture. It seems the difference between 0% and 1% is as large as say 10% and 30%.
Anybody figure out why that is?
Not to hijack the thread, I agree with Robert, S/H is a great too. I use Shadow ten times more often than highlight, but still, a great tool. |
It's as if the on/off switch produces a noticeable effect from the get-go; BUT you can mute the effect with the other two sliders in the box and make it very slight. To a certain extent this is true of the shadow portion also, except for some reason its on/off effect is less pronounced. Why this is I do not know, but I'm all the time having to mute the highlight portion for sure. Not in this shot though; this one is about as much highlight muting as I've ever used. It's quite extreme actually.
R.
|
|
|
|
11/07/2007 02:21:30 AM · #4 |
Here is another example, I cropped from Raw and opened in CS3. The first is the original out of the camera, the second is with only shadow/highlights adjustment.
[thumb]609973[/thumb] 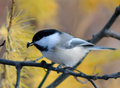 |
|
|
|
12/12/2007 09:01:23 AM · #5 |
I was just playing with this tool. I'm a little unclear about what the values mean. The sliders seemed a bit counter intuitive as far as which direction I slid them and what happened to my image.
Anybody have a laymans terms of describing these actions? |
|
|
|
12/12/2007 10:57:58 AM · #6 |
Originally posted by tpbremer:
I was just playing with this tool. I'm a little unclear about what the values mean. The sliders seemed a bit counter intuitive as far as which direction I slid them and what happened to my image.
Anybody have a laymans terms of describing these actions? |
I'll try:
Open an image, duplicate the BG layer, and open shadow/highlight from the "image/adjustments" menu. In shadow/highlight dialogue box, check the box to "show more options";
you now have a control panel divided into "shadows", "highlights", and "adjustments".
Both "shadows" and "highlights" have 3 sliders: "amount", "tonal width" and "radius".
1. "Amount" controls the amount of detail that is recovered, from either shadows or highlights.
2. "Tonal Width" controls the range of tones that will be affected by the adjustment, with 100% meaning that all tones will be adjusted and 0% meaning only the extremes (light or dark, depending on which panel you are in) will be adjusted.
3. "Radius" is a little harder to describe, but basically it controls local-area contrast by determining how coarse or fine will be the "border" between adjusted/non-adjusted areas in the tonal width dialogue.
"Midtone Contrast" setting determines the contrast values in the areas affected by your adjustments only.
****************
Suggestion; load up an image that is basically backlit and pretty dark out of the camera, set shadows amount to 100%, zoom in pretty deep on the image, and play with the tonal width slider and watch what happens.
Now set shadows to 100% and tonal width to 100% and play with the radius slider and watch what happens. Then do the same thing with tonal width at 50% and varying the radius. You will note that radius will "posterize" to some extent if it deviates too far from a norm in either direction, up or down scale, depending on where the tonal width is set at. Radius is touchy, you don't want to overdo it.
Now repeat above with the Highlight adjustments.
Finally, experiment with the interaction between shadow and highlight. That is to say, if you don't touch the highlight tool at all, "x" amount of shadow recovery will seem optimum; but if you also do highlight recovery, you very likely will need to recalibrate shadow recovery to strike the best balance between the two.
Hope this helps.
R.
|
|
|
|
12/12/2007 11:28:31 AM · #7 |
it's curves for dummies.
huge time saver. just remember to INCREASE THE CONTRAST after the fact. |
|
Home -
Challenges -
Community -
League -
Photos -
Cameras -
Lenses -
Learn -
Help -
Terms of Use -
Privacy -
Top ^
DPChallenge, and website content and design, Copyright © 2001-2026 Challenging Technologies, LLC.
All digital photo copyrights belong to the photographers and may not be used without permission.
Current Server Time: 06/27/2026 02:01:11 PM EDT.


