| Author | Thread |
|
|
12/19/2004 02:46:43 AM · #1 |
The following article is from the “New York Institute of Photography”. I though it may help in taking those holiday light pictures.
Digital Holiday Lights.
Digital cameras add some new twists to the holiday light photography challenge. In fact, most consumer-level digital models struggle in low light situations. Here’s why – the cost to manufacture a CCD or CMOS chip that is super-sensitive to a wide range of tonal (light) values is expensive. You’ll find these expensive chips in professional-level SLRs, not in your $300 point-and-shoot model. One way to compensate for this deficiency is to use a cheaper image sensor and then process the digital signal with proprietary software. This can cause some problems. Let’s look at the most important ones.
Problems
Digital ISO
Increasing your film speed makes a lot of sense when photographing subjects in low light. However increasing the ISO setting in your digital camera isn’t always the best idea. In order to improve the sensitivity of an electronic image sensor, the digital signal is “amplified”. Amplifying a digital signal is like turning the volume up on your radio as loud as it will go. At the maximum volume every hiss, pop, and scratch is heard and, depending on the quality of the equipment, quality is diminished. The same thing happens in a digital camera. When the ISO setting is increased, every image artifact and defect is magnified, reducing image quality quickly.
To achieve the best image quality, you might try working with a slower ISO setting to start. If you are having trouble getting a good exposure, increase the ISO as needed. You might even try using the Auto ISO setting and see how the camera handles exposure.
Digital Noise
Regardless of the ISO setting chosen, most reasonably priced digital cameras produce “noise” during long exposures. Noise is caused by the small electrical disturbances that are present in every electrical system. In order to capture a weak light signal, such as a subject in low-light, longer exposures are usually needed. The longer a digital camera shutter is open, the more electrical noise is recorded as well.
So, it seems we have a double-edged sword.
Increase the ISO to achieve faster shutter speeds and you will amplify noise and other image problems.
Reduce the ISO and shutter speeds are slower. As a result, you will record inherent noise that might not be seen in a “normal” exposure.
Limited Dynamic Range
To make things worse, digital cameras have a limited dynamic range. Image sensors are only sensitive to a specific range of brightness. Anything outside of that range is recorded as pure white or pure black. This can result in an image without shadow or highlight detail.
Solutions
Here are a few ways to solve these problems. Noise can be reduced with software. In fact some cameras offer in-camera noise reduction features. Proprietary software is used exclusively, yielding uneven results. Test your camera’s capabilities before committing to this feature. There are many noise reduction software products on the market today, some as stand-alone applications and others which are plug-ins that work in conjunction with your favorite image editor. This means you can select a camera with noise reduction or address any problems later in the digital “darkroom.”
Timing is Everything
When shooting holiday lights outside, I find that the best exposures can be made at twilight. Twilight is after the sun has set but before the dark of night. This fleeting balance of light and shadow will yield the brilliance of the lights while maintaining details in the shadow. Don’t underestimate shadow detail to help establish your composition. Consult your camera’s manual for details on your white balance options and how to adjust them.
When shooting holiday lights inside, try turning on lights in the room to increase the ambient light, rather than using a flash. Flash can produce a harsh, high-contrast quality that obliterates the brilliance of the light. A carefully positioned incandescent light can work increase the ambient light without overpowering your holiday lights.
Shoot Two Exposures
One way to extend the tonal range of a digital image is by making two exposures of a scene. Shooting in Manual mode, make one exposure configured to capture the best highlight detail. Make a second exposure to capture the best shadow detail. Then combine the two exposures in Photoshop as separate Layers. Using the Eraser tool remove poorly exposed areas to reveal detail and take advantage of the best parts of each Layer/exposure. Using this technique you could extend the tonal range well beyond the possibility of any single exposure made with the same camera. Of course this requires a strong tripod to ensure both compositions match perfectly. Consider using a remote control to reduce the possibility of camera movement.
Turn Off Automatic White Balance
In many photographic situations white balance is a godsend. By automatically neutralizing extreme color casts, believable digital color is rendered without breaking a sweat. It is important to remember, not all photos require white balance. Tone down the rich, saturated colors of a sunset and you’re left with nothing. Attempt to white balance a fireworks display and you end up with dull lifeless, de-saturated bursts and streaks of light. Holiday lights should be treated similarly. By turning off the auto white balance feature you are sure to capture the exaggerated colors the holidays have to offer.
You could try turning off white balance altogether or even experiment with any of the other manual settings to find a color balance that suits your visual needs. Either way is a better bet than giving the decision to the camera.
Test, Test, Test
The immediacy of digital photography begs you to test your exposures to determine what works best. Take advantage of the metadata that most digital cameras embed inside every digital picture you make. Metadata can include camera make and model, exposure, flash, white balance and other important information that can help you to determine what works and what doesn’t work. This means you don’t even have to take notes! To access your digital image metadata, open a file in Adobe Photoshop.
Choose File > File Info.
The File Info dialog box appears.
Select the Camera Data option on the left side of the screen.
The Camera Data screen reveals shutter speed, aperture, ISO settings, lens focal length, flash settings and even the metering modes.
Holiday lights are usually around for more than a couple of days each year, take advantage of this by shooting early in the season and then re-shooting if you have too.
Digital cameras offer some real benefits for holiday season picture taking. As look as you pay attention to the drawbacks we’ve mentioned, you should get great results
Message edited by author 2004-12-19 02:56:35. |
|
|
|
12/19/2004 08:58:51 AM · #2 |
|
|
|
12/19/2004 10:01:40 AM · #3 |
Can you post the link to the NYIP site?
|
|
|
|
12/19/2004 10:04:14 AM · #4 |
|
thanks for the info, great to learn from. |
|
|
|
12/19/2004 10:15:07 AM · #5 |
Originally posted by SDW65:
...
Shoot Two Exposures
One way to extend the tonal range of a digital image is by making two exposures of a scene. Shooting in Manual mode, make one exposure configured to capture the best highlight detail. Make a second exposure to capture the best shadow detail. Then combine the two exposures in Photoshop as separate Layers. Using the Eraser tool remove poorly exposed areas to reveal detail and take advantage of the best parts of each Layer/exposure. Using this technique you could extend the tonal range well beyond the possibility of any single exposure made with the same camera. Of course this requires a strong tripod to ensure both compositions match perfectly. Consider using a remote control to reduce the possibility of camera movement.
... |
Is this legal under any set of DPC rules? |
|
|
|
12/19/2004 10:21:53 AM · #6 |
Originally posted by soccerdad:
Originally posted by SDW65:
...
Shoot Two Exposures
One way to extend the tonal range of a digital image is by making two exposures of a scene. Shooting in Manual mode, make one exposure configured to capture the best highlight detail. Make a second exposure to capture the best shadow detail. Then combine the two exposures in Photoshop as separate Layers. Using the Eraser tool remove poorly exposed areas to reveal detail and take advantage of the best parts of each Layer/exposure. Using this technique you could extend the tonal range well beyond the possibility of any single exposure made with the same camera. Of course this requires a strong tripod to ensure both compositions match perfectly. Consider using a remote control to reduce the possibility of camera movement.
... |
Is this legal under any set of DPC rules? |
No, almost sure it isn´t. Think this description is only ment to tell us what is possible too do. |
|
|
|
12/19/2004 11:31:40 AM · #7 |
Originally posted by soccerdad:
Is this legal under any set of DPC rules? |
Under Advanced Editing, you can process two different exposures from a single RAW file and combine them. It will give you one or two stops of leeway. |
|
|
|
12/19/2004 11:58:26 AM · #8 |
Originally posted by scalvert:
Originally posted by soccerdad:
Is this legal under any set of DPC rules? |
Under Advanced Editing, you can process two different exposures from a single RAW file and combine them. It will give you one or two stops of leeway. |
if you don't have raw, there are other ways to do this in PS.
if you are shooting to get teh best pic you can(instead of just for this site) then blending two exposures works very well to extend dynamic range.
(try this: take a shot at daylight out a window. Expose twice - once for outside and once for inside. Put the two together and you can have detail for both.)
|
|
|
|
12/19/2004 12:31:49 PM · #9 |
Already been posted and updated...use search. :)
//www.dpchallenge.com/forum.php?action=read&FORUM_THREAD_ID=59471&highlight=holiday
Message edited by author 2004-12-19 12:32:07. |
|
|
|
12/19/2004 12:53:47 PM · #10 |
I think this is DPC-legal (Advanced Rules) workaround for those without RAW files which could help where there's a pretty clear division of tones, like a sunset with dark foreground (terms from Photoshop, but should be similar in other programs which support layers).
- Make two copies of the Background layer (can lable Highlight and Shadow)
- Create a mask at the horizon line
- Go to one of the layers, load the selection, feather 1-2 pixels, and create and Adjustment Layer (I use Curves) linked to the active layer, and adjust for best exposure.
- Go to the other layer, repeat above steps after first inverting the selection.
- On the upper layer, select the unadjusted part and delete it (either partially or erase selectively) to allow the adjusted layer below to show through, or else try adjusting the opacities of the adjusted layers.
- Save a copy (composite) as TIFF or JPEG. I first save to TIFF and then apply sharpening, saving the result of that as the final JPEG.
You can also just use masks and a series of adjustment layers all acting on the background layer, which makes the file smaller but may provide a bit less flexibility.
I used three separate curves on different areas of this into this into this 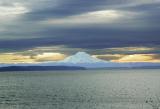 and eventually into this and eventually into this  |
|
|
|
12/19/2004 01:30:31 PM · #11 |
Holiday Lights Digitally
NOTE: Scroll Down to the digital portion.
|
|
Home -
Challenges -
Community -
League -
Photos -
Cameras -
Lenses -
Learn -
Help -
Terms of Use -
Privacy -
Top ^
DPChallenge, and website content and design, Copyright © 2001-2026 Challenging Technologies, LLC.
All digital photo copyrights belong to the photographers and may not be used without permission.
Current Server Time: 07/16/2026 11:25:13 PM EDT.


