| Author | Thread |
|
|
10/28/2013 08:03:56 AM · #1 |
For our "straight from the camera" enthusiasts.
Pablao Inirio - Master Darkroom Printer
Want to see what kind of work goes into turning a masterful photograph into an iconic print? Pablo Inirio, the master darkroom printer who works at Magnum Photos‘ New York headquarters, has personally worked on some of the cooperative’s best-known images. A number of his marked-up darkroom prints have appeared online, revealing the enormous amount of attention Inirio gives photos in the darkroom.
Tim |
|
|
|
10/28/2013 08:45:37 AM · #2 |
A truly wonderful thing to post, thank you Tim.
Fascinating to see how meticulously a darkroom master works, and what he achieved. The James Dean pair is a brilliant illustration. The life he found in Dean's shadow is just one of the many wonders of the final print.
I will look forward to reading the reactions of DPC's several analogue aficionados. |
|
|
|
10/28/2013 10:07:11 AM · #3 |
What a splendid document! (not to mention the picture).
I spent more than 15 years doing dark room photography in improvised places in my apartments. I can still smell the chemicals and feel the cold that was penetrating my bones being either in a basement or on a corridor without heat in wintertime or sweltering heat in summer - in a temperate climate though!
I regret having thrown away the various recipes for the chemicals because I liked using my own formulas.
I had numerous gimmicks to dodge and burn, to make a vignette ... pieces of cardboard, pencils and brushes made of straw ... using my cupped hands ...
All this is in the past and I would not do it again - all the hours in the red/dark place et all. Plus, where would I get the incredible atmosphere of the childhood basement where my sister, a medical student then, stored a full size skeleton that was moving gently each time I was getting up to hag a picture for drying!
Thank you very much for the post. I'll read the article with much interest. |
|
|
|
10/28/2013 11:15:30 AM · #4 |
|
|
|
10/28/2013 11:27:08 AM · #5 |
Having never done more than rudimentary exposures of x-rays, I dont have the experience to truly comment or appreciate on this mans skill with the chemicals. But I sure do appreciate how meticulous he was with defining exact areas of the photo for different treatments.
Exceptionally precise and well thought out. Very fun to see and read. |
|
|
|
10/28/2013 12:14:28 PM · #6 |
Fascinating article. Thanks for sharing. I am definitely a child of the digital age. I always suspected that even images from the "masters" of analog were significantly "processed".
As for this paragraph:
"Over the last fifteen years, almost every photographer I’ve interviewed has waxed poetic about that “magical” experience of seeing an image develop in chemicals for the first time. You have to wonder whether today’s young photographers will rhapsodize as much about the first time they color-calibrated their monitors."
the answer is "YES!!!". When I open a promising capture in my digital editor and start playing with it, I am constantly delighted by what reveals itself through processing. A diamond is in the rough is still a diamond. It is a matter of the photographer's personal preference if they want to leave it rough or make it shine as brightly as possible.
Mariuca, your skeleton story just cracks me up. What a lab partner! |
|
|
|
10/28/2013 01:01:07 PM · #7 |
|
Have always wondered how they did selective changes and dodge and burning with film! |
|
|
|
10/28/2013 02:11:34 PM · #8 |
Originally posted by Garry:
Have always wondered how they did selective changes and dodge and burning with film! |
You should see if your local library or used bookseller has a copy of Ansel Adams' The Print — it will help you understand the purpose and principles of post-processing as well as the methods, and most everything described can be translated into Photoshop techniques. |
|
|
|
10/28/2013 09:46:24 PM · #9 |
This was posted on APUG several weeks back, and there seems to be a consensus there that his notes are just that -- notes -- and that the article misleadingly suggests that each print received the insane amount of attention shown therein. I tend to agree; the diagrams were probably made over several printing iterations and are meant to be a timesaving aid and general guide for the printer who finds themselves reprinting the same negative at some later date.
But that's not to take anything away from his masterful work! I truly believe a lot of time and skill and detail (not to mention paper) went into making those prints, and that's what those notes are telling us more than anything. If my participation here has been waning lately, it's because I've been spending more time in my own darkroom, so I can truly appreciate this. It makes what I do look like child's play. Still, I have done some traditional dodging and burning (see my latest upload), and while it's not hard in and of itself, it does take several tries and test clips to get the "choreography" down. In the end, it's quite rewarding. |
|
|
|
10/29/2013 12:32:55 PM · #10 |
I feel so much better right now!!
I've been doing more processing on images that I had before. I go in phases: almost nothing, lots, almost nothing, even more, back off, more, and I'm in my more phase.
But my "more" phase is -- I want my picture to be what I want. I used to want it to be a perfect replica of what I saw. But nature isn't perfect, and I'm starting to get irritated with it for not being perfect. Or at least for not being the way I want it to be. I try to control as much as I can, but what I can't, I'm going to fix in post processing. Is the lighting too harsh? I'm trying to fix it with fill flash. If I can't, I'm going to try to fix it with soft contrast in efex. I'm bring up those shadows. I'm taking down those highlights. If all the rest of the pieces fell together in the shot: the bird got the fish, and I got the shot, I want my art to look the way I want it. I'm still not at the faking it stage -- cut the fish out of a different shot and stuffing it in the bird's mouth -- because getting the shot, catching the action, is what's important at this stage. But why should the shot suffer because the light sucks and always will suck at this place, when I can work with that?
And maybe it's just because I'm just doing the types of things I see in these examples. The Audrey Hepburn shot, he brought out the reflections in the car, and played with the details. He's just emphasizing different things. Leaving the picture the same, but putting the emphasis in different places. Sculpting it.
And that's what I feel like I'm doing more. Sculpting my shots so that I'm playing with the eye of my viewer to get it to do what I want it to do and see what I want it to see. (or at least that's what I'm trying to do. My photoshop skills are still pretty wimpy comparatively, but I feel by darkening here, lightening there, sharpening here, glowing there, I'm sculpting a road map. And it's a fun pretense to have. :) |
|
|
|
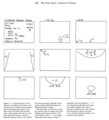
10/30/2013 05:56:00 PM · #11 |
Here are the two most relevant (IMO) pages from Adams' book:
  |
|
|
|
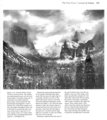
10/30/2013 06:54:52 PM · #12 |
That's a very good example. Here's a better rendering of the print:

Here's my own rendering of the same scene, btw, from 2011:
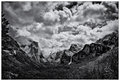
I'd probably downplay the clouds a little if I were redoing this one today.
Message edited by author 2013-10-30 18:57:40. |
|
|
|
10/30/2013 07:22:39 PM · #13 |
Originally posted by Bear_Music:
That's a very good example. Here's a better rendering of the print ... |
Thank you -- I was working with a public scanner at the library ... I'm just glad the text is readable (especially on the full-size versions). |
|
Home -
Challenges -
Community -
League -
Photos -
Cameras -
Lenses -
Learn -
Help -
Terms of Use -
Privacy -
Top ^
DPChallenge, and website content and design, Copyright © 2001-2026 Challenging Technologies, LLC.
All digital photo copyrights belong to the photographers and may not be used without permission.
Current Server Time: 06/25/2026 08:30:22 PM EDT.


