| Author | Thread |
|
|
06/03/2012 11:49:19 PM · #1 |
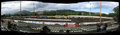
I've been looking to buy a rail that will allow me to shoot panoramas by rotating around the nodal point of the lens rather than the body. This reduces or eliminates parralax error and makes it easier for the computer to stitch together the frames without fudging. I would also like a focus rail that would allow you to move the camera closer or further from a macro subject so as to move the focus plane and let you stack images to increase the depth of field.
I bought a rail in hopes it would do what I want but I did not like it so I sent it back. I decided to put together a mockup of my own and even though it is very rough, it works as far as the panorama shooting goes. I need to chop the end of it off (you can see it in the camera right now), but that is easily done.
Just thought I'd share. I'm going to test it out on a hike next weekend to the Devil's Staircase a wide step waterfall located in the middle of absolutely nowhere in Oregon (no path, just bushwhack and creek fording).


This was cut with a skilsaw rather than with a table saw (which I don't have). The table saw will give much cleaner cuts. Version 2.0 will also have an L-bracket which will allow me to mount the camera in portrait orientation.
Message edited by author 2012-06-03 23:50:30. |
|
|
|
06/03/2012 11:54:26 PM · #2 |
That's awesome. Be sure'n paint the final version with a red stripe.
|
|
|
|
06/04/2012 01:11:07 AM · #3 |
|
|
|
06/04/2012 01:18:07 AM · #4 |
| very cool! how do you set it up for a particular shot to get the point of adjustment right? |
|
|
|
06/04/2012 02:08:26 AM · #5 |
Originally posted by briantammy:
very cool! how do you set it up for a particular shot to get the point of adjustment right? |
You can figure it out by sliding the base forward and back while panning the camera on the tripod. You can watch for parallax by looking through the viewfinder and watching how a foreground object like a pole moves in relation to a background object. When it stops moving you have the spot. A quick pencil mark lets you easily return to the setting for that particular lens. |
|
|
|
06/05/2012 12:11:03 AM · #6 |
Originally posted by DrAchoo:
Originally posted by briantammy:
very cool! how do you set it up for a particular shot to get the point of adjustment right? |
You can figure it out by sliding the base forward and back while panning the camera on the tripod. You can watch for parallax by looking through the viewfinder and watching how a foreground object like a pole moves in relation to a background object. When it stops moving you have the spot. A quick pencil mark lets you easily return to the setting for that particular lens. |
the reason i ask is that i want to try this kind of technique: brenizer method
and i've having trouble getting the images to stitch for the very same reason you are finding. He uses a series of horizontal and vertically stitched images but seems to do well enough free-handing it. Any thoughts? |
|
|
|
06/05/2012 12:42:27 AM · #7 |
Yes. For brenizer you are definitely going to want to move around the nodal point. A contraption like this would certainly help. My guess though would be you'd need to rotate around the nodal point on two axes since you will be shooting rows on top of rows. Mine is too simple for that and you'd likely need a proper gimbal setup.
Message edited by author 2012-06-05 00:42:58. |
|
|
|
06/05/2012 04:10:08 AM · #8 |
| I think you should beef up v2.0 with 4x4's or 4x6 beams. |
|
|
|
06/05/2012 04:38:49 AM · #9 |
Originally posted by Art Roflmao:
I think you should beef up v2.0 with 4x4's or 4x6 beams. |
get a fulcrum and a platform to stand on... |
|
|
|
06/05/2012 10:19:47 AM · #10 |
Ha, nice prototype Jason! I can imagine just placing marks for the nodal points (actually entrance pupils) of each lens... the only fly in the ointment are those lenses that extend during zooming, like the 24-70 and 24-105. I'd suspect that marking for 24mm, 35mm, 50mm, 70mm, and 105mm would be sufficient accuracy.
|
|
|
|
06/05/2012 10:47:18 AM · #11 |
| One thing I need is a little rubberized grommet for the screw that holds the camera to the board. Right now the camera can spin freely because there is no friction to hold it in place. |
|
|
|
06/05/2012 10:55:34 AM · #12 |
Looks like the camera's in a fixed position on the board, just glue down a rubberized panel there. Or better yet, create a custom-milled channel to snug the camera bottom into :-)
|
|
|
|
06/05/2012 12:31:18 PM · #13 |
Glue a strip behind where the camera sits, so that when mounted the camera butts back against the strip. That way, both the longitudinal and angular position of the camera are defined and reproducible.
Edit for typo
Message edited by author 2012-06-05 12:31:44.
|
|
|
|
06/05/2012 12:39:57 PM · #14 |
That looks like a good solution for the intended purpose.
If you have an old bellows rail, it could be easily modified into a light weight and compact tool for this job, since they have tripod mounts the rail and at least one of the sliding parts. The bellows and the upright parts would need to be removed, or cut away, and maybe turn one sliding part upside down on the rail to mount the camera.
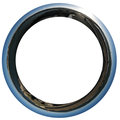
They sell neoprene rubber washers up to about 2 inch diameter at most big hardware stores if you need a quick fix for the camera turning problem. I like BM's idea if you are going to be using only one camera model. That way you would not have to worry about getting the lens axis parallel to the rail every time you set up the rig.
Thanks for the info about finding the nodal point by observation. I would not have thought of doing it that way.
|
|
|
|
06/05/2012 01:07:57 PM · #15 |
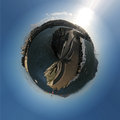
Here's what it will look like through the viewfinder when you find the nodal point. There are many videos out there showing how to do it. This is just one of them. The good stuff gets going at about 2:00.
Finding the Nodal Point |
|
|
|
06/05/2012 01:43:00 PM · #16 |
|
Home -
Challenges -
Community -
League -
Photos -
Cameras -
Lenses -
Learn -
Help -
Terms of Use -
Privacy -
Top ^
DPChallenge, and website content and design, Copyright © 2001-2026 Challenging Technologies, LLC.
All digital photo copyrights belong to the photographers and may not be used without permission.
Current Server Time: 05/08/2026 01:52:23 AM EDT.