| Author | Thread |
|
|
05/11/2011 07:27:34 PM · #1 |
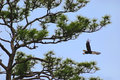
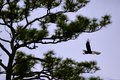
I took this a while back, I dont have the RAW just the Fullsize FINE image.
I would like to bring out the colors and the blue in the sky if at all possible, but I just can not seem to work it out.. anyone want to take a crack at it?
Thanks in advance
Clay

|
|
|
|
05/11/2011 08:11:48 PM · #2 |
not a paid member, so hosted on my personal.
//www.james-goss.com/dpc/dpc1.jpg
here's what I did PP:
image>> adjust>> color balance ------ adjusted the highlights to be more blue
image>> adjust>> replace color ------ selected segments of the sky, and adjusted the saturation/lightness/color
then ran topaz Denoise on it, then sharpened a bit with the highpass method.
there's still some trouble color spots, but it has a bit more pop now. Was this what you were looking for?
Message edited by author 2011-05-11 20:12:07.
|
|
|
|
05/11/2011 08:22:20 PM · #3 |
|
|
|
05/11/2011 08:24:41 PM · #4 |
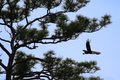
Here is a quick edit I did in LR. I left the editing steps on the image. It actually looks pretty good at full res with those editing steps. I didn't perform any sharpening for web on my edit. Originally I didn't see the bit about blue sky, so I went back in and pulled it back in.
Message edited by author 2011-05-11 20:46:15. |
|
|
|
05/11/2011 08:45:49 PM · #5 |
Originally posted by jamesgoss:
not a paid member, so hosted on my personal.
//www.james-goss.com/dpc/dpc1.jpg
here's what I did PP:
image>> adjust>> color balance ------ adjusted the highlights to be more blue
image>> adjust>> replace color ------ selected segments of the sky, and adjusted the saturation/lightness/color
then ran topaz Denoise on it, then sharpened a bit with the highpass method.
there's still some trouble color spots, but it has a bit more pop now. Was this what you were looking for? |
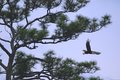
On the right track, I was able to really clean up the sky in mine and give it a nice blue, but I wasnt able to get the trees as sharp (detailed as you were) or the detail on the eagle itself.
So I like what you did with the trees and eagle tho I think to much green for me on the trees
My edit so far
|
|
|
|
05/11/2011 08:46:22 PM · #6 |
Originally posted by bassbone:
Here is a quick edit I did in LR. I left the editing steps on the image. It actually looks pretty good at full res with those editing steps. I didn't perform any sharpening for web on my edit. |
The thumbnail looks completely different then the image that appears.. the blues go away?
Message edited by author 2011-05-11 20:46:53. |
|
|
|
05/11/2011 08:47:19 PM · #7 |
Originally posted by Socom:
Originally posted by bassbone:
Here is a quick edit I did in LR. I left the editing steps on the image. It actually looks pretty good at full res with those editing steps. I didn't perform any sharpening for web on my edit. |
The thumbnail looks completely different then the image that appears.. the blues go away? |
Reload the image and try again - I just updated the photo with the blues in.
|
|
|
|
05/11/2011 08:52:03 PM · #8 |
Ok, so I like my blues better..
but, bassbone and jamesgoss, your trees and eagle especially are soooo much nicer.. so how are you doing that?! :)
Kelli thank you for yours too :) I really appreciate it! |
|
|
|
05/11/2011 08:54:58 PM · #9 |
Originally posted by Socom:
Ok, so I like my blues better..
but, bassbone and jamesgoss, your trees and eagle especially are soooo much nicer.. so how are you doing that?! :)
Kelli thank you for yours too :) I really appreciate it! |
Your first problem is that you need to adjust the histogram - your shot is underexposed. As it is, the trees are way too dark. Go into levels and adjust the white slider so that the slider is next to the far right edge of the histogram. Second, I put a small amount of noise ninja on the image - which smooths the background and can do a bit of sharpening on the details as well. |
|
|
|
05/11/2011 08:56:12 PM · #10 |
Originally posted by Socom:
On the right track, I was able to really clean up the sky in mine and give it a nice blue, but I wasnt able to get the trees as sharp (detailed as you were) or the detail on the eagle itself.
My edit so far |
My sharpening technique was as follows:
duplicate the layer (after all other post processing ideally) and go to filter >> other >> high-pass. I believe I used 9.3 as my magic number, but generally anything from 5-12 will work well.
After hitting Okay, change the layer blending mode to Hard-Light, and use the opacity slider to adjust how strong you want the sharpening.
|
|
|
|
05/11/2011 09:00:00 PM · #11 |
Originally posted by jamesgoss:
Originally posted by Socom:
On the right track, I was able to really clean up the sky in mine and give it a nice blue, but I wasnt able to get the trees as sharp (detailed as you were) or the detail on the eagle itself.
My edit so far |
My sharpening technique was as follows:
duplicate the layer (after all other post processing ideally) and go to filter >> other >> high-pass. I believe I used 9.3 as my magic number, but generally anything from 5-12 will work well.
After hitting Okay, change the layer blending mode to Hard-Light, and use the opacity slider to adjust how strong you want the sharpening. |
Another sharpening technique useful for saving for web is to perform "Adamus Sharpening".
This involves the following:
1) Edit photo as you want but do not perform any sharpening prior to reducing the size.
2) Resize the image to 2X what the final web size is going to be (such as 1600pixels for DPC images)
3) Use 'sharpen' - not smart sharpen, not Unsharp mask, plain old vanilla "Sharpen". Perform this from 1 to 2 times. This image may appear oversharpened and grossly oversharpened looking - don't worry! Keep going.
4) Use "Resize for web" and resize the image to the desired size (800pixels for DPC), and adjust the size to less than 300kb.
DONE! |
|
|
|
05/11/2011 09:01:09 PM · #12 |
Originally posted by bassbone:
Originally posted by Socom:
Ok, so I like my blues better..
but, bassbone and jamesgoss, your trees and eagle especially are soooo much nicer.. so how are you doing that?! :)
Kelli thank you for yours too :) I really appreciate it! |
Your first problem is that you need to adjust the histogram - your shot is underexposed. As it is, the trees are way too dark. Go into levels and adjust the white slider so that the slider is next to the far right edge of the histogram. Second, I put a small amount of noise ninja on the image - which smooths the background and can do a bit of sharpening on the details as well. |
Is there a way you do selective sections of levels, like you can with layers of hue/saturation. (i.e. remove areas you dont want leves to adjust) |
|
|
|
05/11/2011 09:02:33 PM · #13 |
Originally posted by Socom:
Originally posted by bassbone:
Originally posted by Socom:
Ok, so I like my blues better..
but, bassbone and jamesgoss, your trees and eagle especially are soooo much nicer.. so how are you doing that?! :)
Kelli thank you for yours too :) I really appreciate it! |
Your first problem is that you need to adjust the histogram - your shot is underexposed. As it is, the trees are way too dark. Go into levels and adjust the white slider so that the slider is next to the far right edge of the histogram. Second, I put a small amount of noise ninja on the image - which smooths the background and can do a bit of sharpening on the details as well. |
Is there a way you do selective sections of levels, like you can with layers of hue/saturation. (i.e. remove areas you dont want leves to adjust) |
Yes - you can mask hue/saturation/ levels and all other adjustment layers. But for my edit, all adjustments were global and no masking or cloning or dodging or burning was done. |
|
|
|
05/11/2011 09:16:27 PM · #14 |

Viveza 2
Color Efex 3, Tonal Contrast
USM
Message edited by author 2011-05-11 21:18:40. |
|
|
|
05/11/2011 09:23:00 PM · #15 |
Originally posted by hahn23:
Viveza 2
Color Efex 3, Tonal Contrast
USM |
Thats pretty much exactly what I was looking for, tiny bit washed out guessing that happened to bring out the details of the trees and eagle. |
|
|
|
05/11/2011 09:26:52 PM · #16 |
Originally posted by Socom:
Originally posted by hahn23:
Viveza 2
Color Efex 3, Tonal Contrast
USM |
Thats pretty much exactly what I was looking for, tiny bit washed out guessing that happened to bring out the details of the trees and eagle. |
A little less red. It's touchy. Trade-offs galore.
 |
|
|
|
05/11/2011 09:33:32 PM · #17 |
Originally posted by hahn23:
Originally posted by Socom:
Originally posted by hahn23:
Viveza 2
Color Efex 3, Tonal Contrast
USM |
Thats pretty much exactly what I was looking for, tiny bit washed out guessing that happened to bring out the details of the trees and eagle. |
A little less red. It's touchy. Trade-offs galore.
|
Dont see any differences between the two, but I get what your saying in regards to tradeoffs. |
|
|
|
05/11/2011 10:02:31 PM · #18 |
Originally posted by hahn23:
Originally posted by Socom:
Originally posted by hahn23:
Viveza 2
Color Efex 3, Tonal Contrast
USM |
Thats pretty much exactly what I was looking for, tiny bit washed out guessing that happened to bring out the details of the trees and eagle. |
A little less red. It's touchy. Trade-offs galore.
|
Maybe it is my monitor, but I almost get the sense of a purple-ish tone in the sky with your edit Richard. Other than that, it has a good balance of colors. |
|
|
|
05/11/2011 10:24:49 PM · #19 |
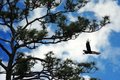
i tend to be goofy when it comes to processing, but i might go with a gradient for the sky if there weren't any restrictions.

|
|
|
|
05/11/2011 10:40:52 PM · #20 |
Originally posted by bassbone:
Originally posted by hahn23:
Originally posted by Socom:
Originally posted by hahn23:
Viveza 2
Color Efex 3, Tonal Contrast
USM |
Thats pretty much exactly what I was looking for, tiny bit washed out guessing that happened to bring out the details of the trees and eagle. |
A little less red. It's touchy. Trade-offs galore.
|
Maybe it is my monitor, but I almost get the sense of a purple-ish tone in the sky with your edit Richard. Other than that, it has a good balance of colors. |
Yes, I see the purple-ish tone, too. Doesn't look like that in AdobeRGB colorspace, but there's definitely an odd color cast when converting to sRGB. It needs more work. I think there is color clipping going on. I use an AdobeRGB proofing profile in Aperture 3.1.2. To get this right, I'd use an sRGB proofing profile to steer away from the color clipping.
The sky gradient by  skewsme is a good solution. skewsme is a good solution. |
|
|
|
05/11/2011 10:53:05 PM · #21 |
Originally posted by skewsme:
i tend to be goofy when it comes to processing, but i might go with a gradient for the sky if there weren't any restrictions.
|
I really like it, never thought of that |
|
|
|
05/11/2011 10:59:54 PM · #22 |
Well since it is not going to be in a challenge, lets go all out.
Enjoy.
|
|
|
|
05/11/2011 11:21:48 PM · #23 |
Originally posted by kenskid:
Well since it is not going to be in a challenge, lets go all out.
Enjoy. |
nice.. wonder how that would look blown up on poster board :) |
|
|
|
05/11/2011 11:27:37 PM · #24 |
The one on my post would look very bad only because of the size. If you would like to put another sky in there and print it into a poster, you would have to do several things.
The background/sky you use should be "large" enough so that it prints nicely at the size you want. You would work with your original photo. If it is say 6000 x 6000 in size, then you would want a background of that size. To do this, you may want to spend a few bucks and get one off of a site sells these type things !
You would also want to be more careful how you mask out your old sky. My edit was very quick. If I was going to hang it on the wall, I would surely spend some time and make sure I iron out all the edges in the mask.
I'm sure some others can fill you in on more details. I have never did anything in "big" size before!
Kenny
Originally posted by Socom:
Originally posted by kenskid:
Well since it is not going to be in a challenge, lets go all out.
Enjoy. |
nice.. wonder how that would look blown up on poster board :) |
|
|
|
|
05/12/2011 12:14:54 AM · #25 |
My very quick version (note ragged mask on eagle):
-Blue/Yellow Curve to to the background
-RGB and Blue/Yellow Curve to eagle
-Resized to 20%
-High-radius USM at 12%/48 dia/TH = 0
-"Regular" USM at 66%/0.6 dia/TH = 5
-SaveAs JPEG at maximum quality.
 |
|
Home -
Challenges -
Community -
League -
Photos -
Cameras -
Lenses -
Learn -
Help -
Terms of Use -
Privacy -
Top ^
DPChallenge, and website content and design, Copyright © 2001-2026 Challenging Technologies, LLC.
All digital photo copyrights belong to the photographers and may not be used without permission.
Current Server Time: 06/23/2026 12:23:32 AM EDT.


