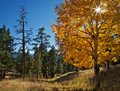
It's all about the dynamic range of the scene. If the difference between the metered exposure in the shadows and the metered exposure of the bright sky is not more than 5 camera stops, you can use your exposure compensation setting to avoid losing details. In the field, just look at your histogram and shift exposure up or down to avoid blowing out the sky. The image below worked because there was enough light bouncing around everywhere that the dynamic range could be contained. A gentle touch on the Recovery adjustment and the Black point adjustment provided a finishing touch. I advise against using the Highlight or Shadow adjustments, as you'll lose too much contrast. I will be the first to acknowledge the dynamic range difficulty most of the time during mid-day shooting. All I'm saying is, there are some days with well illuminated scenes which can be captured with our DSLRs, using RAW image captures.
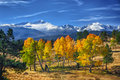
Another mid-day shot which worked for Basic Editing, only because the entire scene was sunlit.

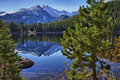
For Advanced Editing rules and scenes with wide dynamic range, it can work to use HDR blending techniques. I bracket exposures +1, 0, -1. Often, I will also use physical GND filters in addition. So, as in the images below, there were at least 10 - 12 camera stops of light between the shadows and the highlights. Using 5 stops of GND filters on the sky brought the dynamic range down to 7 camera stops. Then, the HDR Efex Pro blending brought the scene down to a workable 5 camera stops. HDR output can look surreal and some object to the effect. It's a matter of practicing the methods until no one can differentiate between one image and blended many.
Message edited by author 2011-05-11 09:19:55. |


