| Author | Thread |
|
|
03/20/2011 07:57:35 PM · #1 |
This is embarrassing. Let's just say I'm glad the camera bag I own is long enough to accomodate a 300mm lens whose normally retractable lens hood is stuck at the lens end. Has anyone else ever had to unjam a retractable lens hood that got stuck? What is the safest way to do it without injuring the lens and preferably not the lens hood?
Any help greatly appreciated! |
|
|
|
03/21/2011 05:35:32 AM · #2 |
I don't know, but though you might need a boost for the day crowd. :O)
Ray |
|
|
|
03/21/2011 06:22:53 AM · #3 |
| Wouldn't hurt. Thanks Ray! :-) |
|
|
|
03/21/2011 01:48:56 PM · #4 |
Hmmmm. A retractable lens hood, eh. No experience with this, but one thing I would try in this case if it were my lens might be to put a towel in the dryer on hi heat, and warm that puppy up. Then wrap the towel around the end of the lens/lens hood area. The heat can cause things to "open up" just a bit, and it will be a dry heat, so as long as it is not too hot, it should be fairly gentle. I would keep the lens cap on if possible, as the plastic cap might protect the coatings from the heat a bit longer, should it even be a concern.
I take it from your description that the lens hood is stuck in the extended position? I am not familiar with that lens or hood design. |
|
|
|
03/21/2011 03:19:35 PM · #5 |
Yes, the lens is stuck at the extended position. What happened is that I was getting into a car (passenger side) with camera in one hand. Lightly bumped the lens hood against the ceiling, so it was just enough to put it off the threads is my guess. To extend it you have to turn and push it clockwise and the opposite to retract it. I'll post a pic later, away from home at the moment.
Thanks for the idea, may try that. |
|
|
|
03/21/2011 03:29:14 PM · #6 |
Originally posted by snaffles:
... To extend it you have to turn and push it clockwise and the opposite to retract it. I'll post a pic later, away from home at the moment. |
A pic would be great... definitely a different design from the Canon ones that just slide. Does the hood look like it's crooked at all, even a little? |
|
|
|
03/21/2011 06:56:15 PM · #7 |
Originally posted by kirbic:
Originally posted by snaffles:
... To extend it you have to turn and push it clockwise and the opposite to retract it. I'll post a pic later, away from home at the moment. |
A pic would be great... definitely a different design from the Canon ones that just slide. Does the hood look like it's crooked at all, even a little? |
 Sadly, yes. Which makes me worry about cross-threading. Certainly don't want to have to destroy the lens hood, or send in the whole shebang to Nikon :/ Sadly, yes. Which makes me worry about cross-threading. Certainly don't want to have to destroy the lens hood, or send in the whole shebang to Nikon :/ |
|
|
|
03/21/2011 07:23:23 PM · #8 |
Well, here's what I'd do:
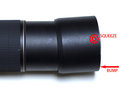
You want to compress the hood slightly, make it a little oval, then gently bump the end of the hood at the point that's forward the most. If a gentle bump got it in that position, another one should move it back. The squeeze gives it a little more clearance at the end so it can get over the top easier.
Bottom line, if it's already damaged, it will mean a trip to Nikon... but if it's not, this technique should not put you at undue risk for damage. Not to say there is no risk (there is a little) but if you can't move it back, it's still a trip to Nikon. |
|
|
|
03/21/2011 07:30:52 PM · #9 |
This method should either loosen the hood, or it won't matter.
//web.aanet.com.au/bayling/repair.html
:)
|
|
|
|
03/21/2011 07:37:58 PM · #10 |
Originally posted by kirbic:
Well, here's what I'd do:
You want to compress the hood slightly, make it a little oval, then gently bump the end of the hood at the point that's forward the most. If a gentle bump got it in that position, another one should move it back. The squeeze gives it a little more clearance at the end so it can get over the top easier.
Bottom line, if it's already damaged, it will mean a trip to Nikon... but if it's not, this technique should not put you at undue risk for damage. Not to say there is no risk (there is a little) but if you can't move it back, it's still a trip to Nikon. |
Since one side looks farther back to the rear and you indicate it took a slight bump, I would be inclined to pull out on the side that is farther back, moving it back in place. A little heat as suggested might help too...maybe use a hair dryer. Good luck. I hope it all works out for you.
If you use aloha's method....wear safety glasses.
Message edited by author 2011-03-21 19:42:27. |
|
|
|
03/22/2011 06:21:38 AM · #11 |
Originally posted by kirbic:
Well, here's what I'd do:
You want to compress the hood slightly, make it a little oval, then gently bump the end of the hood at the point that's forward the most. If a gentle bump got it in that position, another one should move it back. The squeeze gives it a little more clearance at the end so it can get over the top easier.
Bottom line, if it's already damaged, it will mean a trip to Nikon... but if it's not, this technique should not put you at undue risk for damage. Not to say there is no risk (there is a little) but if you can't move it back, it's still a trip to Nikon. |
Hmm problem here is trying to squeeze the lens hood, it's carbon fibre. Pretty strong stuff. Haven't tried any methods involving dry heat yet. Googled a suggestion to use a pipe wrench, but worried about that due to the angle. *sigh*... |
|
|
|
03/22/2011 09:52:28 AM · #12 |
Originally posted by snaffles:
Hmm problem here is trying to squeeze the lens hood, it's carbon fibre. Pretty strong stuff. Haven't tried any methods involving dry heat yet. Googled a suggestion to use a pipe wrench, but worried about that due to the angle. *sigh*... |
If it's cross-threaded, *don't* try to force turning it. You will wind up with a trip to Nikon.
When I say "squeeze" I do mean relatively gently. No matter how strong the hood is, it won't be that hard to deform just a little, and a little is all you need. Try putting a finger on opposite sides and squeezing. You should see the hood go just a little bit oval.
When you bump the end of it, bump it against something that is very solid but has just a little bit of padding, or tape a couple layers of heavy cloth over the end. |
|
|
|
03/22/2011 01:55:27 PM · #13 |
It doesn't seem to a threaded design to me (based on the photo).
So it is more "wedged" and the textured surface of the lens body is gripping it a bit.
I would seriously attempt a little dry heat applied to the hood, and would use something like a heated towel for that, or something soft, formable, and dry that maybe has more thermal mass. I would personally avoid a hair dryer, as that adds a lot blowing dust, the heat can get out of hand pretty quick, etc. Get a hand-sized square of that grippy shelf liner (always handy to have for loosening tight lens filters, anyway).
I'm thinking a clean, dry, HOT dish towel, folded lengthwise in layers to just cover the hood (layers will hold the heat longer).
So one hand will be holding the towel wrapped around the hood, with fingers placed so you can give a very slight squeeze. Use the shelf liner the same way you would for removing a tight lens filter: over the end of the hood, palm of your hand across the face with no squeezing (trying to grab a lens filter tighter with your fingers, by the way, causes an oval that will keep that sucker on there tight). But back to the hood: As you apply the heat, squeeze very very slightly as kirbic suggests, but add a little twisting with your other hand. If you can get the thing moving, break the static/grip friction, you have "sliding friction" which will be less and easier to manage. Once you have it starting to rotate, try to keep it moving (twist back and forth) as you use the other hand to orient it back to normal. Along the way, it may seem like it won't go back to normal, and that could be because the "squeeze" is now creating an oval that prevents it, instead of helping.
I could imagine this taking a few cycles to complete, or it freeing suddenly and surprising you.
The texture on the lens will be impeding you here. Based on what I can see from the photo, I would also consider taking a q-tip and applying a slight amount of liquid soap (dawn dishwashing stuff, etc) at the binding points and maybe a quarter to a half inch out from them. This should be safe, easy to wipe off later, etc.
i think the heat may do the trick, even without the "squeeze", but who doesn't enjoy a little squeeze now and again? :-)
|
|
|
|
03/22/2011 02:01:49 PM · #14 |
| Have you tried smacking it with a hockey stick? |
|
|
|
03/22/2011 02:09:49 PM · #15 |
Originally posted by franktheyank:
Have you tried smacking it with a hockey stick? |
I think the consensus from The Committee is that taking a hockey stick to it is Plan B. And that we will want VIDEO of the attempt, as well :-) |
|
|
|
03/22/2011 02:13:42 PM · #16 |
|
|
|
03/22/2011 02:37:40 PM · #17 |
Originally posted by mike_311:
run it under hot water? |
Nah, just put it in the oven.. (seriously enough, although I'm kind of joking, this might work, but make sure it's at 150 or so, wrapping it in a towel or something to slow the thermal transfer would also be a fine idea.) |
|
|
|
03/22/2011 04:54:58 PM · #18 |
Originally posted by chromeydome:
I would seriously attempt a little dry heat applied to the hood, and would use something like a heated towel for that, or something soft, formable, and dry that maybe has more thermal mass. |
Fill an old sock with a couple of cups of rice, tie it closed, and microwave for 1-3 minutes. I use one as a heating pad/handwarmer all the time. You can keep re-heating it an indefinite number of times.
Be careful, it can get very hot. Also, shake it around a bit after zapping to distribute evenly.
AFAIK, brown rice conveys no advantage in this context ... ;-)
ETA: When not keeping your hands warm, you can use it as a "beanbag" support for your camera.
Message edited by author 2011-03-22 16:56:06. |
|
|
|
03/22/2011 05:00:47 PM · #19 |
| If you want to do the heating approach AND the hockey stick approach, just stick in in the dryer and let it tumble for awhile. :) |
|
|
|
03/22/2011 05:08:58 PM · #20 |
Originally posted by vawendy:
If you want to do the heating approach AND the hockey stick approach, just stick in in the dryer and let it tumble for awhile. :) |
You think it's just a lousy lens hood, eh? (medical humor ...:-) |
|
|
|
03/22/2011 05:10:34 PM · #21 |
| circumcision, that's the only answer to a sticking hood! |
|
|
|
03/22/2011 05:52:01 PM · #22 |
Just bring the darn thing over... I have an vice and a ball peen hammer and some good pipe wrenches... it shouldn't take long. :O)
Ray |
|
|
|
03/22/2011 05:58:04 PM · #23 |
| FWIW, if the hood is really carbon fiber, it will have a *very* low coefficient of expansion. Heat won't create much extra room in that case. |
|
|
|
03/22/2011 06:46:30 PM · #24 |
| I like kirbic's idea, bag the heat. The thermal transfer is pretty tough to get a shift in given the proximity of what you want to heat to what you want to stay cool and the low COE. I would apply force at 4 spots. Use some channel lock pliers that are big enough to grab the low side and be able to rest on the high side (the longer type that are designed for waste pipes will do the job) and pinch the sides, then give a short rotation, it ought to pop back into place. |
|
|
|
03/22/2011 07:03:53 PM · #25 |
Originally posted by kirbic:
FWIW, if the hood is really carbon fiber, it will have a *very* low coefficient of expansion. Heat won't create much extra room in that case. |
You know, that's true, but, that does mean the metal body probably will contract more than the hood will in cold conditions. Try (ziplock?)bagging the thing and putting it in the freezer, could do just exactly what is needed. Just be sure to leave it in the bag while you're messing with it (if possible) and while it warms up, since it might draw condensation onto the surfaces as it warms up if there's enough humidity.
ETA: If that doesn't work go down to your local welding / industrial supply shop and get some liquid nitrogen, that should DEFINITELY do the trick. ;) *(Legal Disclaimer: You should never even think about doing this..)
Message edited by author 2011-03-22 19:09:31. |
|
Home -
Challenges -
Community -
League -
Photos -
Cameras -
Lenses -
Learn -
Help -
Terms of Use -
Privacy -
Top ^
DPChallenge, and website content and design, Copyright © 2001-2026 Challenging Technologies, LLC.
All digital photo copyrights belong to the photographers and may not be used without permission.
Current Server Time: 05/08/2026 03:45:51 AM EDT.


