| Author | Thread |
|
|
01/02/2011 08:07:46 PM · #26 |
Originally posted by bmartuch:
When an image is up in PSP, is there anyway to toggle the background between black and standard so I can see what it looks like against a black background? |
If you are using X2 or later, you can go to "View-->Use Graphite workspace theme". That's not available in earlier versions, to my knowledge. I can't find it in the copy of X1 on my netbook.
|
|
|
|
01/03/2011 10:28:38 AM · #27 |
I presume that the order in which editing steps are done make a difference in the final image. I would share my sequence, except that I'm not confident that it produces the best results.
BTW - I'm using X2, not X1.
Part of the reason I'm asking is that I noticed in an earlier post  Yo_Spiff mentioned that he uses Levels as his first step, and I typically do that near the end of the process... Yo_Spiff mentioned that he uses Levels as his first step, and I typically do that near the end of the process...
|
|
|
|
01/03/2011 11:15:36 AM · #28 |
Originally posted by dtremain:
I presume that the order in which editing steps are done make a difference in the final image. I would share my sequence, except that I'm not confident that it produces the best results.
BTW - I'm using X2, not X1.
Part of the reason I'm asking is that I noticed in an earlier post Yo_Spiff mentioned that he uses Levels as his first step, and I typically do that near the end of the process... |
I believe the order in which we perform steps is important not only to the end result but more important to subsequent steps we take during our workflow.
For example: My workflow always starts with a Noise Reduction, then a levels/curves (lighting) adjustment to get lighting basically where I want it. This gives me a starting point for the effects that I might apply.
Then for Contrast and Punch I will always try an Adjust > Brightness and Contrast > Local Tone Mapping (PSP X3) effect, which is close to Adjust > Brightness and Contrast > Clarify in PSP X1/X2.
Applying Local Tone Mapping before performing Levels/Curves will result in a much different effect. Doing levels/curves second will net a darker, less contrasty end result.
I might do a levels/curves near the end of the workflow if Banding in a bright sky is evident.
Personally, I just think it is easier to see my effect results if I remove the noise and get the lighting right first...
Message edited by author 2011-01-03 11:21:51. |
|
|
|
01/03/2011 11:38:35 AM · #29 |
I'm interested in other perspectives about early noise reduction. If I'm shooting at a high ISO, I will sometimes remove it in my RAW conversion, but most of the time it is one of my last steps.
I may have to try it "backwards." |
|
|
|
01/03/2011 11:49:45 AM · #30 |
Originally posted by awpollard:
... Personally, I just think it is easier to see my effect results if I remove the noise and get the lighting right first... |
Early NR is good...no sense in sharpening the noise. I'll usually do a quick levels check initially also (as others' have mentioned). |
|
|
|
01/03/2011 11:54:29 AM · #31 |
Originally posted by karmat:
I'm interested in other perspectives about early noise reduction. |
I do it early on as well, since later steps will amplify any noise that is present. I've always done it as a second step after levels however. My feeling was that doing such an overall exposure adjustment first gave me an idea of how much noise reduction was needed. I might try it as the first step and see if there is any noticeable difference.
|
|
|
|
01/03/2011 01:14:37 PM · #32 |
Alright! I am now the owner of PSP X3! boy its different from my 9 lol! Wish me luck!
|
|
|
|
01/03/2011 01:15:36 PM · #33 |
Originally posted by karmat:
I'm interested in other perspectives about early noise reduction. If I'm shooting at a high ISO, I will sometimes remove it in my RAW conversion, but most of the time it is one of my last steps.
I may have to try it "backwards." |
If you remove the noise eariler its easier to remove... and allows for a small retouch after the editing is done. Waiting till the end will often undo a lot of what you have already done! IMHO
|
|
|
|
01/04/2011 09:32:05 AM · #34 |
How about resize? I tend to do resize, unsharp mask, save for web (optimization tool to get it under 300K) as my final steps. Is there a better way to do this?
|
|
|
|
01/04/2011 09:40:18 AM · #35 |
Originally posted by dtremain:
How about resize? I tend to do resize, unsharp mask, save for web (optimization tool to get it under 300K) as my final steps. Is there a better way to do this? |
That's how I resize. The biggest factor is the reduction algorithm you choose. I use bicubic resizing. When I sharpen, I use a very low radius. My starting settings are Radius: 0.35, Amount: 150, Clipping: 4. From there I increase or decease the amount as needed. Note that you cannot get to a radius of under 1.0 with the arrows or slider, you have to type it into the box.
|
|
|
|
01/04/2011 12:51:13 PM · #36 |
Originally posted by Yo_Spiff:
Originally posted by dtremain:
How about resize? I tend to do resize, unsharp mask, save for web (optimization tool to get it under 300K) as my final steps. Is there a better way to do this? |
That's how I resize. The biggest factor is the reduction algorithm you choose. I use bicubic resizing. When I sharpen, I use a very low radius. My starting settings are Radius: 0.35, Amount: 150, Clipping: 4. From there I increase or decease the amount as needed. Note that you cannot get to a radius of under 1.0 with the arrows or slider, you have to type it into the box. |
Ditto (except the Save for web part as that tosses out EXIF and Color Profile)
On the sharpen after resize...I set a preset in PSP (named it Resize Sharpen), I'm right there at .40 for radius. |
|
|
|
01/04/2011 01:00:37 PM · #37 |
Originally posted by awpollard:
Ditto (except the Save for web part as that tosses out EXIF and Color Profile) |
That shouldn't happen. There should be a checkbox to preserve EXIF. |
|
|
|
01/04/2011 01:06:38 PM · #38 |
Originally posted by bvy:
Originally posted by awpollard:
Ditto (except the Save for web part as that tosses out EXIF and Color Profile) |
That shouldn't happen. There should be a checkbox to preserve EXIF. |
I think he was just talking in PhotoShop terms, since there isn't any "Save for web" as such in PSP.
|
|
|
|
01/04/2011 03:20:39 PM · #39 |
A real quick primer on using Layers and Layer Groups to process Highs and Darks of a shot seperately, using PSPs New Mask from image... function.
Layers and Groups have a lot of uses, this is just a starting point :)
Open your picture
With Background selected, Reduce noise and initial adjust exposure (Levels/Curves or I use NIK Viveza 2).
Preparation:
(Duplicate Background twice, rename layers and create groups)
Right click Background, choose duplicate.
Right click Background again, choose duplicate.
Click on top Copy of Background and rename to Highs.
Click on the other Copy of Background and rename to Darks.
Create the two Groups from the existing Highs/Darks Layers:
Right click on Highs choose New Layer Group, Name it Highs Group
Right click on Darks choose New Layer Group, Name it Darks Group
Create Masks using the New Mask from Image function for the two groups:
Right click on Highs layer under the Highs Group choose New Mask > From Image...
Select Source Luminance, Invert mask data Unchecked, click OK.
Right click on Dark layer under the Darks Group choose New Mask > From Image...
Select Source Luminance, Invert mask data Checked, click OK.
on New Mask > From Image... dialog Invert mask data unchecked means to mask out the dark areas, and checked means to mask out the high areas.
Process the Highs and Darks seperately:
The bottom layer (Highs and Darks) in each group is the "Solid" of each group.
We can adjust those bottom layers as we see fit. Adjusting Darks will only effect the mids and darks of our image and Adjusting Highs will effect the High to mids.
for example if we have a lot a grain in the sky, we could noise reduce the Highs layer without effecting the darker spots in the shot (this happens a lot with Air Show pics).
We can also blend layers on to those bottom layers of each group. For example: I put a high pass layer on my darks. A High Pass layer is really a greyscale, transparent layer so I don't want to give the bottom layer opacity so I duplicated the bottom layer in the Darks group. Renamed the layer a did applied Effects > Edge Effects > High Pass and set that High Pass layer to a Hard Light Blend. (note I renamed my layer incorrectly, in the photo below, while going through the steps)
Rename your layers and groups reflecting what the heck they are. You can end up with a lot as:

Message edited by author 2011-01-04 15:38:43. |
|
|
|
01/04/2011 08:51:05 PM · #40 |
Here is a long tutorial using PSP X that will show a couple of techniques I use on images with extreme contrast (shadows and sunlight). Click on thumbnails for larger image and then click on that image to see the 100% size image.
Here is my original converted from Raw. It looks a little dark because I wanted as much detail in the water as possible.

1) My first step was to use Histogram Adjust to bump the gamma to 1.47, while keeping the black setting at 0 and the white setting at 255.

2) Now I want to balance/flatten the contrast of the image to maximize the visible detail. To do this I make a duplicate layer and desaturated it using Hue/Saturation/Lightness

3) Then I changed the B&W duplicate layer to a negative.


4) Then change the blend mode of the duplicate layer to Overlay and the Opacity to approximately 50-55%. Different photos will require a different Opacity setting but generally it will fall between 40-75%.

Now merge the duplicate layer into the background layer. The image should look kind of washed out. Don't worry, now I'll show you a technique to bring a little pop back to the image.
5) To give the image some pop, I use a double USM process shared by benjikan with a detailed Photoshop tutorial found HERE.
Here are the settings I used. The first USM action was Radius @ 0.3, Strength @ 250, and Clipping @ 0. The second USM action was Radius @ 50, Strength @ 12, and Clipping @ 0. After you run both USM actions, duplicate the layer and set the blend mode to Soft Light and adjust the opacity to what looks good to you (I used 100% opacity on this image).

This duplicate USM layer can also be desaturate and the opacity decreased if contrast and saturation are too strong.
6) Once you flatten all the layers, you can now tweak the image using layer or curves if you desire.
7) Now resize for the web and use USM (Radius @ 1, Strength @ 100, and Clipping @ 3) to sharpen the final image.

If any of this is confusing, please send me a PM and I'll try to clarify it a bit.
Tim
Edit: I removed the two Clarify adjustments I used at the end of the processing because it looked like crap when I viewed it on my better computer.
Message edited by author 2011-01-09 11:04:17. |
|
|
|
01/04/2011 10:06:12 PM · #41 |
Originally posted by atupdate:
Here is a long tutorial using PSP X that will show a couple of techniques I use on images with extreme contrast (shadows and sunlight). |
Sounds similar to a method I have been using in the same situation. I'll give your variation a try next time.
-Duplicate layer
-Desaturate upper layer
-Negative image upper layer
-Apply light gaussian blur to upper layer (I use a value of 4)
-Select a blend mode of "overlay"
-Adjust opacity of upper layer to preference. (I find an opacity of somewhere between 15-30% works for most images.)
-Flatten
|
|
|
|
01/05/2011 06:40:46 AM · #42 |
Originally posted by Yo_Spiff:
Originally posted by atupdate:
Here is a long tutorial using PSP X that will show a couple of techniques I use on images with extreme contrast (shadows and sunlight). |
Sounds similar to a method I have been using in the same situation. I'll give your variation a try next time.
-Duplicate layer
-Desaturate upper layer
-Negative image upper layer
-Apply light gaussian blur to upper layer (I use a value of 4)
-Select a blend mode of "overlay"
-Adjust opacity of upper layer to preference. (I find an opacity of somewhere between 15-30% works for most images.)
-Flatten |
What is the purpose of the Gaussian blur step? |
|
|
|
01/05/2011 07:18:18 AM · #43 |
Originally posted by bmartuch:
Originally posted by Yo_Spiff:
Originally posted by atupdate:
Here is a long tutorial using PSP X that will show a couple of techniques I use on images with extreme contrast (shadows and sunlight). |
Sounds similar to a method I have been using in the same situation. I'll give your variation a try next time.
-Duplicate layer
-Desaturate upper layer
-Negative image upper layer
-Apply light gaussian blur to upper layer (I use a value of 4)
-Select a blend mode of "overlay"
-Adjust opacity of upper layer to preference. (I find an opacity of somewhere between 15-30% works for most images.)
-Flatten |
What is the purpose of the Gaussian blur step? |
I think it helps prevent some haloing (blends the high contrast boundaries) and I have used it on occasion. My image didn't seem to need it but it was good that Yo_Spiff mentioned it because it can be helpful.
Tim
Message edited by author 2011-01-05 07:25:33. |
|
|
|
01/05/2011 09:07:50 AM · #44 |
Originally posted by bmartuch:
What is the purpose of the Gaussian blur step? |
Not sure. I originally ran across this as a method of doing a false HDR. I really dislike the look it gives when used that way at full strength, but I found at lower opacity, it worked well for recovering something from the harsh shadows and bright highlights of a midday sun scene. I have it saved as a script, with a link to it on my toolbar.
The suggestion of it being to prevent haloing is probably correct.
Message edited by author 2011-01-05 09:08:24.
|
|
|
|
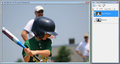
01/06/2011 08:58:15 PM · #45 |
|
Just got my version of X2 and installed it. It definitely looks different. |
|
|
|
01/06/2011 09:19:20 PM · #46 |
|
When I have the crop tool selected in X2, A crop area always appears asking if I want to use the "Last Applied" crop. It gets irritating after a while. Is there a way to stop that? |
|
|
|
01/06/2011 09:41:43 PM · #47 |
I don't get that. Mine just uses the last crop setting without any prompt. I think you need to change this setting in the preferences:
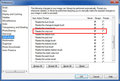
|
|
|
|
01/07/2011 12:55:49 PM · #48 |
|
Since I do quite a bit with textures, I often have to resize them to match the original image. I generally check the size of the image and then resize the texture to match. Is there a way of sizing one image to another without manually having to go in and set the size each time? I now have X2. |
|
|
|
01/07/2011 01:23:03 PM · #49 |
If there is, I am not aware of it. Maybe someone else has done it.
|
|
|
|
01/07/2011 08:45:28 PM · #50 |
Generally I have pretty good luck translating Photoshop tutorials into PSP terminology. I found a Photoshop tutorial on Luminus Landscape today that I think could be used instead of the tutorial I posted earlier in this thread.
I'm interested in the second method (Layer Mask method) of this tutorial. I initially thought using a mask from an image might get me there but I couldn't get to the result I was looking for.
Any help with this would be appreciated.
Tim |
|
Home -
Challenges -
Community -
League -
Photos -
Cameras -
Lenses -
Learn -
Help -
Terms of Use -
Privacy -
Top ^
DPChallenge, and website content and design, Copyright © 2001-2026 Challenging Technologies, LLC.
All digital photo copyrights belong to the photographers and may not be used without permission.
Current Server Time: 07/17/2026 03:12:10 PM EDT.


