| Author | Thread |
|
|
10/04/2011 10:17:03 AM · #1 |
I have an idea that I am working on to put together an awesome photo shoot and I want to brush up on my techniques and be as prepared as possible when I shoot this tomorrow morning.
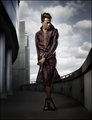
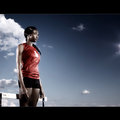
The look that I want is really strong light on my subjects that overpowers the sun in the middle of the day. Then, I want to post process in a certain way that I can't name, but I have a couple of examples to show:
Post processing in this shot coupled with the dramatic lighting
Shooting into the sun with dramtic lighting
Again, overpowering lighting and cool processing
Ever since I arranged for all of the components of this shoot to come together, I've been scouring the internet for tips and/or tutorials on how to create this look, both during the shoot and in post processing the images.
I've looked over this guy's images in the hopes of 'backward engineering' what his setup is. I can see that there are two main lights, one on either side of the subjects that light them from the side and slightly behind which creates some defining shadows on the fronts of their faces. I'm sure that there is a lot more going on and I want to figure it out as much as possible.
Can anybody please point me in the right direction towards a website or other source that I can use to learn more about how to successfully pull off this type of shot? I'd also like to look at similar examples by other photographers if you know of any. Tim Tadder's work is awesome, but I'd like to see what other's have also done in this style.
Thanks. |
|
|
|
10/04/2011 10:25:58 AM · #2 |
|
IMHO the persons and the environments are shot separately. It's all in the post. |
|
|
|
10/04/2011 10:33:21 AM · #3 |
Well that stinks when it comes to challenges here :(
I need to figure out how to do this with one exposure. |
|
|
|
10/04/2011 10:43:55 AM · #4 |
|
I would say Leo is the closest to that sort of light work. Also looks heavily processed with Tonal Range or HDR |
|
|
|
10/04/2011 10:46:43 AM · #5 |
Light Gangster
Here is a good read on the guy! Links to some interesting information and photos, too. Others have started processing as he does and apparently run workshops on "how", so should be able to find something.
Message edited by author 2011-10-04 10:48:02. |
|
|
|
10/04/2011 10:48:25 AM · #6 |
I agree with Oliver. The first one of the guy on the steps MIGHT actually be an HDR image, but likely still a composite. The fighting girls is for sure a composite - the ground with the narrow channel is (the only part of image) from the famous Salk Institute in La Jolla, CA.
You can approximate this kind of look with lighting, but you'd likely need strobes rather than speedlights to get that kind of brightness. Then you could run it through one of several programs to get the grungy look as well. |
|
|
|
10/04/2011 11:04:03 AM · #7 |
I have three Alienbee strobes and two speedlights that I plan to use, so I think that I can get the brightness. I also have a variable ND filter to reduce the ambient light.
I just didn't want to put my 'models' through a couple of hours of experimenting. It would be better if I knew more about how I am going to pull this off.
I've seen Dave Hill's website before, but while exploring it again this morning I came across a bunch of 'behind the scenes' videos which helps a little.
|
|
|
|
10/04/2011 11:14:38 AM · #8 |
For a similar look, and a *little* less post processing (he still post processes a fair bit--backgrounds are sometimes shot separately) check out Joel Grimes work... He has some serious on-site lighting arrangements that might give you some ideas :-)
edited to add that he includes a list on flickr of the equipment he uses... (helpful!)
Message edited by author 2011-10-04 11:19:28. |
|
|
|
10/04/2011 11:32:46 AM · #9 |
Originally posted by profoto site:
Tadder credits the acceptance of his style to both a demand for a look representative of the digital age and the practice of shooting digitally for budgetary reasons. “In a completely digital world where everybody is shooting all-digital, producers are producing in the digital world,” he says. “Previously, an art director would say. ‘I need a helicopter and I need an elephant.’ A guy would have to go out and get an elephant and a helicopter and permits, put it all together and make it all happen. Get the animal trainer, get this thing checked in, that thing checked in, and the permits for everything. They’d get it all done and shoot it all in one good shot and it would be done. People did those five years ago.”
Things are done differently in a digital workflow. “Today, it’s like, ‘I’m going to the toy store to buy a helicopter for 15 dollars, and I’m going to go to the zoo to shoot a shot of an elephant, and I’m going to put it all together in post-production,’” he says. “That’s a very real process—something we experience on a first-hand basis. I had a producer estimate a job at $300,000, and another producer handled it for $30,000 digitally.” |
This makes it pretty obvious we're dealing with composites, as Oliver theorized and Johanna stated based on the Salk Institute example.
R.
Message edited by author 2011-10-04 11:33:47.
|
|
|
|
10/04/2011 11:56:42 AM · #10 |
|
Yep, I looked over Joel Grimes again & there are very few he did not do HDR at least for the background... |
|
|
|
10/04/2011 11:59:11 AM · #11 |
|
Joel does tons of workshops now on his lighting and processing. But they are over $1000 for a workshop. But he also has several videos floating around on YouTube that you can see how it all works (if you piece it together) |
|
|
|
10/04/2011 12:05:13 PM · #12 |
I was going to suggest Joel Grimes as well. The style between Grimes and Tadder is very similar as is the workflow. There is a lot of compositing going on with unrelated backgrounds being used and models being shot against a solid neutral background or in some cases a green screen. That way you get the natural ambient light coupled with selective lighting of the background environment and match the studio lighting of the model to fit the scene. For instance if you have a big warehouse shot separately as your background with strong daylight lighting coming from skylight windows in the roof you would want to shoot your model in the studio with a light above their head to give the similar result and make it look realistic once you composite. The large majority of Joel Grimes work is done this way, and Tadder seems to work in a similar manner.
What sets Dave Hill apart from many is his lighting techniques. EVERYTHING is his photos gets it's own lighting. His works usually consist of very active scenes with a lot of models and objects in the frame. If it's a beach scene with a beach ball, a cooler, a towel, two or three groups of people, a hot dog stand, a kid on the board walk going by on a skate board and so on....it ALL gets lit individually and then layered together and processed with his unique style and look. The attention to detail is staggering.
That's not to say that they never take a well lit scene in one shot and process it, but for these three guys that's the exception to the rule.
Dave |
|
|
|
10/04/2011 12:50:56 PM · #13 |
Originally posted by Bear_Music:
Originally posted by profoto site:
"I had a producer estimate a job at $300,000, and another producer handled it for $30,000 digitally.” |
This makes it pretty obvious we're dealing with composites ....
R. |
Boy, I would have composited a toy helicopter and zoo shot of an elephant for only $3,000 ... guess I'll have to raise my rates (and get a better camera!). ;-) |
|
|
|
10/05/2011 01:00:32 AM · #14 |
Originally posted by yakatme:
I just didn't want to put my 'models' through a couple of hours of experimenting. It would be better if I knew more about how I am going to pull this off. |
it seems to me that this is exactly what you would want to be doing...experimenting and finding your own style, rather than just emulating somebody else's five-years-ago style.
;-)
good luck! |
|
|
|
10/05/2011 08:14:49 AM · #15 |
I'd check with Leo --  lvicari lvicari
It reminds me of some of his stuff.
Message edited by author 2011-10-05 08:15:56. |
|
|
|
10/05/2011 11:42:49 AM · #16 |
Originally posted by Skip:
Originally posted by yakatme:
I just didn't want to put my 'models' through a couple of hours of experimenting. It would be better if I knew more about how I am going to pull this off. |
it seems to me that this is exactly what you would want to be doing...experimenting and finding your own style, rather than just emulating somebody else's five-years-ago style.
;-)
good luck! |
In the end it will be my style that prevails. What each of the photogs that have been mentioned has done is different in their own way and I'll find my way also. I would like to learn what I can first before I put anybody through my perfectionist type of dedication to my work.
The photo shoot is done now anyway and what I have certainly is unique. Now for the post processing and to learn this part of it at my own pace. |
|
|
|
10/05/2011 11:45:26 AM · #17 |
|
Thanks everybody else for your discussion and help. I looked through all of your suggestions and it definitely helped me to learn what I needed to make this happen this morning without burning out a two year old model with an unnecessarily prolonged photo shoot. |
|
|
|
10/14/2011 09:38:14 AM · #18 |
Originally posted by Skip:
Originally posted by yakatme:
I just didn't want to put my 'models' through a couple of hours of experimenting. It would be better if I knew more about how I am going to pull this off. |
it seems to me that this is exactly what you would want to be doing...experimenting and finding your own style, rather than just emulating somebody else's five-years-ago style.
;-)
good luck! |
Now that the challenge is over I can reply more specifically to your somewhat snide remark about "emulating somebody else's five-years-ago style."
I wasn't planning to copy anybody else's style and I don't think that I have. But my research, studying, and backwards engineering of these photographer's images helped me to pull off this photo shoot without having to make my two year old model sit still for more than 10 minutes as I generally mentioned was my intent. That was the reason for starting this thread and asking for help, not to copy anybody, but to fast forward my understanding of techniques ahead of time so that I could efficiently pull off what I had in mind without putting a toddler through hell.

I think that it worked out well, and the final result is far from a copy of Tim Tadder's or Dave Hill's work. |
|
|
|
10/17/2011 08:41:14 PM · #19 |
sheesh, robert, i never would have taken you for being such a whiner. snide? jesus, i even bolded the emoticon so that you would know it was a tongue-in-cheek remark. glad you got it all figured out, though. it's a nice update of mark's two-year-old idea...
 |
|
Home -
Challenges -
Community -
League -
Photos -
Cameras -
Lenses -
Learn -
Help -
Terms of Use -
Privacy -
Top ^
DPChallenge, and website content and design, Copyright © 2001-2026 Challenging Technologies, LLC.
All digital photo copyrights belong to the photographers and may not be used without permission.
Current Server Time: 06/23/2026 07:44:48 AM EDT.


