| Author | Thread |
|
|
09/07/2011 07:30:05 PM · #1 |
I received a comment from Melethia on my stop motion entry:
"But what I want to know is how you got such exceptional detail in the bird AND the sky without all sorts of artifacting?"
So I figured I'd share the secret (foolish me!!!!!)
If anyone read my comments on this entry, you'll notice that it's actually an outtake for the flare challenge. (Though I was also shooting for the stop motion challenge as well. I think I can safely say this, because I didn't enter a bird in the flare challenge. :)
The first thing to learn from this is: always shoot RAW when shooting birds! Especially birds in flight. The sky can be such a problem. Especially around here, the sky has a tendency to be quite light. Because of this, the seagull shots are almost always underexposed. (white bird, white sky -- grey picture)
Usually, when shooting seagulls, I overexpose by about 1 1/2 stops, and then chimp to see if I'm close. Most of the time it exposes fine for the bird, and blows the sky. I actually like that look. The following shot was done in minimal editing -- so no cropping, no adjustments whatsoever -- other than resizing and sharpening. The camera was set to +1. At times I need to do +2 or even sometimes a little more.

If you shoot jpeg, you can adjust it a bit, but if you shoot RAW, you can save even more.
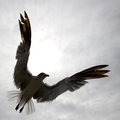
As I mentioned earlier in this rambling thread, I was trying to get lens flare. So I didn't overexpose. I shot directly into the sun, figuring I'd get a silhouetted bird, and hoping for a flare.
No flare.
Silhouetted bird. Very nice silhouetted bird. Well, at least the shape was nice -- but the exposure was awful! I knew it would be, I just wanted flare.
No flare.

When I started looking through for stopped motion possibilities, I realized I really liked the position of the bird, and I was hoping I could salvage some of the photo by adjusting the exposure in RAW.
(This is where people start getting irritated -- thinking that this photo was saved by photoshop. Many people think you can do incredible things to bad photos in photoshop and make them awesome. This is not one of those cases!!)
First lesson: shoot RAW. If you don't get your exposure right, it might help you. It doesn't always, but with birds it can be very handy.
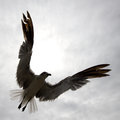
This is how it was shot (cropped in a bit)
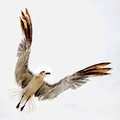
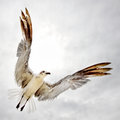
This is what it would look like if I had simply overexposed it:
All I did was up the exposure in RAW to +3.5. My details in the bird were all there. They were a little grainy because of being underexposed to begin with, but denoise helped a lot.
It was still a little too dark, so I did a very simple curves -- just one point in the center -- dragging it up a bit.
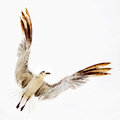
Now I had some nice clouds in the shot, and I didn't want to lose it, so I opened another copy, this time upping the exposure just to 1.5
Now I had my sky back!
The rest was simple -- just copy and paste the darker version on the lighter version and mask out the bird. It's very forgiving. You'll notice that when you over expose, you lose the edges of the wings. When you mask out the bird, you just mask out most of the way to the edges of the wings, not all the way. That way you get the wing tips back. You may notice they're a little darker, but I think it actually works quite well.
3 layers -- very simple editing -- and voila!
I played a little bit more with bringing up the shadows a tad, and then added a vignette. But that's all there is to it.
I hope this was informative instead of just rambling. :)
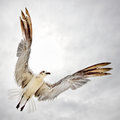
The finished product:
Message edited by author 2011-09-07 19:44:39. |
|
|
|
09/07/2011 07:41:07 PM · #2 |
Nice job Wendy. This really shows the benefits of shooting RAW.
Message edited by author 2011-09-07 19:41:57. |
|
|
|
09/07/2011 07:43:13 PM · #3 |
| Thanks for the info Wendy.. |
|
|
|
09/07/2011 07:44:16 PM · #4 |
| Hey what shutter speed did you use? With that lens could you have used a flash to fill in the bird and thus not having to use PS and CHEAT!!!!! :) |
|
|
|
09/07/2011 07:44:43 PM · #5 |
|
|
|
09/07/2011 07:46:20 PM · #6 |
Originally posted by LVicari:
Hey what shutter speed did you use? With that lens could you have used a flash to fill in the bird and thus not having to use PS and CHEAT!!!!! :) |
I've actually tried fill flash on the seagulls. The high speed flash doesn't work too well with it, and I need more than 1/250 sec most of the time. Also, the biggest problem is that the recycle time is way too slow, so you can't do multiple shots too easily.
Considering I took about 800 shots over two days, I would have burned out my flash. :D |
|
|
|
09/07/2011 07:47:38 PM · #7 |
| Thanks, Wendy! The use of two layers at different exposures explains a lot - it is not something I've done, nor would I have thought to do, as I cannot mask anything without it looking like a third grader trying to color within the lines and failing miserably to do so! Lovely to see how it is supposed to work!! |
|
|
|
09/07/2011 07:47:41 PM · #8 |
Originally posted by LVicari:
Hey what shutter speed did you use? With that lens could you have used a flash to fill in the bird and thus not having to use PS and CHEAT!!!!! :) |
oops -- wrong lens! It was the 10-22 not the 28-135. fixing... |
|
|
|
09/07/2011 07:49:05 PM · #9 |
| P.S. I'm even more impressed taht this was with the 10-22!! |
|
|
|
09/07/2011 07:49:37 PM · #10 |
Originally posted by Melethia:
Thanks, Wendy! The use of two layers at different exposures explains a lot - it is not something I've done, nor would I have thought to do, as I cannot mask anything without it looking like a third grader trying to color within the lines and failing miserably to do so! Lovely to see how it is supposed to work!! |
Birds are extremely forgiving. I can't mask other things to save myself, but luckily there really isn't that much detail to work with in birds. |
|
|
|
09/07/2011 07:50:51 PM · #11 |
Yes I agree with the hisync option as it loses power with hisync. BUT!!! You can still use your flash at a faster shutter speed than 1/250 and get results!
Especially shooting into the sun like that,there is enough light that your "black band" problem will be barely visible.
Try shooting at 1/500 and see what happens.
10-22!!? Thats awefully close to that bird. What did you do lay on the ground with french fries on you?
Message edited by author 2011-09-07 19:52:35. |
|
|
|
09/07/2011 07:52:17 PM · #12 |
Originally posted by LVicari:
Yes I agree with the hisync option as it loses power with hisync. BUT!!! You can still use your flash at a faster shutter speed than 1/250 and get results!
Especially shooting into the sun like that,there is enough light that your "black band" problem will be barely visible.
Try shooting at 1/500 and see what happens. |
Ooooh... intriguing! I'll give it a shot! |
|
|
|
09/07/2011 07:52:43 PM · #13 |
Originally posted by vawendy:
Originally posted by LVicari:
Yes I agree with the hisync option as it loses power with hisync. BUT!!! You can still use your flash at a faster shutter speed than 1/250 and get results!
Especially shooting into the sun like that,there is enough light that your "black band" problem will be barely visible.
Try shooting at 1/500 and see what happens. |
Ooooh... intriguing! I'll give it a shot! |
Won't it flatten things out a bit? |
|
|
|
09/07/2011 07:55:26 PM · #14 |
Originally posted by vawendy:
Originally posted by LVicari:
Yes I agree with the hisync option as it loses power with hisync. BUT!!! You can still use your flash at a faster shutter speed than 1/250 and get results!
Especially shooting into the sun like that,there is enough light that your "black band" problem will be barely visible.
Try shooting at 1/500 and see what happens. |
Ooooh... intriguing! I'll give it a shot! |
Even better that it was 10-22. If you are that close to the bird, then you can set your flash to a lower setting to fill, judging by th edistance and light i would say 1/8 power thus giving you much faster recyle times for burst shooting. |
|
|
|
09/07/2011 07:56:16 PM · #15 |
Originally posted by LVicari:
Even better that it was 10-22. If you are that close to the bird, then you can set your flash to a lower setting to fill, judging by th edistance and light i would say 1/8 power thus giving you much faster recyle times for burst shooting. |
Hah, I just PM'd her that suggestion :-)
R. |
|
|
|
09/07/2011 07:56:52 PM · #16 |
Originally posted by vawendy:
Originally posted by vawendy:
Originally posted by LVicari:
Yes I agree with the hisync option as it loses power with hisync. BUT!!! You can still use your flash at a faster shutter speed than 1/250 and get results!
Especially shooting into the sun like that,there is enough light that your "black band" problem will be barely visible.
Try shooting at 1/500 and see what happens. |
Ooooh... intriguing! I'll give it a shot! |
Won't it flatten things out a bit? |
Shouldnt if u get your flash off camera. Say off to one side of you, maybe righ tby your french fries :) |
|
|
|
09/07/2011 08:00:58 PM · #17 |
Fabulous work and info Wendy.
Bravo! |
|
|
|
09/07/2011 08:01:40 PM · #18 |
Originally posted by LVicari:
Originally posted by vawendy:
Originally posted by vawendy:
Originally posted by LVicari:
Yes I agree with the hisync option as it loses power with hisync. BUT!!! You can still use your flash at a faster shutter speed than 1/250 and get results!
Especially shooting into the sun like that,there is enough light that your "black band" problem will be barely visible.
Try shooting at 1/500 and see what happens. |
Ooooh... intriguing! I'll give it a shot! |
Won't it flatten things out a bit? |
Shouldnt if u get your flash off camera. Say off to one side of you, maybe righ tby your french fries :) |
Haha!! The real secret of the shot is....
cheeze-its!!
The seagulls like those much better than french fries or bread.
Although they liked the Parmesan foccacia ...
 (a failed stop motion, flash after dusk shot. I was taking the ferry across the river, and I had no seagull snacks. I had to give up my foccacia!!) (a failed stop motion, flash after dusk shot. I was taking the ferry across the river, and I had no seagull snacks. I had to give up my foccacia!!)
Message edited by author 2011-09-07 20:03:47. |
|
|
|
09/07/2011 08:03:25 PM · #19 |
Originally posted by Revecca:
Fabulous work and info Wendy.
Bravo! |
Yes Wendy, Fabulous work. I didnt mean to hijack. I was just thinking out loud. You have more opportunity to shoot these bids than I and
You seem to have a knack of getting the results so stick with what you are comfortable with. |
|
|
|
09/07/2011 08:05:36 PM · #20 |
Originally posted by LVicari:
Originally posted by Revecca:
Fabulous work and info Wendy.
Bravo! |
Yes Wendy, Fabulous work. I didnt mean to hijack. I was just thinking out loud. You have more opportunity to shoot these bids than I and
You seem to have a knack of getting the results so stick with what you are comfortable with. |
Thanks revecca and leo!
You didn't hijack the thread, Leo. I was posting this to help others -- I have absolutely no objection to being helped as well. :D
I like expanding my horizons, and trying different options. So I appreciate the info quite a bit.
This is why this site is so great! |
|
|
|
09/07/2011 09:31:21 PM · #21 |
Originally posted by Melethia:
Thanks, Wendy! The use of two layers at different exposures explains a lot - it is not something I've done, nor would I have thought to do, as I cannot mask anything without it looking like a third grader trying to color within the lines and failing miserably to do so! Lovely to see how it is supposed to work!! |
I have found Topaz Remask very useful. I used the free trial for a while and became convinced that the results were much better with less effort than working with a PS mask and brush. I finally gave in and paid for it. It works particularly well for things like hair, fur, and feathers, which are very hard to do convincingly by hand. |
|
|
|
09/08/2011 10:25:40 AM · #22 |
Originally posted by JuliBoc:
Originally posted by Melethia:
Thanks, Wendy! The use of two layers at different exposures explains a lot - it is not something I've done, nor would I have thought to do, as I cannot mask anything without it looking like a third grader trying to color within the lines and failing miserably to do so! Lovely to see how it is supposed to work!! |
I have found Topaz Remask very useful. I used the free trial for a while and became convinced that the results were much better with less effort than working with a PS mask and brush. I finally gave in and paid for it. It works particularly well for things like hair, fur, and feathers, which are very hard to do convincingly by hand. |
I downloaded it for a trial, but never used it. I should try it again. |
|
Home -
Challenges -
Community -
League -
Photos -
Cameras -
Lenses -
Learn -
Help -
Terms of Use -
Privacy -
Top ^
DPChallenge, and website content and design, Copyright © 2001-2026 Challenging Technologies, LLC.
All digital photo copyrights belong to the photographers and may not be used without permission.
Current Server Time: 05/04/2026 01:16:30 PM EDT.


