| Author | Thread |
|
|
02/07/2011 11:47:02 AM · #1 |
Does anyone know why one film type (Agfa CNS) can produce both cold (bluish) and then on a second roll (of the same type), warm (orange) prints? I thought film white balance came only from the film type... Does it come also from the type of developing?
Thanks :-) |
|
|
|
02/07/2011 11:50:28 AM · #2 |
| Were they shot in the same environment? Reflected light can effect the overall colour. |
|
|
|
02/07/2011 12:02:02 PM · #3 |
Originally posted by jeger:
Were they shot in the same environment? Reflected light can effect the overall colour. |
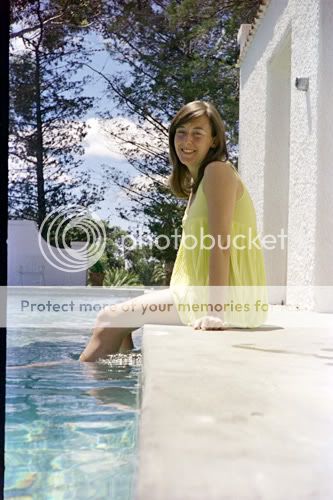
yep, shot in the same environment, all about the same time (1972/3). Only difference was the film roll. Here's a couple examples:

 |
|
|
|
02/07/2011 12:08:41 PM · #4 |
When were they processed? The cyan version looks like image degradation over time. If the two shots were stored in different conditions, that could account for the difference.
R. |
|
|
|
02/07/2011 12:35:42 PM · #5 |
OK. Sounds good. So should I normally expect film types to have the same white balance?
& forgot to add... The negatives were all preserved together. I wouldn't have thought there'd be differences in deterioration.
Message edited by author 2011-02-07 13:18:12. |
|
|
|
02/07/2011 01:52:32 PM · #6 |
One of the images seems to have been shot in open shade, the other in full sun. So that would make the color temperature of the light falling on the subject different. Shade tends to be a bit blue/cool.
The shadows suggest different times of day (sun nearly overhead by the pool, but long shadows in the other shot). This alters the color temperature of the available light as well.
The environments are different (white walls, light concrete, and reflective water at the pool, plants, rocks, soil in the other). This will affect the color temp of the reflected light in the environment.
Film, if I recall correctly, is extra sensitive to blue and uv light (hence the origination of UV/Haze filters)
Another variable with film is development: if one roll went thru development just before the chemicals were replaced, it could have been developed with more "exhausted" chemicals. Rolls developed right after chemical replacement will be in strongest chemicals. Unless going to a more specialized, pro lab with very good process controls, it was very possible to get a LOT of variation with film development. Process control (chemical mix/temperatures/times) can be significant players in the results, especially for consistency and repeatability.
Since these shots were on different rolls, the processing variable also comes into play. In these two shots, I could imagine that time of day/direct sun vs. open shade/environment/film-roll processing all had an effect. |
|
|
|
02/07/2011 02:20:46 PM · #7 |
Alright, that's viable: the open shade shot would have been much more blue int he first place. When the fading starts, it affects the red tones most. So the mostly-blue shot loses what little red it ever had, and looks very blue/cyan, whilst the much warmer shot still looks relatively warm. It has no excessive blues to dominate.
Still seems like normal age fading to me.
R. |
|
|
|
02/07/2011 02:32:40 PM · #8 |
I agree--it does seem that aging is present, too. Lord knows that I have shot images in one year, but "discovered" an unexposed roll more than a year later. Even though the event is from the same year, I suspect you are right, and one of the rolls was developed a bit later on down the road. If we are to assume that all rolls went in for processing together, then we have to find some other factors. Given only these two images, hard to say. Would be easier if we saw other images from the "blue" roll, and if direct sun shots are are also blue, aging is the primary cause.
1972. This is officially a Cold Case investigation. :-) |
|
|
|
02/07/2011 02:34:53 PM · #9 |
Originally posted by Medoomi:
Originally posted by jeger:
Were they shot in the same environment? Reflected light can effect the overall colour. |
yep, shot in the same environment, all about the same time (1972/3). Only difference was the film roll. Here's a couple examples:
|
This is why I asked about the environment. They were taken in different locations with different qualities of light. As other people have mentioned, one was shot in the shade, which might affect the overall colour. |
|
|
|
02/07/2011 03:01:06 PM · #10 |
Just another comment: yes, a film type is balanced for one type of light, and this is typically Daylight. But look outside during the day (morning, noon, late afternoon, near sunset, just after sunset) and notice the differences in "daylight". Add other factors, like open shade, overcast, smog, haze, etc., and you can see that effectively one is using a single white balance under widely varying conditions. In the DSLR age, we are used to the option of shifting WB to shade, sun, overcast, tungsten as needed. "Back in the day" we had to use filters, instead, along with choice of film type (there were variations between types: some did better skin tones, some did better greens, and there were tungsten balanced films available).
Some color view-camera photographer friends of mine in Arizona actually LOVED an overcast day best: the light was not as harsh/contrasty, softer shadows. They used varying degrees of warming filters to reduce or eliminate the bluish cast, often to the point that one would never guess it was a cloudy day at all. Some of the best flower images I have seen are done in open shade (or created shade) with warming filters. It appears to be direct sunlight in temperature, but the details are clear, no blown highlights or blocked shadows. (film, particularly color film did not have the latitude we enjoy with digital)
We all carried a lower strength warming filter for any shots at higher altitudes, since those shots would tend toward blue cast some simply due to the thinner atmosphere (more uv and bluer skies).
Message edited by author 2011-02-07 15:04:40. |
|
|
|
02/07/2011 04:21:28 PM · #11 |
Thanks for the input. It might not be obvious from the individual pics above, but seeing the whole films next to each other, the pics are noticably cool in the one, and warm in the other (for no noticable reason in the locations)
It's good to know there can be variation as I'll be doing the conversions from the film in a bit, and I didn't want to assume one white balance alone if there's going to be variation.
By the way, and someone might be able to help me here. My plan so far is to use vuescan for facilitating the conversions. It has presets for the various film negative types, and I'm hoping that there's some develop presets that may prove helpful in them. Any thoughts on that?
My hesitation is just that I'm dealing with Canon RAW... So, I'm not sure at what stage vuescan will apply the preset, or if this really matters at all. Any suggestions?
Message edited by author 2011-02-07 16:22:18. |
|
|
|
02/07/2011 04:51:40 PM · #12 |
I'm not sure either as to exactly what Vuescan's process flow is when using a RAW file as input. Obviously it has to demosaic the data first, then apply any data transformations required, including correcting for the tint in the film base stock. I don't know if, when processing for color negative film, if it corrects for the film base tint before or after inverting colors; I'd suspect before but I could be wrong.
Another open question is how Vuescan deals with the white balance of the RAW file. It probably cannot deal well with variation of WB setting in the camera, so I think it would be wise to lock down the WB in the camera when acquiring images. If I were setting up to do this, I would make a test exposure with no film in place and set a custom WB based on this exposure. This should compensate for both the temperature of the illumination and any minor color cast in the diffuser used, and lock down the WB across all exposures.
You probably also want to find a very light area of film stock to use as a reference for base stock color; I haven't experimented too much with this, but I think you can tell Vuescan what area of a file to use for this reference.
I'm interested in what you find to be the optimal process on this. I have some color negative film that will need to be "scanned" at some point. |
|
|
|
02/07/2011 05:09:48 PM · #13 |
Originally posted by kirbic:
I'm not sure either as to exactly what Vuescan's process flow is when using a RAW file as input. Obviously it has to demosaic the data first, then apply any data transformations required, including correcting for the tint in the film base stock. I don't know if, when processing for color negative film, if it corrects for the film base tint before or after inverting colors; I'd suspect before but I could be wrong.
Another open question is how Vuescan deals with the white balance of the RAW file. It probably cannot deal well with variation of WB setting in the camera, so I think it would be wise to lock down the WB in the camera when acquiring images. If I were setting up to do this, I would make a test exposure with no film in place and set a custom WB based on this exposure. This should compensate for both the temperature of the illumination and any minor color cast in the diffuser used, and lock down the WB across all exposures.
You probably also want to find a very light area of film stock to use as a reference for base stock color; I haven't experimented too much with this, but I think you can tell Vuescan what area of a file to use for this reference.
I'm interested in what you find to be the optimal process on this. I have some color negative film that will need to be "scanned" at some point. |
Thanks for the input. I agree that there's quite a few open questions. Another one to add to the mix is whether vuescan takes into account any camera profiles (I highly doubt it).
Which raises another question you might be able to help me with: If I were to convert the pics of the negatives into 16-bit tiff files (thereby being able to use the adobe camera raw camera profile for the camera, as well as a basic white balance to neutralize the base color of the film negative), would such tiff files be a better starting place to input into vuescan (it can take tiff's as well as raw's)? |
|
|
|
02/07/2011 05:26:33 PM · #14 |
Originally posted by Medoomi:
It's good to know there can be variation as I'll be doing the conversions from the film in a bit, and I didn't want to assume one white balance alone if there's going to be variation.
|
This is true with digital as well as film: any time the lighting changes, the color balance may have changed. If you are doing work where white balance is important or critical, any change to lighting warrants another gray card shot, for example. Adding a softbox to a bare strobe changes the color temperature. Time of day and type of daylight matters. I learned that my two different cameras don't respond the same, so I can't use the same white balance fix in post for all shots even in the same lighting, if I switched camera bodies. It is particularly pronounced from a D80 to a D90 as the sensors are different technology. I have not noticed a significant difference when changing lenses thus far, but I know of some photographers who have noticed it.
For a lot of stuff it is not a big concern, but for some things the extra test shots with a card or at least something consistent in the shots to "eyedrop" is important, and each time the lighting is changed, etc. is really valuable later.
I have not (yet) done film scanning, so how that comes into play is not clear to me. I'll be watching this thread, as I do plan to start scanning some old (and some new) film shortly. |
|
|
|
02/07/2011 06:28:01 PM · #15 |
Originally posted by chromeydome:
Originally posted by Medoomi:
It's good to know there can be variation as I'll be doing the conversions from the film in a bit, and I didn't want to assume one white balance alone if there's going to be variation.
|
This is true with digital as well as film: any time the lighting changes, the color balance may have changed. If you are doing work where white balance is important or critical, any change to lighting warrants another gray card shot, for example. Adding a softbox to a bare strobe changes the color temperature. Time of day and type of daylight matters. I learned that my two different cameras don't respond the same, so I can't use the same white balance fix in post for all shots even in the same lighting, if I switched camera bodies. It is particularly pronounced from a D80 to a D90 as the sensors are different technology. I have not noticed a significant difference when changing lenses thus far, but I know of some photographers who have noticed it.
For a lot of stuff it is not a big concern, but for some things the extra test shots with a card or at least something consistent in the shots to "eyedrop" is important, and each time the lighting is changed, etc. is really valuable later.
I have not (yet) done film scanning, so how that comes into play is not clear to me. I'll be watching this thread, as I do plan to start scanning some old (and some new) film shortly. |
yep, agreed. Sorry for not putting things more clearly. My mental process for conversion at least at the moment is the following
1) color correct for the DSLR used for scanning (5D2) eg. ACR camera neutral profile
2) color correct these result files (tiffs) for film peculiarities eg. vuescan
3) re-input tiffs into lightroom for final processing (I don't like vuescan's toolset for final developing/white balance).
-- but white-balancing all through the process so I don't clip color channels along the way (final processing will adjust for the white balance in scene changes).
I know the above process seems a bit redundant. At the moment I'm hoping vuescan has helpful conversion profiles for the various film types & the ability to output this alone without further conversions.
any thoughts?
Message edited by author 2011-02-07 18:32:01. |
|
|
|
02/07/2011 08:00:23 PM · #16 |
Originally posted by Medoomi:
...Which raises another question you might be able to help me with: If I were to convert the pics of the negatives into 16-bit tiff files (thereby being able to use the adobe camera raw camera profile for the camera, as well as a basic white balance to neutralize the base color of the film negative), would such tiff files be a better starting place to input into vuescan (it can take tiff's as well as raw's)? |
Well, I'll take a stab, but with a twist... If you were to bring the RAW files right into Lr, and convert them with a linear tone curve, you'd get conversions using one of the best available RAW processing engines. If you white balance using a light-and-diffuser-only test shot, and apply this WB to the negatives as well, your would also achieve nice consistency across the scans & conversions. Now you now could export as 16-bit TIFFs and let VueScan do the base stock correction and reversal. Once you have done that on a few images, you just might be able to create a Lr preset to do the same job, and at that point your workflow becomes very simple. Creating the Lr preset might be as simple as picking the eyedropper for WB and selecting a clear part of the negative... but I suspect not. |
|
|
|
02/07/2011 08:21:50 PM · #17 |
Originally posted by kirbic:
Well, I'll take a stab, but with a twist... If you were to bring the RAW files right into Lr, and convert them with a linear tone curve, you'd get conversions using one of the best available RAW processing engines. If you white balance using a light-and-diffuser-only test shot, and apply this WB to the negatives as well, your would also achieve nice consistency across the scans & conversions. Now you now could export as 16-bit TIFFs and let VueScan do the base stock correction and reversal. Once you have done that on a few images, you just might be able to create a Lr preset to do the same job, and at that point your workflow becomes very simple. Creating the Lr preset might be as simple as picking the eyedropper for WB and selecting a clear part of the negative... but I suspect not. |
aaah, cool suggestion--I didn't think about the medium contrast curve that LR applies by default.
I appreciate also the suggestion to create a LR preset. My thoughts went to creating a camera "profile" (applied in the calibration tab of LR), but I would probably stick to the "camera standard" profile for getting neutral processing of the negative from the 5D2 (without trying to convert it to the positive).
My thinking is that LR uses a bit of approximation in it's generation of camera presets anyway (ACR resorts to matrix profiles, rather than LUT profiles). So there is going to be a bit of inaccuracy in the conversion straight out the camera. Add to this my own inability to approximate the response curve of the color conversion of each film type (eg with the DNG Profile Editor) and it will be a complete nightmare...
But there's a fair bit of redundancy in the process I'm thinking. I'm just trying to find the best conversion method so all that remains are my mistakes (eg. I accidentally vignetted all the images by the design of my backlight, so that's going to need correction anyway).
Speaking just about getting a neutral image out of the RAW file (before converting the film types into positives)... I assume that I should set the black clipping to 0 huh?
Anything else come to mind? |
|
|
|
02/07/2011 08:30:29 PM · #18 |
Originally posted by Medoomi:
Speaking just about getting a neutral image out of the RAW file (before converting the film types into positives)... I assume that I should set the black clipping to 0 huh?
Anything else come to mind? |
I'm thinking that leaving the black clipping at the default might not be bad, but moving it to zero would certainly be the conservative approach. One could then re-adjust it inward (almost certainly necessary) during final processing of the image.
FWIW, your one conversion (the shot at poolside) is exceptionally well balanced, so if you can achieve that with even one shot, I think you are bound for some good results. The other conversion is very cyan-heavy, in addition to looking "cool" due to the open shade. I too suspect that some color degradation has gone on. |
|
|
|
02/07/2011 09:42:43 PM · #19 |
Originally posted by kirbic:
FWIW, your one conversion (the shot at poolside) is exceptionally well balanced, so if you can achieve that with even one shot, I think you are bound for some good results. The other conversion is very cyan-heavy, in addition to looking "cool" due to the open shade. I too suspect that some color degradation has gone on. |
thanks, and yeah, I can't wait to get the details nailed as I think most conversions should come out quite nice in the end. |
|
|
|
02/07/2011 10:28:37 PM · #20 |
Well fudge. Since I just happened to be sorting through some old film prints, I pulled out one of the negative strips and experimented a little. I set a custom "blank" white balance for my illumination (a halogen bulb) and then shot one of the negatives. I brought this directly into Lr to see if I could set up a one-stop-shopping conversion. I was defeated. The biggest impediment to doing this is the fact that Lr does not implement RGB curves. You can invert, but you cannot move the Red, Green and Blue curves independently of each other. So you can get close to a good positive image, but you cannot get rid of the blue color cast from the orange base stock. :-P
ETA:
Exported a linear conversion out of Lr to 16-bit TIFF. Used as input to Vuescan. Selected "Color Negative" as the media under the Input tab, then selected the negative vendor, brand and type under the Color tab. Selected the "Auto Levels" option for color balance in the Colors tab, and only had to tweak a couple settings for a near-perfect color conversion.
Message edited by author 2011-02-07 22:48:36. |
|
|
|
02/07/2011 11:22:05 PM · #21 |
Originally posted by kirbic:
Well fudge. Since I just happened to be sorting through some old film prints, I pulled out one of the negative strips and experimented a little. I set a custom "blank" white balance for my illumination (a halogen bulb) and then shot one of the negatives. I brought this directly into Lr to see if I could set up a one-stop-shopping conversion. I was defeated. The biggest impediment to doing this is the fact that Lr does not implement RGB curves. You can invert, but you cannot move the Red, Green and Blue curves independently of each other. So you can get close to a good positive image, but you cannot get rid of the blue color cast from the orange base stock. :-P
ETA:
Exported a linear conversion out of Lr to 16-bit TIFF. Used as input to Vuescan. Selected "Color Negative" as the media under the Input tab, then selected the negative vendor, brand and type under the Color tab. Selected the "Auto Levels" option for color balance in the Colors tab, and only had to tweak a couple settings for a near-perfect color conversion. |
haha--sounds like fun!
I think you might be able to do a conversion profile if you used the dng profile editor, but that works best with the 24 patch macbeth chart... (just a thought).
By the way, could you figure a way to output Vuescan without alteration. I'd much prefer doing the final step of black clipping & exposure/tone curve in LR. I'm guessing the "manual" setting might be the trick, but I'm not sure what the bells & whistles do... Any idea?
Message edited by author 2011-02-07 23:22:45. |
|
|
|
02/07/2011 11:48:45 PM · #22 |
Originally posted by Medoomi:
By the way, could you figure a way to output Vuescan without alteration. I'd much prefer doing the final step of black clipping & exposure/tone curve in LR. I'm guessing the "manual" setting might be the trick, but I'm not sure what the bells & whistles do... Any idea? |
I have had a play with the "Manual" mode in Vuescan, and actually I liked this better than my previous conversion. I do recommend doing some black and white point adjustment in Vuescan, and adjusting the "Netural red", "Neutral green" and "Neutral blue" as well as the brightness sliders for the individual colors. Once optimized for a particular set of negs, you should be able to use the same conversion for all.
For final tweaks to the tone curve, I'd use Ps, not Lr specifically because the curves tool in Ps is much more flexible (RGB curves, not just luminance). |
|
|
|
02/08/2011 12:18:29 AM · #23 |
Kirbic, talking about the orange/blue issues from the film color. Actually had my scanner refuse some night shots so i just manually scanned them. Invert and levels (manual sample on black) works every time. Not to mention if your able to scan past the expected frame area you can expect the film to be a black point as well. I have a Canon 8600F flat bed with the film attachments (light section built in) I love it, but its not perfect, no where near pro quality.
|
|
|
|
02/08/2011 07:56:35 AM · #24 |
| Yep Rain, I think your process sounds like it should do the trick... but if I were scanning directly with a flatbed (or film scanner) I'd just use Vuescan, which can be quickly configured to do the job. There are several of us that "scan" using a DSLR, though and it would be outstanding to be able to do the job properly right in Lr. We just haven't figured out a process that really works. I do believe it is possible, but the tools that are there (and not there) make it more difficult than it should be. |
|


