| Author | Thread |
|
|
07/16/2010 12:49:11 PM · #1 |
Hey all,
I know that part of the solution is to shoot at as low an ISO as possible. However in this instance, an ISO of 320 didn't seem too high, moving subject and all with variable sun/cloud for lighting. F5.6 and shutter speed 1/320, shot with the 18-200, wb set for cloudy.
I probably exposed off of the horse's face or an area of sunburned black on her body. She looks fine in colour 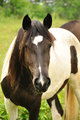 albeit a bit washy, but once I began doing basic PS and desaturated her, the hollows of her all-black ears began to cause problems. albeit a bit washy, but once I began doing basic PS and desaturated her, the hollows of her all-black ears began to cause problems. 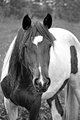
Any helpful suggestions greatly appreciated! |
|
|
|
07/16/2010 12:54:37 PM · #2 |
| Look at your color channels to see if there's more info in one of them. If so, you can use that channel for b/w on the ears. Copying the image layer, setting to Screen, and masking can help. Also topaz does a great job of pulling detail out of dark areas. |
|
|
|
07/16/2010 01:04:00 PM · #3 |
Originally posted by mycelium:
Look at your color channels to see if there's more info in one of them. If so, you can use that channel for b/w on the ears. Copying the image layer, setting to Screen, and masking can help. Also topaz does a great job of pulling detail out of dark areas. |
Sounds like it might work...oops forgot to mention my PS skills (PS CS2) are pretty minimal...where do I find color channels? Generally I don't use masks or layers. |
|
|
|
07/16/2010 01:06:00 PM · #4 |
Might want to try shadows/highlights and see if that will work to lighten the shadow area.
|
|
|
|
07/16/2010 01:08:58 PM · #5 |
Um... color channels... one of the tabs off the layer palette. Or click the background layer and hit ctrl + 1, 2, or 3.
Don't be afraid of layers and masks! They are absolutely the key to making Photoshop really work, and although some of it is complex, basic masking is as simple as using the brush tool in black and white. |
|
|
|
07/16/2010 01:12:51 PM · #6 |
Originally posted by mycelium:
Um... color channels... one of the tabs off the layer palette. Or click the background layer and hit ctrl + 1, 2, or 3.
Don't be afraid of layers and masks! They are absolutely the key to making Photoshop really work, and although some of it is complex, basic masking is as simple as using the brush tool in black and white. |
Ok, thanks! Guess I'll be needing to borrow that PS CS2 book I gave someone! :-) |
|
|
|
07/16/2010 01:38:38 PM · #7 |
| There are at least two or three tutorials on using masks in the Tutorials section ... layers and masks are indeed a key to using PS effectively and non-destructively; without them, you may as well be using Photoshop 2.0 ... |
|
|
|
07/16/2010 01:49:14 PM · #8 |
Originally posted by GeneralE:
There are at least two or three tutorials on using masks in the Tutorials section ... layers and masks are indeed a key to using PS effectively and non-destructively; without them, you may as well be using Photoshop 2.0 ... |
Thanks, will definitely be checking them out. Meanwhile,  vawendy's suggestion has helped a lot and easy enough for me to understand! :-) vawendy's suggestion has helped a lot and easy enough for me to understand! :-) 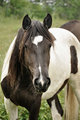 Did a magic lasso on the individual ears, took em down to 17%, then did a whole-pic sh/hi before twiddling brightness/contrast, saturation, etc. Did a magic lasso on the individual ears, took em down to 17%, then did a whole-pic sh/hi before twiddling brightness/contrast, saturation, etc.
Message edited by author 2010-07-16 13:54:55. |
|
Home -
Challenges -
Community -
League -
Photos -
Cameras -
Lenses -
Learn -
Help -
Terms of Use -
Privacy -
Top ^
DPChallenge, and website content and design, Copyright © 2001-2026 Challenging Technologies, LLC.
All digital photo copyrights belong to the photographers and may not be used without permission.
Current Server Time: 04/30/2026 03:45:46 AM EDT.


