| Author | Thread |
|
|
03/21/2010 10:56:06 AM · #126 |
Originally posted by jbsmithana:
Originally posted by davidw:
I'll be watching this thread, thank you for taking the time. I've had some luck, and this thread should help me have some more!
 |
I must have missed this 1st time around. I love these funny eagle shots. Here is one of mine, they should get together.
 |
LOL - here's another bird with imperfect grooming techniques:
|
|
|
|
03/21/2010 01:49:09 PM · #127 |
Light Matters
Let’s talk a bit about light in general. We all know about the great light of early morning and early evening when the light is warmer, at a lower angle and how it will enrich the colors in your shot. We also know that midday light on a sunny clear day is harsh, cool and full of contrast and shadows. So it goes without saying that we should be out there early to try take advantage of that good warm light. But if you are like me that does not always happen and midday is the time you have. Does this mean that you can’t make good shots? Not at all. On bright cloudy days or days with light overcast you can shoot all day and get great detail in your images. Light overcast is like having one big softbox hanging over your subject all the time. And if you can choose wisely you can even get good shots on bright sunny days.
The secret is in how you orient yourself to the light and the subject and the adjustments you make in your exposure. Most of the time it is good to try and have the light source at your back making the subject front lit. This reduces the strong shadows that occur when the light is harsh. This is not always possible as birds like to face into the breeze and it may not be blowing from your back. If you have side lit or back lit subjects try to have a dark background as it will help assure the bird or animal is rim lit and that it stands out. In harsh strong light a little plus exposure compensation will work to add a bit of detail to the shadowed side of the subject. Of course you need to be careful it the lit side is white so that it does not blow out. A little experimenting and using your screen for blinkies and the histogram will help. In all cases you want to at least try and have some of the light catch the eye of the subject. It is not always possible to get catch light in the eye, as in backlit subjects, so for those you want to accentuate the rim lighting with the dark background as mentioned, the rim light then becomes the emotional component of the shot.
Another time to use a bit of plus exposure compensation is fog. Fog shots of birds, especially groups of birds, can be surreal. To get the fog to look white instead of gray you need to increase exposure, say plus 1 or so.
Shooting at midday in strong light will cause the color to get a little cooler. In the old days you could add a warming filter, and still can. But today, even when we shoot in the harsher and cooler light of mid day, we have the ability to add back a little warmth during post processing.
What you should come away with here is to think about the light you see through your viewfinder. How is going to affect your subject? How can you adjust for the negative effects the light is going to have on the subject? Can I move to a better position or should I increase or decrease exposure? When you start thinking of the light source and its impact on your subject you will know what needs to be done and adjustments will become automatic, eventually, hopefully.
Silhouettes
My preference for silhouette photography is a telephoto and a sunset / sunrise so that I can isolate and compress the subject to the sunset and grab the richest colored area. But you can take shots with wider lenses as I’ve done with these two I just happened to have on DPC already:
 
Silhouettes require strong backlight, like that found in a sunrise and sunset. Fortunately birds and some animals, especially herd animals, congregate at sunset and can make dramatic images. Flocks of snow geese take off from the fields in unison every night around sunset and go to the water for the night. Starlings swarm in large flocks at sunset. Lone herons and many other water birds hold out in shallow water until the last light of day, looking for that final meal before roosting. You just have to know your area and where they are. Figure out the spot where you can be so they are between you and the sunset / sunrise. Prepare and wait for the drama to unfold. Sunsets are all unique and they change colors from reds to oranges to yellows to purples. Clouds influence the drama sometimes creating a band just the right density that you can look right at the sun as it sets.
Exposure settings for silhouettes and sunsets / sunrises are not hard and there is no real right or wrong answer. The darker the image the more drama it may have so I often leave my camera on matrix metering and set a -1 to -2 exposure compensation. I check my screen image and histogram and then adjust from there as needed. You can also use spot metering in this instance and choose a place on the image that gives you the result you want, darker or lighter. Color silhouettes are purely a personal thing so experiment and see what you like. The one rule is that the subject should have a lighter background so they stand out. You might have to move around a bit or wait for them to move so that they do not have a shadowed or dark background. If the sun is going to be in the frame then a great shot combines the subject and the sun if possible. That could be either a bird in flight with the sun in the background or an animal or bird in reflected water with the sun in the frame behind them.
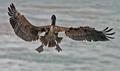
I’ve talked about silhouettes using the setting or rising sun but you can use the technique for other shots as well. An example are these two shots of a bald eagle returning to it’s roost after a failed attempt hunting with the ducks in the background. These were shot during the bright part of the afternoon and I was going to throw them out but ended up playing around and making them into silhouettes and kept them. They are not great shots for a variety of reasons but I could not bring myself to throw them out. When looking through some of my old photos I thought they would give you ideas you could use to play with.
 
Note of Caution
When including the sun in your frame make sure the sun is very low on the horizon and preferably has haze, fog or clouds to mute it a bit. If you use a long lens and look directly into the sun for even a short time you can do serious damage to your eyes. BE CAREFUL!
A Bit More On Flash – High Speed Flash with a Speedlight
The main reason I use flash is for fill light. Filling with a muted flash can bring an image to life and should not be obvious to the viewer. Today’s flash heads like the Nikon and Canon Speedlights work in sync with today’s DSLR’s to provide a very powerful tool for using fill lighting. And they do not necessarily slow your shutter speed to the cameras maximum flash sync speed (1/250th with my D300) as some have already talked about in this thread. Speedlights like the SB-600, SB-800 and SB-900 for the Nikon and I’m sure the higher end Speedlights for Canon are capable of High Speed Sync. If your DSLR is capable, and likely yours is, you set High Speed Flash Sync in your camera. In my Nikon it is called Auto FP High Speed Sync and is found in Menu e1, Flash Sync Speed. I keep my camera set to Auto FP mode and can then use my flash even at the highest shutter speed available, 1/8000th. Look in your manuals for a High Speed sync mode and learn how to use it as it will open many more opportunities for you.
When using fill flash I normally set my flash compensation to between -1 and -2 in order to minimize the harshness of the flash. It will vary depending on the subject as a light colored to white bird needs less flash than a dark to black bird. Black sucks up light so you can use more to bring out the feather detail. White birds in a dreary but otherwise light environment need less flash but benefit from some as it brightens up the white feathers. In all cases it adds a bit of catch light to the eye and brings out more color, which is always good. In addition , fill flash will tone down the shadows when shooting in the woods where dark bird feathers can get lost and be without detail.
The downfall of flash is that you can not shoot in high burst modes as the flash just will not keep up with you. But there is one addition you can make that will help in this area, a flash extender. Flash extenders like the Better Beamer and others not only increase the flash output to add distance but they save on battery life and reduce the recycle time of the flash. I have been able to get off two or three shots this way before the flash dies off on me and the exposure begins to suffer. The downfall of course is that they are a pain to carry around so I seldom use them. I do however use my SB-800 Flash often.
Assigment
You get to go out and do a bit more shooting! Aren’t you lucky? The best way to learn is to go out and experiment. Building on what you have already done with exposure compensation and flash go find yourself another subject. This time pay closer attention to the light. Take your time and think about what parts of the subject will be well exposed and which will not be. What direction is the light coming from? Is the subject front-lit, side-lit or backlit? Now think about what adjustments you can make to improve the situation. Think about how your metering system is seeing the scene. Try exposure compensation to improve shadow detail or to punch up a flat scene.
If you can get out at sunrise or sunset look for an opportunity to try a silhouette.
If you have a Speedlight and can do high speed flash sync get out your camera and flash manual and figure out how to use it. Go out and play with it a bit.
Next Lesson
How to Get Sharper Images and maybe Composition.
|
|
|
|
03/21/2010 02:07:53 PM · #128 |
I apologize that I've been pre-occupied and haven't done my bird homework yet...
I've been momentarily side-tracked on another project. (YIKES!)
But not to worry...I still have plenty of questions to pester you with!
Ohhh  Artifacts!......Steve, Dear...so wonderful to see you posting here and causing some mischief and mayhem...;-) Artifacts!......Steve, Dear...so wonderful to see you posting here and causing some mischief and mayhem...;-) |
|
|
|
03/21/2010 02:21:43 PM · #129 |
Originally posted by hihosilver:
Ohhh Artifacts!......Steve, Dear...so wonderful to see you posting here and causing some mischief and mayhem...;-) |
Should be merrily photographing landscapes, wildflowers and bugs right now in southern California on my way to points east and north but since I'm not I might as well be me.
I still remain in a conundrum over this bird/wildflower release form controversy you started. Now I don't know what to do.
Message edited by author 2010-03-21 14:22:22.
|
|
|
|
03/21/2010 02:27:11 PM · #130 |
Originally posted by hihosilver:
I apologize that I've been pre-occupied and haven't done my bird homework yet...
I've been momentarily side-tracked on another project. (YIKES!)
But not to worry...I still have plenty of questions to pester you with!
Ohhh Artifacts!......Steve, Dear...so wonderful to see you posting here and causing some mischief and mayhem...;-) |
No problem with the homework, I'm not grading you know. My hope is that this outline will be here for people to use in the future and they can get out and play when they can. We all have other lives and that is why I keep plowing through this at a fairly good clip. You see I want to try and go down and meet up with that "mischief and mayhem" lad right after I finish a class I have to put on at the end of the month.
But fear not as even when I'm done posting the lessons I will keep visiting the thread to follow up, look at everyones work and make useless comments or even anwser questions! |
|
|
|
03/21/2010 03:01:12 PM · #131 |
Contrary to how it looks, I have been paying close and serious attention to this discussion.
Though I don't expect to take lots of bird, I now have wildlife capable equipment and plan to use it for that purpose this spring and summer. The lessons and discussion points here geared specifically to birding applies to land based wildlife as well and I read it in those terms.
There have been many wildlife opportunities I missed that I now hope to capture.
|
|
|
|
03/21/2010 03:31:49 PM · #132 |
Today is a dark drizzling, gray day. I decided it was great for an example of High Speed Flash so I picked up my camera, set it to Shutter Priority, 1/500th of a sec, ISO 800, turned on my flash (which is already set for high speed mode), opened the window of my office and shot handheld the first three birds that came within range around my feeders, about 20-25 feet. Here are the results with the only editing being small crop and save as a .jpg using LR2 set to Screen Sharpening / Low.
  
A Few Notes:
I know I said I use Aperture Priority most of the time and I do, really. But when I use High Speed Flash I sometimes switch to Manual or Shutter Priority. In this case I should have used Manual because I could have dialed open the aperture to about 7.1 on one or two of them and gotten a higher shutter speed. Most times when I do High Speed Flash I set the shutter speed I want and set the aperture to F7.1 or so and then take a test shot. From there I make an adjustment and then go about firing away. With all this confusion I should say that you can just leave your camera on Aperture Priority and sometimes I do, I'm just so unpredictable! Like I said it is whatever works for you as long as you understand the concepts.
Also, in this case I used no Exposure Compensation as after one shot I saw it was not needed. This is the way I normally work, by taking a test shot and seeing what the conditions give me. Then based on the results and the subject I make an exposure compensation setting. What I have been giving you in the lesson plans are starting points for you to try. Each camera metering system is different and you need to experiment. It is also always a good idea to take a test shot if you can.
All these shots can be perked up a bit in processing but I wanted to show you as close to out of camera as possible.
Message edited by author 2010-03-21 15:48:39. |
|
|
|
03/22/2010 05:26:18 PM · #133 |
How to Get a Sharp Image
You can cover this topic in one sentence. If you start with a quality lens, use a sturdy tripod, shoot at a low ISO and high shutter speed, and use good technique you will get a very sharp image. That is it in a nutshell. So go out there and spend big bucks on a fast long lens and a heavy duty carbon fiber tripod and then wait for a nice bright day, or heck why not fly to Florida while we are spending the big bucks, and find ourselves a beautiful brightly colored bird and shoot away. But the reality is that we do not all have the greatest equipment or the best of weather. So what do we do? Let’s look at the components of a razor sharp image individually.
Lenses and Teleconverters
There is no question that with lenses you get what you pay for. If you have ever used a professional high quality lens then you know what I’m taking about. With all other components being equal you can not get as sharp an image with a cheaper lens versus a top of the line lens. I once owned the Nikon 70-200 F2.8 VR lens and it produced some of the sharpest shots in my portfolio. It also gave me beautiful soft out of focus areas, great color and more control over DOF due to it being faster glass. Unfortunately for me I sold it to buy a longer lens. Although I can get sharp images with my Nikon 80-400 F4.5-5.6 VR, using good technique, they do not compare to the 70-200.
Same goes for teleconverters. If you want to get razor sharp photos when using a TC you better start with a high quality one, preferably made to match the lens you’re using. And you better mate it to a fast piece of glass. Technique will help but the more components you put in the mix that are not quality the less chance you will have for that razor sharp shot.
I never use filters to protect my lens as many people do. They will always degrade the image to some extent. This is especially true if you are using one on a long lens. Think about it. The manufacturer puts much research into creating a lens that normally has many elements of glass put together in groups, each to obtain the highest quality image possible. You adding an additional piece of glass to the end of the lens was not part of that equation.
Now I know that we all can’t afford to go out and buy the multi-thousand dollar long telephotos lenses to shoot wildlife and birds. If you can great, as they can not be matched for giving you the opportunity to get the highest quality bird /wildlife shots possible. But we can keep in mind the “you get what you pay for” message. Buy the best glass you can possibly afford from the start as it is money better spent in the long run.
A Note on Focus
Before going out to shoot you should assure your camera / lens combo is focusing properly. If you use the diopter to adjust your viewfinder check it to make sure it is set properly for your shooting eye. Do this by removing the lens cap and turning on your camera. Now while looking through the viewfinder look at the focus points and the data display within the viewfinder, not the scene outside. Adjust the diopter knob until the display data and focus points are as clear as you can get them. You may have to hit the focus button slightly to get the display data to come on. Once they are clear your diopter is set. Take a look at the knob and note the setting position for future reference.
Checking the autofocus system is simple but a bit time consuming. There are a variety of test methods you can use to check the autofocus on the camera to assure yourself it is focusing properly. If you do an internet search of Camera Focus Test or Camera Focus Chart you will find many examples of how to do it. Once you are assured your camera / lens combo focuses properly and that what you see through the viewfinder looks in focus to you then your set to go out. The reason this is important is that if you have to switch to manual focus you want to be assured that you’re getting a true focus based on what you see.
As I have stated before the autofocus systems in modern cameras are very good. However, like everything else in photography it all depends on the light. A lens that lets in more light will focus better than one that does not. So again, lens quality helps or hurts here. In addition the focus point you choose can make a difference. Normally the center focus point is the most accurate and as light drops it is always a good idea to use it. That does not mean to not use the other focus points for composition purposes as they are very helpful when you do not want to recompose a shot after locking focus. Without going into the technical reason why (as I do not understand it that well myself) there is an argument that when using very narrow DOF settings that recomposing throws off your focus.
How to Release the Shutter
There are a number of ways to release the shutter; cable releases, electronic releases, timers and manual. Even with long lenses you can and should use manual as long as the shutter speed is at or above 1/60 second. Obviously if you are using a long lens and the shutter speeds get that low you better be using a tripod. To do this you hold the camera firmly in your right hand with your finger on the shutter trigger, press your cheek against the camera back and place your left hand or forearm across the barrel of the lens directly over the tripod. You’re now adding part of your body weight to the camera / tripod setup which in turn adds stability and dampens vibration, including shutter slap. When the subject is in the position you want it roll your index finger over the shutter release. It works well and is a better system than using a timer (who knows what the subject will do) or even a cable release (because you no longer add your mass to the platform to stabilize it). I like it because it gives me more direct control and makes me feel in tune with the shot.
Cable releases, mirror lock-up and remote releases all have their place. For me they lie in that very slow shutter range, less than 1/60th with a telephoto, or when using a 500 or 600mm lens with a TC and a shutter speed less than say 1/125th. Even then you need to add weight in order to add mass to the tripod unit to help reduce vibration.
Shutter Speeds
Your subjects seldom stand still so the answer to subject movement is shutter speed. Famed bird photographer Arthur Morris once wrote the following:
“Always choose the fastest shutter speed that the lighting conditions and film speed (insert acceptable ISO) will allow by working aperture priority and choosing your lenses largest opening. At 1/1000 sec or faster almost all motion will be frozen. At 1/750 or 1/500 sec most movement will be frozen, but images of flapping wings may exhibit blurred wingtips. At 1/350 and 1/250 sec some blurring of moving birds may result and with shutter speeds of 1/125 sec or less blurring due to subject movement will most surely occur.”
He also states that “ at 1/500 sec or faster, getting relatively sharp images with a handheld 400mm lens should be routine.” I do not have the steadiest hands I find that to be true as I use a 400mm lens often. Today, with VR I can even get it lower than that, maybe as low as 1/125 and sometimes less in the right conditions.
Something to note is that with a constant shutter speed blur due to subject movement decreases as the distance between you and the subject increases. That is to say that if you shoot a bird flying at 50 feet using 1/30 sec it will likely be blurred. If you shoot the bird or a flock of birds flying at 200 feet using 1/30 sec they are more likely to be relatively sharp. This comes in handy when shooting those silhouettes of a flock of birds in dim light right after sunset.
Depth of Field
DOF has an effect on sharpness. For most bird and wildlife photography shooting wide open is a good thing as it isolates the subject and blurs the foreground and background. But sometimes you will need to make adjustments and close down that aperture a bit. You may want to get the whole bird in focus and you can only manage the head wide open. You may be shooting a flock of birds, in what is called a birdscape, so you will want a very deep DOF like most landscapes.
One rule to remember is that as a given aperture DOF decreases as subject to camera distance decreases. What this means in practical terms is that if you are shooting wide open with a long lens and are at minimum focus distance your DOF will likely be very narrow. In this case in order to get more than one eye of a subject that close in focus you will have to close your aperture to F8 or so. This will of course slow down you shutter so remember the use of high speed flash for fill.
You will also have to shoot at higher apertures if you’re shooting a pair of birds as it is seldom that they are on the same plane. In this case you may have to go as high as F11. As mentioned previously if it is a flock of birds you may stop down even further, maybe F16 or more.
Tripods and Ball Heads
I’m not going to go into much detail about tripods and heads. As I stated in an earlier lesson you can find many threads on DPC talking about different tripods systems. Suffice it to say that if you are shooting long lenses you should be using a tripod, a heavy duty one. There is no substitute for them if you are shooting super telephoto lenses and using TC’s. Even with image stabilization it is just very difficult to hold all that weight and size.
An option with image stabilized lenses is to use a monopod with a ball head. This is my preferred option even though I only shoot up to 400mm and can handhold. I use the same technique of holding the camera on the monopod as I explained for the tripod earlier.
A couple of notes about ball heads: Buying a heavy duty quality ball head so that you do not get any creep after locking the ball after framing. Cheaper heads used with heavy lenses will almost always creep so that what you framed is no long there after locking it off. Also, you do not always have to lock the ball down. As a matter of fact I often do not. I want to have the ability to constantly make small changes to composition or follow the movement of small birds. Even on larger birds I often do not as they may be moving, even slowly or suddenly flap their wings or nab a fish or whatever. I want to be able to adjust. The key is that the ball head must be able to adjust the tension. You do not want the ball to be completely loose or you have no stability but you also do not want it locked down tight.
Assignment
1. If you use the diopter take a moment to reset it using the technique I outlined.
2. If you are unsure of your autofocus with the lens you use test it to assure autofocus is accurate.
3. Go out and take some shots using your tripod and /or monopod. Try using the technique I outlined here to see if it makes you feel more stable.
Next lesson we get into what to look for in composition and action shots. |
|
|
|
03/22/2010 05:51:53 PM · #134 |
I'm outta my league here......I may try to do something down the road, but this just isn't working for me now, especially with some time constraints that I have with my work. Have a good time, people, I just wish I could follow along.
|
|
|
|
03/22/2010 05:55:22 PM · #135 |
| Assignment 2: Nikon D300 adjusts camera for lens attached, for back focus or minor focusing errors. Just for info of others, as D700 and other models will do the same. |
|
|
|
03/22/2010 06:09:45 PM · #136 |
| Uhmm will a D90 and an 18-200 suffice? That's all I have for birdy shots right now! |
|
|
|
03/22/2010 08:06:17 PM · #137 |
Originally posted by SteveJ:
Assignment 2: Nikon D300 adjusts camera for lens attached, for back focus or minor focusing errors. Just for info of others, as D700 and other models will do the same. |
This is correct but I'm trying to stay with the shooting part instead of all the tech stuff. Next lesson we move on to nothin but shootin! |
|
|
|
03/22/2010 08:07:31 PM · #138 |
Originally posted by snaffles:
Uhmm will a D90 and an 18-200 suffice? That's all I have for birdy shots right now! |
You can get decent shots with it and have fun trying. I mean it is not a true birding lens but most of us can't afford a "true" birding lens anyway.
Message edited by author 2010-03-23 19:56:10. |
|
|
|
03/22/2010 08:08:13 PM · #139 |
Originally posted by NikonJeb:
I'm outta my league here......I may try to do something down the road, but this just isn't working for me now, especially with some time constraints that I have with my work. Have a good time, people, I just wish I could follow along. |
Jeb don't go! I was almost to the rusty old cars part! |
|
|
|
03/22/2010 09:35:56 PM · #140 |
Jeb's kind of bird : )
Rusty Balckbird Wiki
|
|
|
|
03/22/2010 09:50:46 PM · #141 |
Originally posted by NikonJeb:
I'm outta my league here......I may try to do something down the road, but this just isn't working for me now, especially with some time constraints that I have with my work. Have a good time, people, I just wish I could follow along. |
Originally posted by jbsmithana:
Jeb don't go! I was almost to the rusty old cars part! |
LOL!!!
I came to the awful realization last night after being out & about for the better part of six hours that I didn't for even one minute think about birds. I put about 100 miles on the car doing one of my "circuits" that I do when I'm looking for cool stuff, and I should have been looking for birds.
Epic fail.......8>(
|
|
|
|
03/22/2010 10:16:01 PM · #142 |
Shoot birds on rusty trucks, trains, and cars?
|
|
|
|
03/23/2010 09:30:57 AM · #143 |
Great job, J.B. This quote: "But when all is said and done they(70-200) are just not long enough for serious bird / wildlife photography and if they are all you carry you find yourself wanting eventually." describes me. I always feel guilty because it's a great lens...just not quite enough.
Thanks for sharing your knowledge.
edit: I've got some catching up to do! You are moving right along with your lessons. Did I see homework assignments?
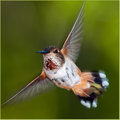
The only bird shot I've taken this year: Actually, I've not taken much of anything this year. :( Actually, I've not taken much of anything this year. :(
Captured on tripod through the window. Manual, F2.8, 1/6400, ISO 200, focal 200, eval metering, high speed continuous.
Message edited by author 2010-03-23 10:55:48. |
|
|
|
03/23/2010 10:58:01 AM · #144 |
Originally posted by Marjo:
Great job, J.B. This quote: "But when all is said and done they(70-200) are just not long enough for serious bird / wildlife photography and if they are all you carry you find yourself wanting eventually." describes me. I always feel guilty because it's a great lens...just not quite enough.
Thanks for sharing your knowledge.
edit: I've got some catching up to do! You are moving right along with your lessons. Did I see homework assignments? |
Thanks Marj.
Yes but I would not call what I'm assigning home work, more like fieldwork with nobody checking up on you and no grades. I know I'm moving quick and I don't expect everyone to keep up with the pace I'm posting lessons. You can move along at your pace and still post shots and questions along the way. I'll be here and there are others who can post good info and share their knowledge also.
Message edited by author 2010-03-23 19:59:29. |
|
|
|
03/23/2010 01:16:31 PM · #145 |
Originally posted by jbsmithana:
Yes but I would not call what I'm assigning home work, more like fieldwork with nobody checking up on you and no grades. I know I'm moving quick and I don't expect everyone to keep up with the pace I'm poting lessons. You can move along at your pace and still post shots and questions along the way. I'll be here and there are others who can post good info and share their knowledge also. |
The whirlwind pace is what scared me off. Are you going to hang in with this topic for a while? It's something I really want to learn, and I will over time just like I've learned how to work with derelict things, and am learning portraiture, but I'm not particularly fast.
If I thought that it'd be okay to stop back and post here and there on things that you've moved past, I'd love to participate.
I'm not terribly far from this place, and once I have a little better handle on how to go about it, I want to make the trek. It's known in this area to be a terrific birding spot.
Conowingo Dam
I'm also near this place....
Middle Creek Wildlife Management Area
And this....
Hawk Mountain
So....I *do* have the resources if I can get comfortable in knowing somewhat how to go about doing this.... |
|
|
|
03/23/2010 02:34:24 PM · #146 |
Originally posted by NikonJeb:
The whirlwind pace is what scared me off. Are you going to hang in with this topic for a while? It's something I really want to learn, and I will over time just like I've learned how to work with derelict things, and am learning portraiture, but I'm not particularly fast.
If I thought that it'd be okay to stop back and post here and there on things that you've moved past, I'd love to participate.
So....I *do* have the resources if I can get comfortable in knowing somewhat how to go about doing this.... |
No problem Jeb. I figured I must have scared off a few with the pace I've been posting. I'm not trying to rush it I'm just trying to get the info up on the thread because I have a few other things I need to get to by the end of this month. Once it is all there people can work through it and it will be easier for me to keep track of questions and comment on photos posted along the way.
BTW - Looks like you have a few great locations to go shoot!
So people, don't give up on me and don't panic. Take each lesson as you can and feel free to post questions, comments and photos. I'm going to keep posting the lessons to get them up there but you can work at your own pace. I'll be keeping the threacd active.
Message edited by author 2010-03-23 20:01:22. |
|
|
|
03/24/2010 03:33:41 PM · #147 |
Composing Your Image
I don’t have much natural artistic talent, it would sure help if I did. For those of you who have an artistic eye you likely just know it when you see it through the viewfinder. But when it comes to photography I believe that you can at least learn the basics in what to look for to compose your image. I have worked on it for some time now and think that I may be getting there. Here is what I have gleaned from my readings and practice.
Let’s look at placement of the subject first. We all know the rule of thirds and it is well known for a reason. By placing the subject off center at one of the intersections of the third lines you create an image that looks more natural and gives the subject a place to move to (assuming you place the subject facing the larger empty space in the frame). This works especially well for horizontal compositions.
If you are composing a horizontal headshot then you would want to use the eye as the intersection point as in this photo.

Sometimes you want to use the whole bird to almost fill the frame. Birds that are longer than they are tall work well in horizontal format. In this case you would want to keep the bird a bit off center with the tail closer to the frame edge and a bit more room on the head side. It helps to have some element in the shot to balance to weak side of the frame.
 
What about vertical framing? Tall birds or animals work well in a vertical format, things like egrets, herons and the like. They work perfectly fine centered in the frame and many nature photographers prefer that. Normally I would just place the subject slightly off center and use it’s height to fill the frame like I did with this Great Blue Heron.

Vertical head and shoulder portraits work well in this format also.

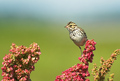
You can also work within a vertical frame with smaller birds if there is another component to work with like the branch this White Crowned Sparrow is sitting on.

What About Backgrounds
For most bird and wildlife photography you will want to shoot for soft blurred backgrounds. They will normally help isolate the subject as well as add a pleasant artistic look to the image. You have seen this image before but I think it shows what I’m talking about. The soft lighted green background helps fill the empty space to the left of this Steller’s Jay as well as help frame it.

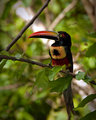
You normally would not want a bright highlight in the background, like patches of light sky mixed with the foliage. The viewer’s eye will want to travel there and detract from the subject. Here is a good example where the bright patches ruined an otherwise nice portrait of a Fiery-billed Acacari.
You also do not want patches of very dark background, especially right behind the subject, where they could blend with dark parts of the bird and lose detail like beaks or the bird completely.
Clutter on the same plane, or close behind it, makes for problems. I have plenty of nice photos of birds that are ruined by quite a bit of branch clutter as you’ve seen in this thread. Sometimes you can work with it by actually increasing your DOF, making the surroundings part of the composition. This works for leaves or grasses that help show the bird’s habitat. Sometimes the light helps as in this photo of a Tiger Heron,
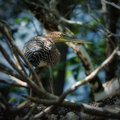 that I felt was interesting because it showed the habitat as well as a mood of this bird and how it stalks. that I felt was interesting because it showed the habitat as well as a mood of this bird and how it stalks.
A long telephoto lens with a wide aperture and its narrow field of view helps you isolate your subject with the background and with small adjustments in your position you can many times mitigate the above problems.
There are many times when including something other than the immediate subject adds interest to the image. If it is a component that helps show the bird’s habitat all the better. Here I used more of the log this Northern harrier was trying to balance on in the wind because I thought it had an artistic look to it in itself.

Before we leave basic composition I should mention a word about choosing a subject. Birds and animals go though stages when they look great and when they look, well, bedraggled. This image of the Chickadee (also seen earlier) with a beak full of insects shows a bird that has been through the ringer.
They work so hard raising the young that they get looking pretty tired. In this particular shot that is part of what I wanted to show. Birds have plumage changes between seasons. Many birds are much more colorful during breeding season. Same with some larger wildlife, this Mountain Goats coat looks pretty worn in this spring shot.
 They are shedding their coats in spring but by fall they look beautiful and majestic. Learn these times of change for your subjects. If you know when a bird changes plumage you can go try and shoot them when their feathers are bright and new. As the season wears on so do their feathers, getting faded and torn. They are shedding their coats in spring but by fall they look beautiful and majestic. Learn these times of change for your subjects. If you know when a bird changes plumage you can go try and shoot them when their feathers are bright and new. As the season wears on so do their feathers, getting faded and torn.
One final note, keep it simple. Just look at DPC, often what scores well is simplicity, the old "less is more" saying. This shot works for me because of the simplicity, a bird in action, pleasing green background and a simple square frame. Although you would not know it by the score!
[b]Which will bring us to our next lesson - Action and How to Catch It[b] |
|
|
|
03/24/2010 05:15:31 PM · #148 |
| J.B...I'm wondering if you have any specific technique(s) of approaching your birds and how you think about which one you will photograph? I guess that sounds like a rather obvious question, but I know it take me a while to pick out a bird and I'm just wondering how others do it. |
|
|
|
03/24/2010 05:29:49 PM · #149 |
Originally posted by hihosilver:
J.B...I'm wondering if you have any specific technique(s) of approaching your birds and how you think about which one you will photograph? I guess that sounds like a rather obvious question, but I know it take me a while to pick out a bird and I'm just wondering how others do it. |
Actually that is a good question and one that will be addressed in part in the next lesson on Action Shots as well as a coming lesson on how to approach and get close to birds. Your just a step of two ahead of me which I like as I keep thinking I'm losing people by moving too fast.
Stick with me for a while longer. |
|
|
|
03/24/2010 05:33:24 PM · #150 |
Originally posted by jbsmithana:
Originally posted by hihosilver:
J.B...I'm wondering if you have any specific technique(s) of approaching your birds and how you think about which one you will photograph? I guess that sounds like a rather obvious question, but I know it take me a while to pick out a bird and I'm just wondering how others do it. |
Actually that is a good question and one that will be addressed in part in the next lesson on Action Shots as well as a coming lesson on how to approach and get close to birds. Your just a step of two ahead of me which I like as I keep thinking I'm losing people by moving too fast.
Stick with me for a while longer. |
I want you to know that I really tried to stay on topic with this one as it appears to me part of composition.
I have read every one of your posts though...excellent stuff. Thank you!!! |
|


