| Author | Thread |
|
|
03/01/2010 08:12:54 AM · #1 |
Can anybody tell me how to overcome the appearance of the dark bands where these 7 images are merged in CS2?

I've encountered this problem before but I thought it was because I didn't ensure that I used the same exposure settings for each image. This time, however, I made sure that all of the settings were the same for each of the shots:
f/2.8
1/6 sec.
ISO 100
I used a Nikon 50mm f1.8 lens on a D80 and using a tripod.
Is the problem a limitation with CS2? If so, then what program should I look into next?
Thanks for your help. |
|
|
|
03/01/2010 08:18:09 AM · #2 |
| I'd recommend having a try with Hugin. It's free and good at bending exposures together. |
|
|
|
03/01/2010 08:20:00 AM · #3 |
Hi Robert!
Is it possible that you send the original frames, so I give it a go?
I'm using Autostitch, it's also free.
Regards,
Joao
|
|
|
|
03/01/2010 08:20:34 AM · #4 |
| Did you experience it before with the 50mm? I'm wondering about the lens. |
|
|
|
03/01/2010 08:27:22 AM · #5 |
| Just a guess here but you are using your 50mm wide open which will cause vignetting around the frame. I would suggest trying the shots again but increase the f-stop. |
|
|
|
03/01/2010 08:45:40 AM · #6 |
Originally posted by paynekj:
I'd recommend having a try with Hugin. It's free and good at bending exposures together. |
Okaaayyy, now that I've downloaded it how the heck do I use it??? Man, that is one comprehensive program that might require the entire morning to learn how to use it.
Can you give me any tips to shorten the learning process so that I can get moving on this?
Thanks.
Originally posted by jminso:
Just a guess here but you are using your 50mm wide open which will cause vignetting around the frame. I would suggest trying the shots again but increase the f-stop. |
It's not quite wide open, but vignetting makes sense.
Originally posted by smichener:
Did you experience it before with the 50mm? I'm wondering about the lens. |
It might have been a problem with the 50mm before but I don't remember. I've noticed it before and I'm sure it was with other lenses like my Tokina 12-24 and my Nikon 18-70 so I don't think the problem lies with the 50mm. |
|
|
|
03/01/2010 08:56:06 AM · #7 |
Originally posted by yakatme:
Okaaayyy, now that I've downloaded it how the heck do I use it??? Man, that is one comprehensive program that might require the entire morning to learn how to use it.
Can you give me any tips to shorten the learning process so that I can get moving on this?
Thanks.
|
Press "Load Images" button and select all the pictures you want to use
Press the "Align" button and wait while it finds control points and attempts to join the pictures together. It should then give you a rough preview (without blending). Assuming that it's managed to give you something approaching the panorama you're expecting, then press the "Create panorama" button.
If you don't get a sensible panorama at the align stage, you may need to alter the control points. It does sometimes pick points on clouds that move between frames, which can make a mess of things!
It will make a .TIFF file with your panorama, ready for you to post process.
Message edited by author 2010-03-01 08:57:41. |
|
|
|
03/01/2010 09:42:21 AM · #8 |
| Hugin is rotating some of the images on their side and some of them upside down. I'm surprised at how complicated this program is. I can learn anything, but I don't want to spend all day learning this program when I'm sure there are easier alternatives. |
|
|
|
03/01/2010 09:59:30 AM · #9 |
How many pictures is this made of, and how are they orientated?
Can you put a couple of the problem images in your portfolio, small will do. It sounds like it's having problems identifying the control points - i.e. the common points between adjacent images |
|
|
|
03/01/2010 10:06:39 AM · #10 |
| I've noticed the cs4 panormama tool is much better than the cs3 version which was much better than the cs2 version, the ones I have done with cs4 have worked so much better ... I can give it a try if you want |
|
|
|
03/01/2010 10:12:52 AM · #11 |
Originally posted by paynekj:
How many pictures is this made of, and how are they orientated?
Can you put a couple of the problem images in your portfolio, small will do. It sounds like it's having problems identifying the control points - i.e. the common points between adjacent images |
Coming right up...thanks! |
|
|
|
03/01/2010 10:22:10 AM · #12 |
Here are the pics in numerical order to be placed left to right:
 - -  - -  - -  - -  - -  - -  |
|
|
|
03/01/2010 10:45:54 AM · #13 |

I'm now puzzled why this didn't work for you, as it worked first time for me. I have had to make it think about the exposures again, and even now the purple reflections are clipped.
You do have a discontinuity in one of the poles in the foreground, caused by parallax error, but that would be easy to clone out.
I'm not sure what to suggest now, other than manually choosing control points. |
|
|
|
03/01/2010 11:27:42 AM · #14 |
"Puzzled" only begins to describe how I feel about this now. I don't understand how you could get so much better results than I did. It must simply boil down to not knowing how to get the most out of the program yet. I'll get back to it when I have more time.
I do still see the dark banding, just not as prominent as in my original attempt with CS2. I now believe that this is a result of vignetting as was previously mentioned.
I'm going to reshoot this tomorrow morning and from a different perspective. The reason for using 7 shots stitched together is to have incredible detail when viewed up close, but the details still is not there. I was shooting from a bridge because I wanted the elevated view, but the vibration on the bridge from passing vehicles is too much to handle. Tomorrow I'll reshoot from the shoreline to the left. This should also put the moon more to the left and because it will set sooner it will be lower over the buildings in the center of the current version.
Thanks for your help. |
|
|
|
03/01/2010 12:19:23 PM · #15 |
| I'll give it a try when i get home tonight (after 9:30 Eastern time). |
|
|
|
03/01/2010 12:22:43 PM · #16 |
Originally posted by yakatme:
"Puzzled" only begins to describe how I feel about this now. I don't understand how you could get so much better results than I did. It must simply boil down to not knowing how to get the most out of the program yet. I'll get back to it when I have more time.
I do still see the dark banding, just not as prominent as in my original attempt with CS2. I now believe that this is a result of vignetting as was previously mentioned.
I'm going to reshoot this tomorrow morning and from a different perspective. The reason for using 7 shots stitched together is to have incredible detail when viewed up close, but the details still is not there. I was shooting from a bridge because I wanted the elevated view, but the vibration on the bridge from passing vehicles is too much to handle. Tomorrow I'll reshoot from the shoreline to the left. This should also put the moon more to the left and because it will set sooner it will be lower over the buildings in the center of the current version.
Thanks for your help. |
You may also want to increase your f-stop to say around 11 or so to make sure all of the buildings are in focus. The original shots seem to place the water in focus and the buildings slightly blurred. Just my opinion though.
eta wow you have some beautiful shots in your portfolio, and I am jealous of where you live.
Message edited by author 2010-03-01 12:25:02. |
|
|
|
03/01/2010 02:29:46 PM · #17 |
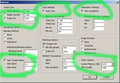
Screenshot of my "Default" settings for a test (small) version of a panorama stitched from horizontal frames, using the free (demo) version of AutoStitch. Circles outline most important settings -- the rest are program defaults, and I've never changed them. If you have vertical frames which have not been rotated already into portrait orientation, you'll have to change the rotation value over on the right.
Once you want to make a full-resolution version, change the percentage setting in the upper-left, and (if possible) assign more memory (lower-right), and be prepared for it to take "a while" ...
You can see some examples of pictures I've made with this program in this Gallery. I think I've only encountered unacceptable banding once, and I do think it was due to vignetting in the source frames.
P.S.: I think for the demo version you have to "feed" it JPEG versions of your originals. Available for Windows and iPhone. |
|
|
|
03/01/2010 03:20:09 PM · #18 |
The focus is on the buildings, not the water. It's just too hard to tell because of the vibration of the bridge and because of that nothing is sharp. I was trying to keep my shutter speed up for this reason and so I chose a large aperture. Tomorrow I'll take the advice to go to f/11 or so since I'll be shooting from shore.
Thanks GeneralE for the details for AutoStitch. What are the limitations for the demo version? Is there a watermark or anything that would prevent me from using the demo version to complete a shot for printing? |
|
|
|
03/01/2010 03:44:58 PM · #19 |
Originally posted by yakatme:
What are the limitations for the demo version? Is there a watermark or anything that would prevent me from using the demo version to complete a shot for printing? |
No watermarks, and you can output at 100% of the resolution of the originals. The only limitations are the clunky interface and that it's using JPEG input and output, but my camera shoots JPEG-only anyway so that's not a limitation for me. I've printed most of the samples in the gallery I listed, some are listed at DPC prints ...
Note that it can combine images in both horizontal and vertical dimensions, helping get more height into your final shot. The demo license allows you to use the output any way you want, but you are supposed to make an attribution to AutoStitch acknowledging its use. I put this -- and a link to the program -- in the picture information area of the online image, but not on the prints themselves. |
|
|
|
03/01/2010 04:25:22 PM · #20 |
I think the banding is from vignetting. I quickly stitched them with Gigapan Stitcher which is really good at knocking out the dark lines in the blending area and they are still showing up a little bit. You can probably hit them lightly with a dodge too and get rid of them though. another option you can try vs reshooting is a vignetting adjustment. I toyed around with one of the images in photoshop and was able to remove the dark bands. If I get some time later today I will do it to all of the images and restitch them to see how it works.

Message edited by author 2010-03-01 16:47:24. |
|
|
|
03/01/2010 05:22:33 PM · #21 |
| One more vote in favor of "vignetting" as the root cause. And one additional idea... when you stitch, make sure yoiu output in a multi-layered format, so that you can go back and adjust the blend lines later. This is *really* important to ensure the best results. Adjusting the blend lines is done by painting on the layer masks for the various images. It takes some getting used to. For the sky, you create a much broader blend between images, and that completely eliminates any sharp edges, masking any remaining color difference. |
|
Home -
Challenges -
Community -
League -
Photos -
Cameras -
Lenses -
Learn -
Help -
Terms of Use -
Privacy -
Top ^
DPChallenge, and website content and design, Copyright © 2001-2025 Challenging Technologies, LLC.
All digital photo copyrights belong to the photographers and may not be used without permission.
Current Server Time: 12/03/2025 03:07:45 AM EST.


