| Author | Thread |
|
|
03/05/2009 03:37:00 PM · #26 |
Whatever technique you use (and there are many that will work as has been shown here), view at 100% and sharpen until you start to see "halos" and then back it off a bit.
|
|
|
|
03/05/2009 03:41:18 PM · #27 |
Just to kick in a few random thoughts...
- I usually resize to double the intended final dimension using bicubic or bicubic smoother. At this point the resulting image is smooth but perceptibly soft. For final resize, I'm going down by 1/2 in each dimension, so I'm using exactly 4 px (2x2) in each final pixel. I use "bicubic sharper" for the final resize. After final resize, if any sharpening is required, it will be at very small radius, <=0.3, and amount less than 100. Any more than this and halos will start to show slightly.
- When applying unsharp mask, always tailor the threshold so that you are not sharpening noise. Normally, that's a threshold of 5 or so; can be higher, and can be somewhat lower for very clean images. If you want to *measure* the noise, select an area at least 50px square in a uniformly lit portion of an image, and one with *no* detail present (sky is often good). There needs to be no gradient in the area. In the histogram palette, you can see the average and standard deviation of the brightness value for each channel. The minimum threshold is about 4 to 6 times the standard deviation.
- Images will nearly always look sharper on an LCD than a CRT. Some LCDs actually apply sharpening as a default (!). If your LCD monitor has this option, *turn it off*!
|
|
|
|
03/05/2009 04:04:37 PM · #28 |
Originally posted by marcusvdt:
 Yo_Spiff would you mind sending me the script that you mentioned? I'd like to know more about using USM to enhance the contrast. Yo_Spiff would you mind sending me the script that you mentioned? I'd like to know more about using USM to enhance the contrast. |
I have it on my computer at home, but it is not available to me at the moment. I'll get it posted where you can get to it a little later. |
|
|
|
03/05/2009 04:28:21 PM · #29 |
Originally posted by dainmcgowan:
bear_music gave me some fantastic advice recently!
google 'Adamus Sharpening'
the results are outstanding. |
This works very well.
Mac,
|
|
|
|
03/05/2009 05:06:04 PM · #30 |
| I have found the Adamus sharpening to be the best for fine detail. I'm not sure it would serve you well with a print, but for web display it works great! I like to run the sharpen filter 2x with the image sized at 1300 pixels. Then resize and selective sharpen if necessary. I've used it in the last couple of my challenge entries but the one where I think it shined was last months FS. |
|
|
|
03/05/2009 06:40:16 PM · #31 |
Here's my script for High radius USM. High Radius USM 12.pspscript
There is nothing really complicated to it, I simply decided that since this is now my preferred method of contrast adjustment, it would be convenient to create a script and put it on my toolbar for 1-click access.
Here's another one I use regularly. Negative Layer Technique.pspscript
I have found this technique useful for pulling in some detail from overly bright highlights and deep shadows.
 
Here's what it does:
What is does:
-Duplicate layer
-Desaturate duplicate layer
-Negative image duplicate layer
-Gaussian blur of 4 on duplicate layer
-Overlay layers
-Final step is to manually adjust to desired amount and merge layers. I normally use it at an opacity somewhere between 10 and 30%
If you need some help with getting the scripts installed and working, PM me. |
|
|
|
03/05/2009 06:54:12 PM · #32 |
| best thread i've read here at dpc. |
|
|
|
03/05/2009 08:19:03 PM · #33 |
Originally posted by mpeters:
I have found the Adamus sharpening to be the best for fine detail. I'm not sure it would serve you well with a print, but for web display it works great! I like to run the sharpen filter 2x with the image sized at 1300 pixels. Then resize and selective sharpen if necessary. I've used it in the last couple of my challenge entries but the one where I think it shined was last months FS. |
You certainly kept all the possible detail in that image. Close up, it's a quite "crunchy," (under-sampled for the technically inclined), and it works for this image and for web display. I agree that for print, it's a different world, but then we don't have to contend with 720px on the long side either, LOL~! |
|
|
|
03/05/2009 08:22:42 PM · #34 |
I got some great sharpening tips from Thomas, but still tend to veer towards oversharpening. A current entry was resized, then I ran unsharp mask 2x over it, then sharpen edges 1x (in PS CS2 for Mac).
Sometimes I get dinged for it, sometimes not. I just try to use PS to bring out the best in my shots and give them a crisp look, without looking...brittle, I guess.
|
|
|
|
03/06/2009 03:52:24 PM · #35 |
| I've just experimented some of the techniques on a HDR landscape photo and I am planning to submit it to the 1000 challenge. Does anybody want to take a look on it and then criticise it for me? I could send it to you by PM so we don't make it public before the challenge... |
|
|
|
03/06/2009 04:06:37 PM · #36 |
Originally posted by marcusvdt:
I've just experimented some of the techniques on a HDR landscape photo and I am planning to submit it to the 1000 challenge. Does anybody want to take a look on it and then criticise it for me? I could send it to you by PM so we don't make it public before the challenge... |
PM me or email is in my profile. I'd be glad to offer an opinion. |
|
|
|
03/06/2009 04:48:49 PM · #37 |
| I recently noticed that "Bicubic (sharper)" image resize (advertised to be "best for reductions") produces slightly over-sharpened images similar to using USM or smart sharpen with a relatively large radius (perhaps radius = 1.0-1.5). Before, I didn't think that a resize function could do such a nasty thing, but now I'm convinced that I get much better results when I use the normal bicubic resize, then apply smart sharpen with a very small radius (smaller then one pixel). The latter adds a fine "sparkle" with less "halos" and "ringing". |
|
|
|
03/06/2009 04:56:14 PM · #38 |
| Generally, you are right. Applying it yourself allows more control. I usually use bicubic with the sharpness slider about halfway. That seems to neither apply sharpening or softening. |
|
|
|
03/06/2009 04:57:35 PM · #39 |
Originally posted by johst582:
I recently noticed that "Bicubic (sharper)" image resize (advertised to be "best for reductions") produces slightly over-sharpened images similar to using USM or smart sharpen with a relatively large radius (perhaps radius = 1.0-1.5). Before, I didn't think that a resize function could do such a nasty thing, but now I'm convinced that I get much better results when I use the normal bicubic resize, then apply smart sharpen with a very small radius (smaller then one pixel). The latter adds a fine "sparkle" with less "halos" and "ringing". |
For the low res. DPC images I use this one as well. I feel the setting provides finer control, especially for B & W. I like the Smart Sharpen filter: Amount: anywhere between 44 and 300, with a Radius of 0.3 or 0.2 or in two passes, one after the other, followed by Fades/Blend Mode: Luminosity.
Message edited by author 2009-03-06 17:22:46. |
|
|
|
03/09/2009 10:39:46 AM · #40 |
I just got one image that I submitted to the 1000 challenge. I used some of the techniques you mentioned in this thread, together with some tips from mpeters. Thank you mpeters!!!
The photo is not that wonderfull, so if I get 5,7 or more I'll be happy. |
|
|
|
03/09/2009 10:56:55 AM · #41 |
I've learned a lot on how to use sharpening properly from this htread and the links, thanks to all involved.
I'm amazed how good my old 2.1mp compact shots look when properly processed and properly sharpened, especially as the site limits image size to 640 or 720px and 150 or 200kb. |
|
|
|
03/09/2009 11:09:29 AM · #42 |
| I find that optimal process is *very* dependent on the image. I have an image I just re-edited for the "Hidden Gem" challenge and I used a pretty aggressive USM (but very small radius) on the intermediate-sized (1440px) file followed by the 2:1 size reduction using Bicubic Sharper, and the results were beautiful. The same settings, applied to the very different image I have in for the march Free Study resulted in poor results. For that image, I had to greatly modify my sharpening of the intermediate-sized image. |
|
|
|
03/09/2009 12:41:34 PM · #43 |
| For those who have it, Genuine Fractals does a great job of resizing and sharpening in a single step. |
|
|
|
03/09/2009 01:01:14 PM · #44 |
lots to see in this thread.
A few things to note:
#1 Neat Image is best done on the original image. BEFORE contrast, levels, hue/sat etc... Also, if you are working on a RAW, try to avoid getting into an 8 bit color space until you are nearly finished. This can make a significant difference in fine gradations. So export to 16 bit TIFF or 16 bit PSD or something, then switch to 8 bit only at the 'save for web' stage.
#2 there are a few different ways to sharpen depending on your final goal. The image size makes a HUGE difference as to your desired radius. If the image is large, expect to use a radius of around 0.3. If it's web-sized, you will probably be using a radius closer to 1. I think GeneralE has a tutorial on DPC about that and his high radius technique.
I would break sharpening down into three groups:
Simple sharpening for DPC (basic editing)
Simple sharpening for DPC (advanced editing)
Complex sharpening for DPC (advanced editing)
The two advanced editing methods should apply to large sized images for print instead of for DPC.
Get a handle on each step before moving to the next.
The Adamus method seems to be good for simple for DPC in Basic.
But when you go to advanced, there are a lot of other methods that work well.
CS2 and later versions of PS have Smart Sharpen which sharpens the highlights and shadows somewhat separately. This approximates the effect of the 'lab color lightening' method.
For a larger print or even something that you really want to show lots of fine detail on DPC, the best methods are usually selective.
This involves building a series of layers with sharpening and a series of layers with blur.
I had an action before that built 2 blur layers (one with gaussian, one with just a heavy handed NI layer - for sharpening purposes, not noise reduction... that was done earlier). The NI layer was below and had NO sharpening in NI.
Then I had it build a couple more layers for actual sharpening. Both of these were a bit strong, but not super-strong. Then just set opacity of all layers to 25% as a starting point and play with the opacity a tiny bit to get an idea of what areas benefit from what level of sharpening and what areas get oversharpened. And what areas can use the blur to prevent excessive noise.
Then a couple of minutes using the layer masks.
If necessary, you can duplicate a layer or simply build a stronger layer. You can also experiment by having duplicates of a layer and having one as a 'darken' and one as a 'lighten' mode layer. You should be able to experiment for a little while to whittle things down to 3 or 4 layers that you are comfortable with.
I used those techniques in PS 7.0 until about a year and a half ago. They are not my own, but are just regurgitations from various sources on DPC and the Radiant Vista. An excellent video tutorial there called 'sophisticated sharpening' that illustrates the above technique.
The names are different for PaintShop, but the ideas are the same.
Incidentally, sharpness isn't always 'more is better'. My 1000 challenge entry is deliberately soft (and selectively softened with gaussian). If in doubt, a more natural look is often quite attractive. Oversharpening is often quite obvious. |
|
|
|
03/09/2009 01:44:00 PM · #45 |
Follow this tutorial for the best results!!
Edge Mask Sharpening |
|
|
|
07/04/2009 07:10:54 PM · #46 |
| when doing the edit/fade usm, can you use the darken mode or lighten mode under the basic ruleset? |
|
|
|
07/04/2009 08:43:11 PM · #47 |
Originally posted by keriboi:
when doing the edit/fade usm, can you use the darken mode or lighten mode under the basic ruleset? |
No. |
|
|
|
07/05/2009 06:34:30 PM · #48 |
Thanks for bringing up this post again. I missed it the first time. I have tried a few of the techniques already and can see a big difference. I only wish I had come across it before the current challenges. Might have helped with my scores. Thanks all for the
wonderful info.
Original unedited version
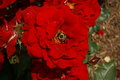
Adamus Method
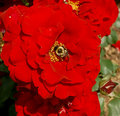
High Radius USM method
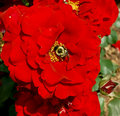
Any comments on which works best? Both methods here can be used in basic editing.
Message edited by author 2009-07-05 18:48:57. |
|
|
|
07/05/2009 08:35:22 PM · #49 |
| I use the "High Radius" method for improving overall contrast, but almost always apply additional edge/detail sharpening using more "normal" USM values afterwards. |
|
|
|
07/05/2009 09:33:50 PM · #50 |
Originally posted by GeneralE:
I use the "High Radius" method for improving overall contrast, but almost always apply additional edge/detail sharpening using more "normal" USM values afterwards. |
Agree. That is what I also use it for, and your example shows more contrast in the high radius USM version. |
|
Home -
Challenges -
Community -
League -
Photos -
Cameras -
Lenses -
Learn -
Help -
Terms of Use -
Privacy -
Top ^
DPChallenge, and website content and design, Copyright © 2001-2026 Challenging Technologies, LLC.
All digital photo copyrights belong to the photographers and may not be used without permission.
Current Server Time: 05/01/2026 05:44:30 AM EDT.


