| Author | Thread |
|
|
02/24/2009 12:24:13 PM · #1 |
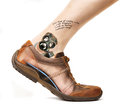
I'd like to try putting my client's logo above the ankle for this orthotic catalogue cover. I have the logo AI file. Does anybody know of 'any how to' resource, or other info on how to make something look like a tatto?

|
|
|
|
02/24/2009 12:28:29 PM · #2 |
Here's one
I've done something like this before. The displacement map is the key to making it look "applied." |
|
|
|
02/27/2009 07:52:59 PM · #3 |
Thanks, but...
================
I did a quick attempt at it using Liquify. The problem, I find, with Liquify, is that it only shows the layer you're working on, so you have to remember where the leg is you're trying to bend the tattoo around.
I also tried the "Displacement" thing in the tutorial, but it's useless for my file, at least.
There must be a better way.

|
|
|
|
02/27/2009 08:10:07 PM · #4 |
Burn it to darken it up. Then use the sponge and desaturate at about 20%. This should give it a good color. You need to fix up the writing though, make sure the logo is readable even on the hot spots of the leg. I played with it, but it was missing too much detail for me to really do any good for readability.
btw: Love the toe!!! It's so cute!
Message edited by author 2009-02-27 20:10:54. |
|
|
|
02/27/2009 08:23:57 PM · #5 |
Originally posted by Kelli:
Burn it to darken it up. Then use the sponge and desaturate at about 20%. This should give it a good color. You need to fix up the writing though, make sure the logo is readable even on the hot spots of the leg. I played with it, but it was missing too much detail for me to really do any good for readability.
btw: Love the toe!!! It's so cute! |
LOL, it's my wife's toe, and I had to desat the polish too, what a pain in the neck. I actually did a Google image search on toenails in the hopes of just pasting something over it. But I gave up after looking at dozens of diseased toenails, and thousands of "Camel-toes", if you know what I mean. ;-)
What I'm really after is a way to deform the flat logo around the leg. The liquify tool doesn't let me see the layer with the leg on it, only the logo.
|
|
|
|
02/27/2009 08:25:15 PM · #6 |
| Have you tried using transform? |
|
|
|
02/27/2009 08:35:11 PM · #7 |
Try Richard Rosenman's filters. Use either Pinocchio or Lens FX.
Here's the link... //www.richardrosenman.com/software/downloads/
Message edited by author 2009-02-27 20:38:56. |
|
|
|
02/27/2009 08:52:36 PM · #8 |
haven't tried this tutorial, but it comes from my favorite and IMO best photoshop learning site (more on the design vs. photo end)
Applying a Realistic Tattoo |
|
|
|
02/28/2009 01:27:17 AM · #9 |
| Came across this and went mmmm never thought of trying this before... now I have something new to play with... thanks everyone! I hope you get this done for your client such a good idea! ~D~ |
|
|
|
02/28/2009 08:54:34 AM · #10 |
I'm wondering if a bit more skin texture would help.
The leg picture seems to have been smoothed a lot, so applying a tattoo is going to seem plastic unless you put it over some texture. Perhaps the best bet would be applying the tattoo before post processing the leg. Another option would be to apply the tattoo to the original, post process that, and apply the result to the leg as you have it now.
I could be way off track, but it's just a thought. |
|
|
|
02/28/2009 09:04:06 AM · #11 |
I think  Medoomi might be onto something here - the tattoo looks a little too perfect at the moment - as does the leg, so one or the other needs a little more texture. You could always try redoing this as is - but then scratching the tattoo up slightly with a grunge brush - not a lot - but just enough to suggest it is over something. Medoomi might be onto something here - the tattoo looks a little too perfect at the moment - as does the leg, so one or the other needs a little more texture. You could always try redoing this as is - but then scratching the tattoo up slightly with a grunge brush - not a lot - but just enough to suggest it is over something.
Alternatively you go for the very PS'd look and sell it as 'plastic fantastic' |
|
|
|
02/28/2009 09:33:00 AM · #12 |
I did set out to try and help - honest . . |
|
|
|
02/28/2009 09:59:51 AM · #13 |
Okay, Slippy, here we go... Tattooing in Photoshop 101
Get the image you want to use for the tattoo into the image you want tattooed. After dragging it over onto a NEW LAYER, Press Ctrl+T and right click in the transform box that appears. Choose warp. Position the tattoo over the leg as desired. Now, add a layer mask or use the eraser at a low opacity and soften the shape a bit. Go over the inside and make sure you leave those defined lines on the outside alone. Next, to to Filter>Noise>Add Noise and add at 10%. Then, Filter>Blur>Gaussian Blur and apply it at .5%. Flatten and be HAPPY ;) |
|
|
|
02/28/2009 10:24:46 AM · #14 |
Originally posted by Strikeslip:
I did a quick attempt at it using Liquify. The problem, I find, with Liquify, is that it only shows the layer you're working on, so you have to remember where the leg is you're trying to bend the tattoo around.
|
I didn't see any specific answers to this, so should like to point you towards the "Show Backdrop" checkbox within the Liquify screen. At least, it should be there.
|
|
|
|
03/02/2009 12:27:59 PM · #15 |
Originally posted by Strikeslip:
Thanks, but...
================
I also tried the "Displacement" thing in the tutorial, but it's useless for my file, at least.
[thumb]768744[/thumb] |
The displacement map needs to have pronouced differences between light and dark in order to work. The lighting on the ankle is fairly even as-is.
ETA: in other words, darken the darks & lighten the lights in order to bring out the contours.
Message edited by author 2009-03-02 12:29:03. |
|
Home -
Challenges -
Community -
League -
Photos -
Cameras -
Lenses -
Learn -
Help -
Terms of Use -
Privacy -
Top ^
DPChallenge, and website content and design, Copyright © 2001-2026 Challenging Technologies, LLC.
All digital photo copyrights belong to the photographers and may not be used without permission.
Current Server Time: 01/16/2026 11:47:42 AM EST.


