| Author | Thread |
|
|
01/08/2009 11:35:44 PM · #1 |
Hi... I never added a border to a pic before... all I did was make 4 white rectangles and 4 black rectangles...
Give me your suggentions and opinions on how it looks, how i can change it, and if there is a better way to do it...
thanks, here's the pic
.
.
 |
|
|
|
01/08/2009 11:39:05 PM · #2 |
If you're using Photoshop, then you can
0. Size your image to final size.
1. Add a blank layer.
2. CTRL-A (select all)
3. Edit|Stroke (x # of pixels -- I use 14, inside, color set to white).
4. Edit|Stroke (x-1 # of pixels -- thus 13, inside, color black).
Quick and easy. |
|
|
|
01/08/2009 11:43:47 PM · #3 |
Well, the border isn't even. The white inline is not the same all 4 sides. The easiest way to make these simple borders, in Photoshop, is with the "Canvas Size" dialogue box. You select white as your color, check the "relative" button, click the central square of the 9 squares (to make the border symmetrical) and specify 2 pixels in width and height. This gives you one pixel of white on all 4 sides. Then do it again, with black as the color and 16 pixels as the size, and you get this:
Clean, simple, fast.
R.
|
|
|
|
01/08/2009 11:46:51 PM · #4 |
| Yeah, pick even numbers when you are increasing the canvas size or the border will be uneven |
|
|
|
01/08/2009 11:49:16 PM · #5 |
Originally posted by Bear_Music:
Well, the border isn't even. The white inline is not the same all 4 sides. The easiest way to make these simple borders, in Photoshop, is with the "Canvas Size" dialogue box. You select white as your color, check the "relative" button, click the central square of the 9 squares (to make the border symmetrical) and specify 2 pixels in width and height. This gives you one pixel of white on all 4 sides. Then do it again, with black as the color and 16 pixels as the size, and you get this:
Clean, simple, fast.
R. |
Just remember to compensate for the border size when sizing your final image otherwise, this method will increase the size of the image, forcing you to resize, which can skew the look of the border. |
|
|
|
01/08/2009 11:54:22 PM · #6 |
Originally posted by HawkeyeLonewolf:
Just remember to compensate for the border size when sizing your final image otherwise, this method will increase the size of the image, forcing you to resize, which can skew the look of the border. |
Right, assuming the image is intended for a challenge. This is an 18-pixel border, so in a basic challenge the image would be resized to 622 pixels, and then the border added to bring it up to 640 pixels.
ALWAYS resize your image before adding a border, regardless of what technique you use to create the border. A border that works well on a very large image may look way too heavy on a smaller image, even if it is proportionally resized with the image.
R.
|
|
|
|
01/08/2009 11:56:03 PM · #7 |
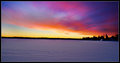
ok.... i followed teh moetho with teh canvas size, REALLY easy!!! thanks!!! but I had to put in 8 for the white and 64 for the black...
here's the pic
 |
|
|
|
01/08/2009 11:57:05 PM · #8 |
| so let me see here, Should I re-size within photoshop to the max challenge size, then so teh canvas size border method, then save for web? |
|
|
|
01/09/2009 03:59:49 AM · #9 |
Originally posted by Shutter-For-Hire:
so let me see here, Should I re-size within photoshop to the max challenge size, then so teh canvas size border method, then save for web? |
If the max image size is 720(for the longest side), and you want a 5px border on each side (at the longest side) then make the canvas 710, a new layer (ensure that you have creates a new layer from background before hand so you can adjust the layer ordering) and add 5 to each side (this is going on the assumption that the perpendicular edges are also going to be 720 or less)
You can then fill this layer with a colour, and in layers panel adjust the order. |
|
|
|
01/09/2009 10:29:56 AM · #10 |
Originally posted by Shutter-For-Hire:
so let me see here, Should I re-size within photoshop to the max challenge size, then so teh canvas size border method, then save for web? |
You need to figure out beforehand how wide your border's gonna be, then subtract twice that figure from the maximum image size. So if you're entering a basic challenge, with a maximum image size of 640 pixels, and you want a 10-pixel border all around the image, then you resize to 640 - 20, which equals 620 pixels. Then you use canvas size to add 2 pixels of white, then 18 pixels of black, and you end up with a 640-pixel image/border combo that has a 1-pixel white/9-pixel black border around it.
It sounds more complicated than it is, because you'll soon settle on a pretty standard border size for most of your images and do all this on cruise control.
Regarding dd's and hawkeye's comments, both of them are suggesting new layers for the bordering, and this is not legal in basic editing. For myself, even in advanced challenges I do all my editing full-size, then save the image, then flatten and resize, then do any extra sharpening or curves work it seems to need at the small size, then finally, as my last step, add the border before saving for web.
NEVER sharpen an image after it has been bordered, especially if you use these white-inline borders, because the sharpening will produce an unattractive haloing on the white/black interface.
R.
|
|
|
|
01/09/2009 10:39:04 AM · #11 |
Originally posted by Shutter-For-Hire:
ok.... i followed teh moetho with teh canvas size, REALLY easy!!! thanks!!! but I had to put in 8 for the white and 64 for the black...
here's the pic
|
If you mean you had to add 8 pixels of white and 64 pixels of black to get this border, then you are bordering the full size image and then reducing it to DPC display size. That's a bad idea. Why? Basically because when you are using keylines you run the risk that the line will reduce to an other-than even pixel dimension and it won't display correctly.
If you started with 8 pixels of white, this means you had a 4-pixel white line surrounding your image, and 64 pixels of black gave you 16 pixels of black outside the white keyline all around, for a total 20-pixel border.
Now, if you reduced the linear dimension of the image by half, you'd have a 10-pixel border with a 2-pixel keyline. Reduce the image to a quarter of its size, and you get a 5-pixel border with a 1-pixel keyline. All of these are OK. But there's a problem at any other percentage of reduction: the screen can only display in 1-pixel increments.
Why is that a problem? Because if you hypothetically end up reducing the image by such a percentage that the keyline is nominally 1.5 pixels, say, then it will display as 2 pixels on two sides of the image and as 1 pixel on the other two sides. And the difference in widths will be very noticeable, very offputting. This isn't as much a problem with wide, solid-black borders, where the difference between 10 pixels and 9 pixels, say, is not particularly obvious. But you can avoid the issue altogether by doing your display bordering after you resize the image.
R.
|
|
|
|
01/09/2009 10:44:24 AM · #12 |
Originally posted by Bear_Music:
Originally posted by Shutter-For-Hire:
so let me see here, Should I re-size within photoshop to the max challenge size, then so teh canvas size border method, then save for web? |
You need to figure out beforehand how wide your border's gonna be, then subtract twice that figure from the maximum image size. So if you're entering a basic challenge, with a maximum image size of 640 pixels, and you want a 10-pixel border all around the image, then you resize to 640 - 20, which equals 620 pixels. Then you use canvas size to add 2 pixels of white, then 18 pixels of black, and you end up with a 640-pixel image/border combo that has a 1-pixel white/9-pixel black border around it.
It sounds more complicated than it is, because you'll soon settle on a pretty standard border size for most of your images and do all this on cruise control.
Regarding dd's and hawkeye's comments, both of them are suggesting new layers for the bordering, and this is not legal in basic editing. For myself, even in advanced challenges I do all my editing full-size, then save the image, then flatten and resize, then do any extra sharpening or curves work it seems to need at the small size, then finally, as my last step, add the border before saving for web.
NEVER sharpen an image after it has been bordered, especially if you use these white-inline borders, because the sharpening will produce an unattractive haloing on the white/black interface.
R. |
This is true... but the same method can be used without the new layer and is quite frankly easier than doing the math to figure out how much space to leave, especially if you want to try different border sizes. |
|
|
|
01/09/2009 11:08:00 AM · #13 |
Assuming the finished product meets the size parameters, it is legal to simply use the "add border" (e.g., in PainShop Pro) function, isn't it?
PS: I'm sorry if this seems like a stupid question, but I'm seriously wondering why it's necessary to use layers to create a border.
Message edited by author 2009-01-09 12:05:47. |
|
|
|
01/09/2009 11:20:33 AM · #14 |
| Bear - When you do your borders in PS do you use the Actions palette? It makes the process twice as slick and easier than cruise control. I have setups for various widths with combos of white/black, grey/black and various colors/black. Hit the 'play' button and sit back and watch the magic happen! |
|
|
|
01/09/2009 11:20:37 AM · #15 |
oh, never mind.
Message edited by author 2009-01-09 11:21:12. |
|
|
|
01/09/2009 11:39:54 AM · #16 |
Originally posted by CEJ:
oh, never mind. |
? Inquiring minds want to know... |
|
|
|
01/09/2009 12:02:12 PM · #17 |
Originally posted by treimee:
Bear - When you do your borders in PS do you use the Actions palette? It makes the process twice as slick and easier than cruise control. I have setups for various widths with combos of white/black, grey/black and various colors/black. Hit the 'play' button and sit back and watch the magic happen! |
No, I've never bothered although it does make sense. I've been making them by hand for so long it's become second nature. And I tend to change them a little bit from image to image, just messing around.
As far as Hawkeye's "Stroke" approach, every time I've tried to work with that I've found it to be somehow less *precise* than the canvas-size approach, so I just stopped playing with it. But it's been a long time since I attempted it. In advanced editing, when I want and "inline" set in from the border of the image itself, I will actually draw a selection where I want it to be, then I'll use the selection to COPY the selected area, then I'll paste the selection to a new layer and stroke that layer; then I can fade this stroked layer and get an almost subliminal inline, and I can also set the stroked layer to different modes. If I understand Hawkeye correctly, all I need is a new layer, a selection, and a stroke, but I've never actually done that...
R.
|
|
|
|
01/09/2009 12:20:13 PM · #18 |
Yeah, I use the actions command if I want to do a large batch of images to have the same look.
However, I may have to try the "Stroke" approach...
Originally posted by Bear_Music:
Originally posted by treimee:
Bear - When you do your borders in PS do you use the Actions palette? It makes the process twice as slick and easier than cruise control. I have setups for various widths with combos of white/black, grey/black and various colors/black. Hit the 'play' button and sit back and watch the magic happen! |
No, I've never bothered although it does make sense. I've been making them by hand for so long it's become second nature. And I tend to change them a little bit from image to image, just messing around.
As far as Hawkeye's "Stroke" approach, every time I've tried to work with that I've found it to be somehow less *precise* than the canvas-size approach, so I just stopped playing with it. But it's been a long time since I attempted it. In advanced editing, when I want and "inline" set in from the border of the image itself, I will actually draw a selection where I want it to be, then I'll use the selection to COPY the selected area, then I'll paste the selection to a new layer and stroke that layer; then I can fade this stroked layer and get an almost subliminal inline, and I can also set the stroked layer to different modes. If I understand Hawkeye correctly, all I need is a new layer, a selection, and a stroke, but I've never actually done that...
R. |
|
|
|
|
01/09/2009 01:00:06 PM · #19 |
Originally posted by Shutter-For-Hire:
ok.... i followed teh moetho with teh canvas size, REALLY easy!!! thanks!!! but I had to put in 8 for the white and 64 for the black...
here's the pic
|
Borders look fine, but you're going to run out of water PDQ! :-P |
|
|
|
01/09/2009 01:02:20 PM · #20 |
Originally posted by citymars:
Assuming the finished product meets the size parameters, it is legal to simply use the "add border" (e.g., in PainShop Pro) function, isn't it?
PS: I'm sorry if this seems like a stupid question, but I'm seriously wondering why it's necessary to use layers to create a border. |
Yep. Much faster if you just want a basic border to use "add border". Or...if you're doing a two color approach just make a simple script (for example - one pixel white, nine black), resize the image to 620 or 700 on the long side, run the script, and done. |
|
|
|
01/09/2009 01:30:06 PM · #21 |
| Thanks, Barry. I wanted to make sure I wasn't inadvertantly breaking a rule. |
|
|
|
01/09/2009 01:37:14 PM · #22 |
The other thing I would maybe think about doing to this image before you add the border is to rotate it so that your horizon line is straight (there is a slight tilt to it, it appears).
To do this easily (if you don't know how) use the measure tool (it looks like a ruler and is hidden under the eyedropper) and click and drag from one point to another on a part that you want to be straight (zero degrees). Go to Image>Rotate Canvas>Arbitrary and click ok... |
|
|
|
01/09/2009 01:39:43 PM · #23 |
Originally posted by tpbremer:
The other thing I would maybe think about doing to this image before you add the border is to rotate it so that your horizon line is straight (there is a slight tilt to it, it appears).
To do this easily (if you don't know how) use the measure tool (it looks like a ruler and is hidden under the eyedropper) and click and drag from one point to another on a part that you want to be straight (zero degrees). Go to Image>Rotate Canvas>Arbitrary and click ok... |
Yep, and if he doesn't hurry up he'll drain the lake!
Hmmm...perhaps the borders will help keep things contained. :-D |
|
|
|
01/09/2009 01:45:28 PM · #24 |
|
|
|
01/09/2009 01:47:12 PM · #25 |
Originally posted by JH:
I thought it was snow. |
It IS snow. These guys don't have a clue... ;-)
R.
|
|


