| Author | Thread |
|
|
11/11/2006 03:52:12 PM · #101 |
Originally posted by MAK:

trying various things with HDR trying to keep it real but wired its a great tool for either style you choose to do. I like all aspects of HDR even the totally wacko stuff |
I have also noticed how easy it is to go completely overboard with HDR.
I'm guessing the 9 shot bracketing on the Nikon D200 works very well for HDR. |
|
|
|
11/11/2006 03:56:08 PM · #102 |
Originally posted by Raziel:
Originally posted by sjul:
Here is a picture I took using HDR:
 |
That's a nice shot. You should post a link to a bigger picture as this one is a bit small. |
Thank you :) Here is a link to a bigger version:
//www.flickr.com/photo_zoom.gne?id=253661910&size=o
Message edited by author 2006-11-11 15:56:25. |
|
|
|
11/11/2006 07:18:24 PM · #103 |
| Bear, when I win the lotto tonight make room because I am moving up there to your house for lessons! (You'll be well paid of course:) |
|
|
|
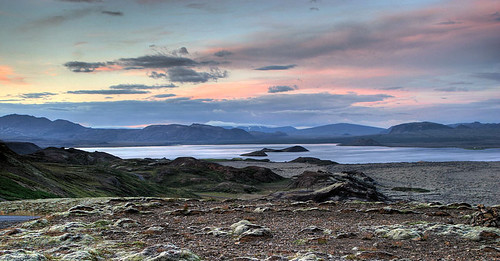
11/11/2006 10:06:35 PM · #104 |
Just uploaded a couple of HDRs from a trip last summer.
 and a "before" and a "before" 
This natural bridge would have been impossible to capture without HDR, at the time of day I was there:
 |
|
|
|
11/12/2006 05:02:21 AM · #105 |
Here's another quick one from me, only 4 shots this time. I seem to have some ghosting in this one.
 |
|
|
|
11/12/2006 01:54:27 PM · #106 |
From three shots under my garage, it's raining here! |
|
|
|
11/12/2006 09:50:48 PM · #107 |
HDR without HDR if that makes sense.
 becomes becomes |
|
|
|
11/12/2006 10:20:25 PM · #108 |
| I need a pluggin with a "de-suck" slider. This HDR isn't helping. |
|
|
|
11/15/2006 05:11:10 PM · #109 |
I processed this back in May from a single exposure so that I could get the windows and the inside done properly. Someday, I'll go back and actually shoot it right. :)
 |
|
|
|
11/15/2006 05:27:09 PM · #110 |
Originally posted by JOHNBOY1970:
From three shots under my garage, it's raining here! |
Bit too busy & flat to fully appreciate the HDR component of this image.. |
|
|
|
11/15/2006 05:49:17 PM · #111 |
My first attempt at this cool technique. I couldnt find my tripod so I shot handheld.
 |
|
|
|
11/15/2006 06:37:54 PM · #112 |
Originally posted by behindthescenes:
My first attempt at this cool technique. I couldnt find my tripod so I shot handheld.
|
You can easily use tone mapping to recover some detail in the reflection... It would work better from a larger original, but this gives an idea where you can go:

R. |
|
|
|
11/15/2006 07:24:22 PM · #113 |
Originally posted by Bear_Music:
Originally posted by behindthescenes:
My first attempt at this cool technique. I couldnt find my tripod so I shot handheld.
|
You can easily use tone mapping to recover some detail in the reflection... It would work better from a larger original, but this gives an idea where you can go:
R. |
you rock!! im not sure what tone mapping is or how to do it. can you steer me in the right direction? |
|
|
|
11/16/2006 04:18:57 AM · #114 |
Originally posted by behindthescenes:
you rock!! im not sure what tone mapping is or how to do it. can you steer me in the right direction? |
Only if you are using Photomatix Pro. I don't know if CS2 even HAS tone mapping...
R. |
|
|
|
11/16/2006 07:17:09 AM · #115 |
Originally posted by behindthescenes:
My first attempt at this cool technique. I couldnt find my tripod so I shot handheld.
|
Using your image as an example, here's a rather simple technique that I kinda like, using only Photoshop (CS or CS2):

1) Duplicate the layer
2) Set layer blend mode to Soft Light (note the loss of some details in shadows and highlights? that's a hint to where I'm going next)
3) Click Edit | Adjustments | Shadow/Highlight
4) Adjust the shadow and highlights sliders to pull back some of the details on either end of the spectrum.
5) Adjust the mid-tone contrast slider.
That's it. With just a couple of steps the output approaches what you've seen with the tone mapping using just PhotoShop CS or CS2.
Now... you could leave off step #2 and simply adjust the shadows and highlights for something similar as well. I just happen to like how doing the adjustment on a soft blend layer bumps up the saturation.
Message edited by author 2006-11-16 07:17:31.
|
|
|
|
11/16/2006 12:50:00 PM · #116 |
Originally posted by dwterry:
Originally posted by behindthescenes:
My first attempt at this cool technique. I couldnt find my tripod so I shot handheld.
|
Using your image as an example, here's a rather simple technique that I kinda like, using only Photoshop (CS or CS2):
1) Duplicate the layer
2) Set layer blend mode to Soft Light (note the loss of some details in shadows and highlights? that's a hint to where I'm going next)
3) Click Edit | Adjustments | Shadow/Highlight
4) Adjust the shadow and highlights sliders to pull back some of the details on either end of the spectrum.
5) Adjust the mid-tone contrast slider.
That's it. With just a couple of steps the output approaches what you've seen with the tone mapping using just PhotoShop CS or CS2.
Now... you could leave off step #2 and simply adjust the shadows and highlights for something similar as well. I just happen to like how doing the adjustment on a soft blend layer bumps up the saturation. |
Kind of underscores my contention that tone mapping and shadow/highlight in PS aren't all that different...
R. |
|
|
|
11/16/2006 12:59:14 PM · #117 |
 (CS2 only) (CS2 only) |
|
|
|
11/16/2006 03:05:23 PM · #118 |
Originally posted by BradP:
(CS2 only) |
I like the texture in the wall and the hand that you got there. Any tips on what you did?
|
|
|
|
11/20/2006 08:49:00 AM · #119 |
Thanks for the walk through David. Im going to try that with the originals.
Thanks to Brad aswell I really liked the postcard look to it on your take on it.
Thanks!
|
|
Home -
Challenges -
Community -
League -
Photos -
Cameras -
Lenses -
Learn -
Help -
Terms of Use -
Privacy -
Top ^
DPChallenge, and website content and design, Copyright © 2001-2026 Challenging Technologies, LLC.
All digital photo copyrights belong to the photographers and may not be used without permission.
Current Server Time: 04/28/2026 02:46:31 AM EDT.


