DPChallenge: A Digital Photography Contest You are not logged in. (log in or register
 
Browse Settings
Currently viewing:
Registered UserArtifacts

Show comments:

Per page:

Order:

Comments:


Comments Made by Artifacts
Pages:   ... [319]
Showing 21 - 30 of ~3187
Image Comment
Tetelestai!
06/08/2007 07:25:53 AM
Tetelestai!
by JamesKW

Comment:
Positives:
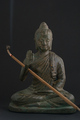
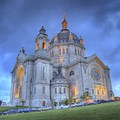
Well constructed image. The strength of the composition is in the detailed clouds and bright highlighting behind the main subject.

Technicals:
Nice use of silhouette, background highlighting and the rule of thirds in a clean and simple composition.

You don't say, but it looks like you used the burn tool on a data layer to darked the image edges. If so, you may have overdone it slightly making the darked areas look a tad bit unnatural with a brownish color cast typical from using the burn tool.

Even though the image was shot at f/14 it still looks as though it was focused at infinity on the sky background, which is nice and sharp, but left some softness in the main subject.

Though the silhouette is soft focused in places it appears haloed on the hands and has some digital "jaggies" on the cross edges in a few places which is typical of oversharpening. Looks like the sharpen tool may have been used for selective sharpening.

The Challenge:
This image has a very unusual double winged vote distribution curve. You have a jump in votes at both ends of the scale, yet not a single "1" vote. That usually indicates a highly controversial image but it IS a religion challenge. This is pure speculation but perhaps a display of The Crucifiction generates strong emotions both ways.

40th out of 302 is a very good placing with a 5.9 score. That means in general voters felt this is a very good image. The strong background highlighting effect likely played a roll in that.

Suggestions:
If, in fact, you used the burn tool for background darkening then I have an alternative suggestion that you might want to try. It will reduce or eliminate the brownish hue. It is a bit more work but is non-destructive and gives a more natural result...

Add a new layer and make it an "overlay" layer and click the 50% grey box. You can paint with white and black to perform dodge and burn but without using the actual dodge and burn tools themselves, just the paint brush.

To burn, like for darkening the clouds, you select black for the brush tool and set the mode to "darken" and opacity around 10%. When painting on the 50% layer this combines naturally with the layers below it to produce nice darkening of the clouds without the brownish color cast typical when using the dodge tool.

Seems like both the silhouette and sky should be in sharp focus when shooting at f/14 but maybe not in this case. Shooting at an even higher f/stop might be needed and since you shot at 1/400th you have the lighting to conveniently bump the f/stop. You always want the edging of a silhouette to be crisp and sharp and that does not appear to true in this particular image.

Sorry... this is a lot of verbiage for such a conceptually elegant image.
Photographer found comment helpful.
Blessing Buddha
06/07/2007 06:13:41 PM
Blessing Buddha
by hajeka

Comment:
Positives:
Post processing is the main strength of this image. The incense is a nice addition.

Technicals:
Basically the sharpness, background and those types of things are all OK.

Perspective and composition, however, are on the weak side. Lighting choice does not add a lot of viewer interest to the composition though there is nothing really wrong with it either. The depth of field makes the near foreground part of the incense out-of-focus

The Challenge:
You got 4.9 but that is only about .3 below the challenge average. It probably would hve scored lower if it were not for its technical merit.

It is doubtful voters had a problem with your religious choice, but pictures of stationary art objects typically score low at DPC. Your idea to add more interest by including the incense is a good one, it just needs more viewer interest.

Suggestions:
As far as it goes there really is not much "wrong" with your picture. But there are some things you might try to increase viewer interest.

One thought would be to change from the snapshot perspective. Try a dramatic angle either high or low. Be creative. Another change would be to give it angled and more dramatic lighting as well. Both would add lots of viewer interest.

Instead of having one incense stick, maybe have two or three and maybe add some breeze to show the smoke curling up better during the timed exposure. Directing strong lighting to the smoke rising would help.

Once I photographed a coffee pot with steaming coffee coming out and took over 70 exposures. I had to boil the coffee in a pan and pour it into the pot every two or three shots before the steam disappeared and I had to do it over again. I did that until I got a smoke curl that worked. That effort earned a yellow ribbon. Consider that for yours.

Lastly, you shot at f/6.3 which left the closer part of the incense stick out-of-focus. Consider a higher f/number for greater depth of field if that is practical. It will make the exposure a lot longer which might screw up the smoke curls so you'd have to work with it to find the right combination. Don't discount the possibility of simply letting the incense burn down enough that you could set them more upright.
Photographer found comment helpful.
through the microscope
06/07/2007 04:27:12 PM
through the microscope
by krnodil

Comment:
Positives:
Stunning clarity, good color and a nice macro. Good concept.

Technicals:
You didn't say in the notes, but imply that this was captured through a microscope. You probably need a lensed adapter to prevent REAL vignetting. LOL!!! You can always deal with that problem through cropping, though.

Lighting(away from the vignette), sharpness are exceptional.

The image lacks a central focal object for the human eye to latch onto. It is like a really nice background without a main subject.

The Challenge:
Yup... science all right. :) It placed well and scored above average. This undoutably is because of it's superb technical quality. But the composition itself lacked thematic content or eye attractive viewpoints and that held the score down.

Suggestions:
The image, as it is is fine, but it needs more sharply focused chives positioned in more interesting ways... whatever THAT means. ;) How to do it is another story all together. I doubt you have any control over DOF so that makes that a very difficult job. Just keep moving things around until to get a lot of chive in focus in an interesting arrangement. :)

For less vignette simply crop the image closer. Detail will be larger in the frame and your camera provides plenty of data for you to work with.
Photographer found comment helpful.
Bleeding Hearts
06/07/2007 04:00:37 PM
Bleeding Hearts
by NstiG8tr

Comment:
Positives:
Selective desat done very well with natural and not overpowering color. Tough to do with reds.

Technicals:
This is a very solid technical achievement all the way around. You did an especially good job with the color boundary. The soft focus background works well.

The composition, though not centered, has a centered framing look. There are a few overexposed "hot" spots in the background. The left flower is SLIGHTLY out of focus.

The Challenge:
Fits the challenge... Duh! LOL. Finished above average and that is good given the subject selection which probably hurt it's score overall. Technical quality saved it.

I voted this image a "7". In my world that means I think it is average. I was influenced by the framing and hots spots. Now I'd score it an "8", because it is definitely above average.

Suggestions:

You have a few background blob-like hot spots in the composition you might consider fixing.

Removing "Hot" Spots
Though "hot" spots, overexposed areas in compositions, are surprisingly tolerated by DPC voters they generally are distractions that should be removed.

There is a simple, but effective technique you can use, probably in a duplicate of your background layer using the clone tool. Here is the trick. Set the opacity of the tool low, around 10%, select an appropriate place to clone from that has some detail to it and then very lightly clone over the overexposed area. You will be surprised how natural the effect is and will not look at all like the place it is cloned from. Amazing what a little blending and brightness difference can accomplish.
End - Removing "Hot" Spots

You might consider different framing of the composition for a more offset look. It's hard to say just how, though. There are a lot of possibilties with this picture. Offsetting the flowers more and framed with an offset vignette done automatically or by hand would work very well with this composition. It is hard to go wrong with vignette highlighting.

You might finally consider using the Sharpen tool VERY gingerly for a bit more sharpness to the left flower. But be careful, of course, because it is easy to screw up. :)
Photographer found comment helpful.
Drive Thru Light
06/07/2007 03:16:36 PM
Drive Thru Light
by quiet_observation

Comment:
Positives:
Your perspective allows you to include a lot for viewers to see and think about in a nicely arranged composition that is image processed well.

Technicals:
Image done technically well and very appropritaely as a black and white for the subject. Sharpness good and choice of central focal point works well with the depth of field(DOF). Cropped out Mikky D's Arches nicely! High contrast treatment adds to its visual impact.

The interest objects in the composition are very closely cropped to the edge of the frame. The background building doesn't add much and acts as a viewer distraction.

The Challenge:
Finished 106/302 so positionally speaking it is well above average though the score indicates it is only slghtly above average. The scattering of low scores probably resulted from a couple fringe voters the didn't think it was religious enough for their taste or inappropriate. No biggie.

Suggestions:
This is a fairly long exposure at a high f/stop probably needed to get the distant sign in sharp focus so there is probably nothing you can do to soften the background buildings in-camera. But you might select and blur the background building more in post to lessen it's distracting effects.

Consider widening the composition slightly on the left, right and bottom to keep interest objects from being so close to the edges. Looks like you got framing to work with though you'll have to do some post processing to keep the added space from becoming a distraction itself.
Photographer found comment helpful.
Allure
06/01/2007 06:12:54 PM
Allure
by adeldegan

Comment:
Composed fine but there are several technical issues to address... mainly that the white balance is probably not correct for the lighting.

1-Shoulder and chest areas have yellow color cast. 2-Face has red color cast. 3-Areas on either side of the nose and around the mouth border on being overexposed. 4-What is probably her hand in the lower left side of the image is a distraction.

Red face and yellow skin can probably be corrected with a remarkably simple "Curves" adjustment layer, maybe both at the same time. In that you create the "Curves" adjustment layer, select the red channel and then drag the center down and away from the word "red". It won't take much. If it does not correct the yellow cast then try creating a "Hue/Saturation" Adjustment layer, select 'yellow' in the popup list and drag the saturation slider left to desaturate the yellows until you get a nice natural skin color. Use a little burn to darken around the nose and mouth a touch for more softness and beauty. Lastly, clone out the segment of hand in the lower left corner of the frame.

Do these things for starters and you will flatter your model better in this photograph.
Photographer found comment helpful.
Cathedral of St Paul
06/01/2007 05:12:18 PM
Cathedral of St Paul
by genghis

Comment:
Nice perspective, great color, exceptional sharpness, great sky... For the print clone out those distracting cars. :)
Photographer found comment helpful.
Yngwie Carrottop
05/30/2007 05:17:58 PM
Yngwie Carrottop
by chip_k

Comment:
Positives:
Very fine capture worthy of inclusion in a rock stars media portfolio.

Technicals:
Composition and framing are excellent. The moment captured is especially good. Lighting and detail are fine. Overall done well except for one thing...

The only major technical flaw is the red oversaturation. I didn't look at this in photoshop but I'd bet money there is plenty of red even in the "black" background.

The Challenge:
Can't argue it doesn't meet the challenge. Ironically, trying to make it match the challenge 'better' might have contributed to it's downfall.

No doubt the oversaturated reds was the main reason for it's low score. It is most apparent in the guitarist's hands which are way to red.

Suggestions:
Here is a shocker for ya... desaturate the red intensity everywhere but the model's hair.

How do you do that? ... Well, I glad you asked...

The easiest way would be to add the red saturation on a duplicate data layer then add a mask to that layer and paint out the oversaturated parts with a black brush on the mask. Basically that means do that everywhere but the model's hair.

If the image was captured in oversaturated reds to begin with you have another option...

Neat technique to correct red skin color
Do a feathered selection including everything EXCEPT the hair and add a new Hue/Saturation adjustment layer. That will create a layer mask that nicely excludes the guy's hair. Then scroll down the color list and select "red". Then simply click the center and drag it down AWAY from the word "red". You will be amazed how much improvment to the image you will make with this simple, easy adjustment.
End - Neat technique
Photographer found comment helpful.
If you run, you will only die tired...
05/30/2007 04:42:52 PM
If you run, you will only die tired...
by Efergoh

Comment:
Positives:
Just about everything in this image is done great. The choice for color desaturation is particularly ominous and therefore appropriate.

Technicals:
Someone else is going to have to tell you what the technical flaws are. I don't see any. Some might suggest the shooter's hand is a little overexposed but that probably isn't even true, its just bright. The hand still retains detail.

The Challenge:
Who could argue that this not only meets the challenge but meets it in a particularly meaningful way.

You scored almost EXACTLY at the challenge average. That blows me away. This picture is no more average than a conservative Republican's ideals. :)

This is just pure guessing, but maybe anti-military feeling played a role in voter reaction to this image. Maybe they think noise reduction is overdone.

When this picture graces the cover of a magazine somewhere I'm gonna start a discussion about it beginning with... "I told you so!"

This one is a 10 all the way.

Suggestions:
Apply a little burn to the shooter's hands.
Photographer found comment helpful.
Castle-like County jail
05/30/2007 04:24:24 PM
Castle-like County jail
by dcb300

Comment:
Positives:
Color and lighting are the strengths of this composition.

Technicals:
Color, lighting and perspective is good in this image. Cropping to include the tree framing adds viewer interest.

Looking on a sharpness sensitive monitor it appears just a touch oversharpened. You can see some digital "jaggies" along the some of the edges on the stairwell.

You might consider a closer crop to highlight the building more. The overhang just to the immediate right bottom of the building acts as a distraction.

The Challenge:
You scored 4.9 which is about .4 below the challenge average. Voters probably felt the link to the challenge topic was weak and lowered the score because of it. Oversharpening may have contributed to a lower score as well.

Suggestions:
The best change you could make to this for a higher score is to crop it differently and closer to the near wall of the building. By cropping it closer to include only the near wall would better direct viewer attention to the 'shapes' it has which is, after all, what attracted you to the image in the first place. Be sure to crop out everything to the immediate right of the main building wall.

Of course, that would mean cropping out almost all the nice tree framing on the left side which I'd normally recommend doing but it would be better for a "shapes" challenge.

Consider backing off the sharpness a bit to eliminate the "jaggies".

Note:
Your pictures are getting better. You are headed in the right direction. Keep with it and you can be as good or better than anyone else at this site.
Pages:   ... [319]
Showing 21 - 30 of ~3187


Home - Challenges - Community - League - Photos - Cameras - Lenses - Learn - Help - Terms of Use - Privacy - Top ^
DPChallenge, and website content and design, Copyright © 2001-2025 Challenging Technologies, LLC.
All digital photo copyrights belong to the photographers and may not be used without permission.
Current Server Time: 08/03/2025 06:42:05 PM EDT.