Daybreak
by
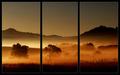
BradComment by Brad: Here is the basic shot without the framework:

Guess here's my "How'd they do that" for the framework.
The process was really very simple. Figure out what size of a frame is suitable for the picture.
Let's say on a 800 x 500 image, a 20 pixel wide border would suffice.
Go to View, ruler and make sure your preferences is set for pixels in the Edit, Preferences section.
Go to the top left tool (Rectangular Marquis Tool) and click it. Then zoom in on the shot until you can see the pixels in the side ruler clearly (typically 800%). Click and drag a box from the top left corner, over 20 pixels, then drag down to the bottom without letting go. That will select a 20 pixel wide section down the left side and will have the dotted lines around it. Then go to Edit, Fill and select Black. Repeat all around the four sides.
(There is a shortcut to do it all at one time - select the first section, then hold Shift, and continue dragging around
the outside framework. Each section will add to it).
Then figure out your 2 vertical divisions and drag a box down and again fill with Black. You should now have the basic 3-pane black frame. May need to zoom in a bit more now and drag a 1 pixel wide "box" along the inside edge of each pane, using Shift again to do it all in one process.
This time when done, Edit, Fill, White or 50% grayscale. If you have a dark background, the 50% gray will look kind of funny as it becomes transparent. In that case, fill with White, then without clicking the dotted lines away yet, go to fill again and select 50% grayscale. If the gray looks too dark, you can go to Edit, Fade Fill and adjust the slider bar until you get the shade you want.
Thanks all!
Message edited by author 2004-11-08 12:56:04.