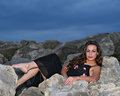
IMG_0351a8x10.jpgby
kawesttexComment: Love the sillyness and carefree look here - it's a great shot!
:))
Suggestion:
New layer via copy.
Image, Adjustments, Levels, move center slider from 1.0 to 1.4
(center of the 3 boxes above histogram)
Image, Adjustments, Brightness/Contrast, bump Brightness to +2 and Contrast to +20
While still in the new layer, select the eraser tool, size depends on actual size of image in edit, set opacity to 100% and erase back everything but the girl and flatten the layers.
As a last touch, he raised foot was so washed out/bright, I did this to restore a more natural color:
New layer via copy, used teh eydropper tool to slect a red tone, in this case, I used a section of her lip and the hex value was 9b5250 - you can type that in and hit ok in the color palette.
Then go to the brush tool, select a soft-edged brush, set to overlay mode in the drop-down, set the opacity to about 40%, flow to 100%, and paint her foot. If it looks too much, that's ok, and don't be too concerned about staying exactly in the lines. If it's too dark /colored, go to Edit, Fade brush and slide the value around until you get what you like. You can go to the eraser tool if you were a bit sloppy and zoom in, use a small eraser brush, and erase the areas you didn't want painted over. The overlay mode isn't like a full on layer of color, but more like a gel, showing the details and texture underneath in order to retain the natural look.
Flatten layers.
This is what I got doing exactly that, using your smaller web-sized shot.

You can open the original and this edit each in their own window, and switch between them to see the changes. I did notice a couple areas on the rocks that I didn't fully erase in the early steps by doing this,, but you get the idea.
Message edited by author 2006-12-21 16:15:11.