
| You are not logged in. (log in or register) | |
|
|
Tutorials :: Model Makeovers
Model Makeovers by Brad 
You've taken your portrait shots and now your model wants a makeover to get rid of, (or hide all together), skin discolorations, blotches, blemishes, just like a magazine cover. This tutorial was written is a simplistic, one layer at a time, one step at a time method in order to keep it simple and easy enough for the novice Photoshop CS2 user to follow along. Step 1: Open in Photoshop (For purposes of this tutorial, this image has already been cropped to final dimensions)  The main tool we will be using to do most of the skin clean-up is Photoshop's Spot Healing Tool, set to Proximity Match in the toolbar. This acts like a super-charged cloning tool, but requires no selection to use it, and is as simple as clicking or dragging over an area you want fixed, as it samples a little of the areas around or near it, and blends it together (for the most part, it works very well).  Step 2: First Things First Layer, new Layer Via Copy. 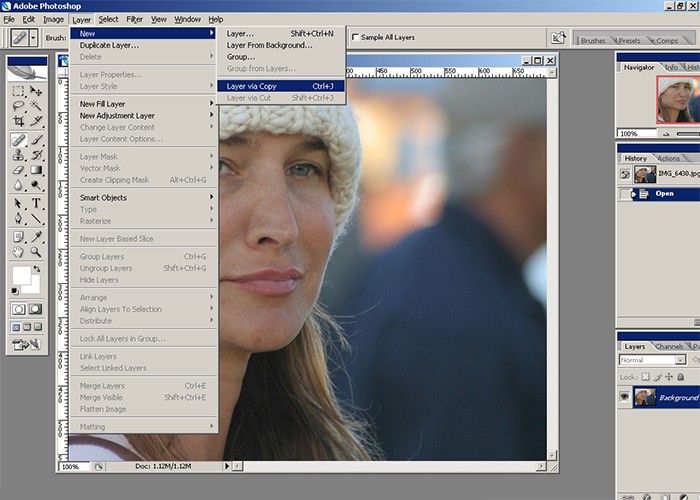 Step 3: Fix Blemishes Using the Spot Healing Tool, start slowly, with a small diameter brush, and start clicking over the blemishes and discolored areas of the skin that you want to get rid of. Stay with a small brush size and work slowly, as many small steps will have a more natural effect than trying large changes.  Pay close attention to lines, noticeable changes in brightness, color and differences in contrast such as the area noted in the circle below, and click along the lines of change to even them out:  It's easy to check your progress as you go along, as you are working in a layer above the main image. To check, simply go to the layers box in the lower right, and click the eyeball on/off in the upper layer. (I did mention this was going to take patience didn't I?)   Don't give up yet ! This may involved several hundred mouse clicks to achieve depending on the skin. Once satisfied that you have the skin cleaned-up and pretty even in appearance, the hard part is done:  Then go to Layers, and select Flatten Image. Step 4: Softening the Skin Layer, New layer Via copy. Go to Filter, Gaussian Blur, and adjust the Radius slider until you achieve a soft-focus blur over the image: (Apply a little more blur than is needed, as we will tweak the final amount in the next step)  Right-click on the upper layer in the layers box on the lower right. This will open a pop-up called layer styles. Select the Blending Options, blend mode Normal, and slide the amount of blending to suit, then hit OK: (This will give you the fine-tuning adjustment on how much blur you want applied from the previous step.)  Note: If you have a 3rd-party soft-focus action or plug-in, it can be used instead of the Gaussian Blur filter above, with the fine-tuning done via Edit, Fade and slide the fader or can also be done in the blending options above. Step 5: Bring Some Details Back While still in the layer from above, select the eraser tool on the left tool bar, select a small, soft-edged brush, set to 100% opacity & 100% flow in the upper tool bar as shown below, and erase back details, such as the eyes, eyebrows, hair, mouth, nostril, clothing or anything else you don't want to have a blur/soft-focus applied to:  Note, Here's a tip when using the eraser tool: If you are unsure of what you have, or have not erased back, a quick check is as simple as, Image, Adjustments, Invert, and reverse the image on screen:  Once inverted, you will easily see what has been erased so far:  You can continue erasing while the image is inverted, giving you a little better control over the details. As seen below, I chose her eyes, eyebrows, lips, hat, ear, earing, shoulder and even the stray hairs:  When done, go to Image, Adjustments, Invert, then Layers and flatten image. Step 6: Punc Up the Skin Tones and Colors Layer, New layer Via copy. Image, Adjustments, Brightness/Contrast, Increased the brightness +4 and the Contrast +11  Then go to Layers, and select Flatten Image. Step 7: The Eyes Now to work on her eyes and make them a strong focal point without looking Demonic. Layer, New layer Via copy. Go to the Rectangular Marquis Tool, Right-click and select the Elliptical Marquee Tool.  Drag an oval around one eye, hold the Shift button and draw an oval around the other one. With both eyes now selected, go to Image, Adjustments, Levels and select the Options button. That will bring up a new pop-up as shown below. Make sure Enhance Per Channel Contrast is checked, and in the Shadows & Highlights Clip boxes, type in 0.5 in each, check the set as default if it wasn't (these are the most recommended settings by Photoshop Professionals). Hit OK, and then OK again.  Now click anywhere on the image to de-select the areas. (makes the marching ants go away). While still in the layer from above, select the eraser tool on the left tool bar, select a small, soft-edged brush, set to 100% opacity & 100% flow in the upper tool bar as was done after the blur was applied, and erase around the eyes, working slowly and getting up to but not over the lines. Zooming in close helps here.  Then go to Layers, and select Flatten Image. Step 8: The Irises Now to work on her Irises, making them look natural, and without popping off the page. Layer, New layer Via copy. Go to the Rectangular Marquis Tool, Right-click and select the Elliptical Marquee Tool. Drag an oval around one Iris, hold the Shift button and draw an oval around the other one. With both Irises now selected, go to Image, Adjustments, Brightness/Contrast. I set both to +20%.  Now click anywhere on the image to de-select the areas (makes the marching ants go away). While still in the layer from above, select the eraser tool on the left tool bar, select a small, soft-edged brush, set to 100% opacity & 100% flow in the upper tool bar and erase around the eyes, working slowly and getting up to but not over the lines. Zooming in close helps here. When done, view image at normal size:  Then go to Layers, and select Flatten Image. Getting there - only a few more steps to go! Step 9 Now to work on the whites of her eyes, making them look natural, and without looking blown-out. Layer, New layer Via copy. Zoom into one eye, then go to the Dodge/Highlight tool on the left, right-click and select the Sponge Tool.  On the top toolbar, set the Mode to Desaturate and the flow to 100%, and start dragging a small, soft-edged brush over the whites of the eyes to remove the colors such as the Cyan and Reds so often found in the eyes.  This will take dragging over & over many times to desaturate completely, but be patient and work slowly. When the whites of both eyes have been desaturated, and still in the layer copy, let's do some painting: Go to the left tool bar and select the brush tool and choose white as the color. Choose a soft-edged brush, and in this case, a 5-pixel brush was chosen, set the Mode to Overlay, Opacity set to about 10%, and the flow to 75-100%, then slowly start painting the whites of the eyes.  Note: Overlay is used here so the details in the whites are not just painted over and will retain the realism of the natural nuances. Try and do all of a section at one time without lifting the brush, as starting and stopping points can readily be seen. Overlay a second layer if needed, and don't be too worried about staying exactly in the lines, as this is a layer, and the eraser can be used to clean-up the stray strokes. Don't be afraid to over do it a little, just try and keep it evenly done.  Right-click on the upper layer in the layers box on the lower right. This will open a pop-up called layer styles. Select the Blending Options, blend mode Normal, and slide the amount of blending to suit, then hit OK (this will give you the fine-tuning adjustment on how much white you want applied in the painting). In this case, I adjusted the blend back to about 50-60%, until I had the natural look I wanted:  When satisfied, go to Layers, and select Flatten Image. Step 10 Now to add some sparkle to her eyes and sharpen up some details: Layer, New layer Via copy. Go to the sharpen tool on the left tool bar, select a soft-edged brush, set the Mode to Normal, adjust the strength between 10-12% and manually drag the brush over her Irises, possibly making several passes depending on the amount of sparkle wanted:  Sharpen areas as needed or wanted in the image, such as the hair, eyebrows, lips, ear & earing, and even the stray hairs if wanted, all until the final appearance is not pixelated and looks natural.  When satisfied, go to Layers, and select Flatten Image. Step 11: Close-In Clean Up Time for a little close-in clean up. Layer, New layer Via copy. Select the clone tool on the left tool bar, choose a soft-edged brush, set Mode to Normal, Opacity to 20-25% and go around and clean up some of the finer details the Healing Tool couldn't do in the first step:  Don't worry if it looks too smooth or plastic at this stage - that will be adjusted later, just work slowly. When satisfied, go to Layers, and select Flatten Image. Step 12 Did she really have a yellow blotch on her upper lip? Chances are your model may not have had a section of her lip that was a yellow Hue, but the following will give you an idea of what can be done when there are abnormal skin colors, and how to correct them: Layer, New layer Via copy. Select the lasso tool from the left tool bar, set to 0 to 5 pixels, and draw around the yellow section of her lip:  With the yellow section now selected, go to Image, Adjustments, Hue/Saturation, and in this case, I went to the drop-down and selected the Yellow Channel, and adjusted the Hue & Lightness until it matched the skin.  Now click anywhere on the image to deselect the areas. (makes the marching ants go away) If needed, use the eraser tool to erase slowly around the area previously selected, to blend any editing line. When satisfied, go to Layers, and select Flatten Image. Step 13: Away Plastic Skin, Away! If during the cloning, some sections of skin were rendered too smooth and artificial looking, a few methods of adding some texture back can be done, and in this example, I'll use the manual sharpening tool to do it: Layer, New layer Via copy. Go to the sharpen tool on the left tool bar, select a soft-edged brush, set the Mode to Normal, adjust the strength between 10-12% and manually drag the brush over the smooth skin, several light passes being better than using too much strength too fast. When done, use the manual blur tool lightly over these areas to soften.  When satisfied, go to Layers, and select Flatten Image. I took one more step and ran another soft-focus / Gaussian blur layer as was done in step #4 above, erasing back the details, just to soften the image a little more, adjusting the blending mode strength until I achieved the look I wanted: Practice and experiment - there is no set right or wrong way. When you are done, practice & experiment more!
Home -
Challenges -
Community -
League -
Photos -
Cameras -
Lenses -
Learn -
Help -
Terms of Use -
Privacy -
Top ^
DPChallenge, and website content and design, Copyright © 2001-2025 Challenging Technologies, LLC. All digital photo copyrights belong to the photographers and may not be used without permission. Current Server Time: 09/16/2025 04:40:29 AM EDT. |