| You are not logged in. (log in or register) | |
|
|
Tutorials :: Wedding Photography 101
Wedding Photography 101 by fotomann_foreverFirst off, I'd like to thank idnic, Niten, marksimms, Mast, kudzu, skylen, enigmania, alanfreed, and nsoroma79 for contributions to this tutorial.
IntroductionShooting weddings has long been a source of the working photographer's income. As such, very nice incomes can come from shooting weddings alone. However, brides can be ferocious animals and the photographer must be confident in his or her skills. Also, doing a good job insures more work for you, not only in that it builds your portfolio, but increases your word-of-mouth advertising. There are a few tricks to producing nice wedding photos. Some of the tricks are technical, some are artistic and some just come from pure instinct. All come with practice. In the beginningTo get jobs as a wedding photographer, one usually has to show a bride that he/she processes the skill to shoot the wedding. For the experienced wedding photographer, this is where a good portfolio comes into play. However, for the newcomer, a portfolio may not have sufficient evidence to show that you can do what you say you can do. Catch 22, you need to have shot a wedding before you can shoot a wedding. Some ideas:
If you are a competent photographer, shoot a friend's or relative's wedding or a friend of a friend. You get the point. Also, you may want to volunteer for someone that can't afford a wedding photographer. Also, shooting other types of events will get you some experience. Shooting birthday parties of your nephew, for example, will help you learn to shoot indoors in changing conditions. Remember also, there will be several showers and such before the wedding date that you might attend to get even more practice. StudyLook at the web sites of well-established wedding photographers, see what they are shooting. Flip through the pages of bridal magazines. Take a peek at DPC's Wedding gallery. Keep in mind this tutorial is intended only as a starting point in your studies. Got one to shoot, what now?I cannot over emphasize the importance of the rehearsal for the new-comer or even the seasoned professional. While you'll want to take good photos at the rehearsal, they are not as critical as the wedding itself. So, take this time to practice. As a working photographer, you will often find me at the rehearsal, especially if it is in a place I've never shot before. I play with the light, experiment with settings and importantly know (and can direct) the flow of the wedding. It's also a good time to get to know your client and is a great jesture. Ask who the wedding director is (normally the person contacting you). This will be your first clue as to how organized the event will be. Get phone numbers that you may need later. Go over the schedule and what time you expect everyone to be there. Emphasize that you expect everyone to be on time. Delays can lead to guests becoming restless or leaving. In case there is no wedding director, it is often your job to control event flow. A word of advice is to have the maid of honor step up and help you with having people organized. Be Prepared
Her wedding is not the time for dead batteries, running out of memory, or technical problems. At a bare minimum, you should have spare batteries (for both camera and flash) and plenty of memory. If at all available, you should have a spare camera body, spare flash unit and more memory than you could possibly shoot. Also, some backup method is recommended, such as a notebook computer or dedicated hard drive. Remember, this is a non-repeatable event. You must be ready. As eluded to earlier, you should know what camera settings you will be using. Especially during the wedding ceremony itself, you have little time for adjusting your camera settings. And, while you could try to "wing it" with auto settings, this is not your best option. So, give yourself ample time to get set up and get some light readings. You don't want to be deciding which aperture to use when the wedding march starts. Don't take gigs that are outside of your experience level or that of your available equipment. For example, don't take a wedding gig in low light, if the bride insists on no flash, unless you have a wide aperture lens and experience shooting in low light. You will both be happier with the outcome if you just turn it down. Sacred yet? Don't be. You can do it. TechnicalsRAW or JPEG?This will be debated forever, so this part is merely my opinion. RAW is your best bet for producing quality wedding photos. You must, however, make your own decision on which works best for you. Advantages:
RAW does however have it's disadvantages:
I do suggest that if you are comfortable with RAW and have never shot a wedding that you use RAW for your first weddings. The white balance flexibility alone can save you a very big headache. Moving along... FLASH
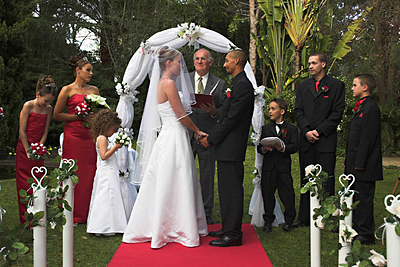
The most repeated mistake made by newcomers is unbalanced, direct flash. By this I mean that the flash over-powers the shot, making it look like a snapshot from your grandmother's Polaroid. To produce wedding portraits the bride will love, your photos should keep a bit of the ambiance of the surroundings. You don't want the background to be overly dark, nor do you want the bride to look like a "deer in the headlights". Unless you are using a soft box or some other diffuser, indoors, you will almost always want to bounce the flash off some surface (preferably white) such as a ceiling. This will diffuse the light and create less harsh shadows. While, not needed, I highly suggest the Gary Fong Lightsphere II, which when used in bounce mode helps provide soft light from above and from the front and produces nice catch lights (the specular highlights in a subject's eye from a light source). You can also use a white card (often built into the flash) with bounced flash to produce catch lights. Of course you can go for more elaborate lighting schemes, but during the ceremony itself, shooting with bounced on camera flash is quite fine. Dragging the shutter to control ambiance It often seems easy with flash to set it into TTL mode and set the camera in aperture priority mode and shoot. However, you should learn a bit about controlling ambient light (often called available light) balance by using your camera in manual mode. Balancing ambient light with flash so that the mood of the setting is retained or so the ambient light still adds to the image is important to your wedding photos. What you need to understand is that shutter speed has no effect on flash exposure. By bringing the shutter speed low enough that ambient light registers on the image (dragging the shutter), you can retain most of the ambiance of a setting by not over-powering it with flash. With this, you'd use your camera's light meter like you normal, but instead you use it as a guideline as to how much ambient light you would like. Somewhere around 1 to 2 stops under-exposure will still give you enough detail in the background. Then you use flash as your main light source. You can either use TTL to get proper exposure of the subject or you can use a combination of manual flash and aperture setting to get proper exposure on the subject. Remember to keep shutter speed adequate enough to freeze any motion or for creative effect use rear curtain sync (if available on your camera). Some cameras offer the ability to fire the flash sync when the shutter is at the end of its peak opening. This is called rear curtain sync, and it is used to freeze motion at the end of the exposure. When making long exposures while firing a flash, rear curtain sync creates the effect of motion blur leading up to the subject as opposed to front curtain sync that creates an effect where the motion blur appears to leave the subject behind.
If shooting outdoors, knowing how to use fill-flash and/or reflectors will help ensure you have great photos. Also, keep a watch out for squinting and don't face your subjects directly into the sun. ISOTwo things to know about ISO:
Knowing these two things, choose your ISO to fit the situation. You'll want to use as low of ISO as possible (to avoid noise), but also have it high enough to allow you ample shutter speed and acceptable flash range. Most of the time indoors, I shoot between 200-400 ISO with flash. This gives me acceptable noise levels and decent flash range. Correcting under-exposure in RAW conversion or in Photoshop will produce more noise than high ISO. APERTURE and DOFAperture settings should not be wide open. There are two reasons for this:
On line DoF Calculator: http://www.dofmaster.com/dofjs.html You will see that at f/5.6 a 50mm lens on a Canon EOS 20D 10 feet from the subject will give you roughly 2.6 feet of acceptable focus, while the same settings will give you nearly 10 feet at 28mm. Learn the DoF of your lenses at various settings and (if available on your camera) use the DoF preview occasionally, to get a feel for your lenses. LENSESWhich lenses should you use? Many things can determine the lens you choose. However, I believe some simple guidelines can help:
ArtisticLet's review the three simple rules of good photography:
Keeping those rules in mind, you can experiment at will. Get a good variety of different shots and different angles and crops. Your client may prefer the tight crops or she may prefer the wider ones. Give her that choice. Do be mindful of the aspect ratios of the finals. An 8x10, for example, will cut quite a bit of the photo off compared to a 4x6. Leave yourself a little wiggle room. Post-Processing
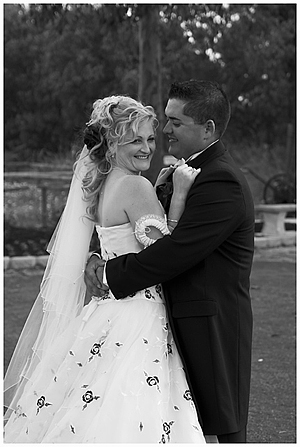
You're shooting digital, so give the bride a choice of B&W, Color or both. Many brides are wanting the B&W images. According to Cindi Penrod (idnic), "People tend to look at B&W work as more professional and more artsy because it isn't something they see much of. When they get their family snaps printed at the Walmart they're always in color. They spend most of their lives seeing only color (and terrible) pics of themselves. A B&W shot, by a pro even, strikes them as stunning and unique in their experience." Give the bride the choice to make that decision though. Also, remember that B&W is not just gray. Warm duotones are generally more appealing than straight grays. Whether color or B&W, your post-processing should make the images seem light and airy rather than dark or gloomy. Try to keep mid tones light and colors warm. Do NOT over Neat Image your photos. We want to see a bride, not Bridal Barbie. Noise is better than plastic. Download and install the proper noise profiles for your camera. These will produce superior results to the auto profiles. A little bit of soft focus goes a long way. A tendency to go overboard with the soft-focus should be avoided. A little soft-focus is nice. Too much will make the prints not so good. Don't try to get rid of every single blemish on the bride's face. A big zit, sure clone it out. But if she has a few wrinkles or a mole she's had all her life, leave them. They are part of who she is. You might think that it's a kind gesture, but it could end up making her look like someone completely different. If I could recommend one filter for Photoshop, I would recommend Alien Skins Exposure. It is a film simulator for both color and B&W films. For the professional, it can be a major time saver and add classic impact to your photos. What to Shoot?Shoot EVERYTHING. Here's a standard list:
Rule of thumb about arrangements, setting, etc if it cost money or time to make, take a photo of it. Also, ask the Bride and Groom of any must-have shots and photograph "important people" during the ceremony. Other helpful tips:
PresentationThe way you present the finished product to your client will have much to do with how many prints you sell. The album you present will be the catalog the client uses to order prints. Throw out bad shots (being glad you took so many). Youd did take a lot of shots didn't you? You may have walked away from the event with 60-700 photos or more. Now is the time to put it together. You'll want to have your best photos presented in a professional manner. Pick a nice wedding album and spend time placing the prints in chronological order. Most of these will be 4x6 prints (available at most labs), although 4x5 works best for presenting what the final crops for most enlargements will appear. Wehn you contract the wedding specify how many proofs you will supply. Usually 150-300 works. And, specify a time limit on processing and stick to it. I generally go for two weeks. Many photographers allow the couple to keep the album and include it in the cost of the wedding along with a number of enlargements. Also, DVD presentations are nice additions. A photo montage set to the music the bride chose for the wedding is often well recieved.
Your PortfolioNow comes the time to build your portfolio. For this, you'll want to choose the best of the bunch, only a few. Have these made into 8x10 and place them into a portfolio. You want to present only the best of the best, quality rules over quantity in your portfolio. As you shoot more weddings your portfolio will grow, but keep it managable by weeding out shots as you build it. Your entire portfolio likely should not exceed 40-50 shots. |