| You are not logged in. (log in or register) | |
|
|
How'd They Do That? :: My World
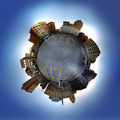
My World by timfythetooI discovered this type of image in one of the threads posted here at DPC and was curious as to how hard it was to make an image like this. Surprisingly it was quite simple. With the Expert Edit Sky Challenge up I had an opportunity to try it out. Here is how I did this image in particular. I went to my location in downtown Columbus just before the sun set so I did not have the actual sun in my image but still a good glow of light. I set up my tripod and proceeded to take 4 images up and down the horizon 360 degrees around with my camera set on P mode shooting in large jpeg (no sense in RAW). I may have not needed this many but I wanted to make sure that I had every part of my landscape in at least 2 images all the way around including a good amount of negative sky space. I used my Sigma 18-125mm lens at 18mm. Below is a collage of the 68 images used. The only editing done to them was to rotate them into an upright position to get ready for stitching.  I used a freeware program called "Autostitch" to create the panorama. I believe I used the standard options with an increase in final image size. I selected all of the images that I wanted to use and the program did its thing. Twenty minutes later I ended up with this image.  After moving this image into Photoshop Elements 2.0 I did a crop to clean up the border and then flipped the image to prepare it for the Polar Coordinates filter.  Right side up gives you an image where the sky is in the center. Upside down will give you the globe shape. Apply the Polar Coordinates filter (Rectangular to Polar) which should give you something like this:  To get ready for the stretch, increase your canvas size with the crop tool to make the height equal to your width (square crop). Duplicate your layer and then using the Free Transform tool stretch your image to fit within your square crop. Stretch it until you get the round shape of your globe to where you like it.  From here on out do whatever editing you would normally do to spiff up your image. For this one I did an auto levels which brought out some colors in my sky and livened up the whole image. Various saturation and selective color adjustments did a lot for this as well. I blended out the sky with some cloning and various intense Gaussian blur layers. An USM, NI and some minor cloning to clean up some of the visible stitch work finished up the image pretty quickly. Not nearly as much editing went into this image as many would think to give me my final product.  This was only the second time I attempted an image like this and I am pretty pleased with the results. Give it a try and let me know how it works out for you!
Home -
Challenges -
Community -
League -
Photos -
Cameras -
Lenses -
Learn -
Prints! -
Help -
Terms of Use -
Privacy -
Top ^
DPChallenge, and website content and design, Copyright © 2001-2024 Challenging Technologies, LLC. All digital photo copyrights belong to the photographers and may not be used without permission. Current Server Time: 04/26/2024 04:00:00 PM EDT. |