| Author | Thread |
|
|
02/10/2010 02:12:28 PM · #1 |
Hey guys. I'm working a skin editing technique and simplifying it. Briefly, I've got a blended skin texture layer at the top of my layers. By painting on the layer below it, it smooths the skin to that particular color. To do it well, you have to keep sampling the color of the specific area, paint, then sample again, and continue to paint. It makes it challenging to get nice smooth transition from shadow to highlight without making everything somewhat flat.
So...my main question, is there a way to get the brush tool to paint with a continuous sample(say 5x5 pixel average)of the colors directly below it? I've tried everything I can think of. The color replacement tool looks promising at a glance but it doesn't give anything like I'm looking for, of course, I have no idea how to properly use it.
Thanks in advance for your ideas.
Cheers, David |
|
|
|
02/10/2010 03:13:09 PM · #2 |
| I don't know of a continuous sample option, but if you just keep a finger on the alt key you can get samples pretty fast by just pressing it a lot as you edit. I've used this, and get a nice smoothing effect. This might be harder if you're editing with a tablet though... |
|
|
|
02/10/2010 03:28:34 PM · #3 |
| How come you don't just create a layer mask on your top layer, set it to solid black (all masked) then paint back in? |
|
|
|
02/10/2010 04:23:40 PM · #4 |
Kirbic: The top layer is only meant to maintain the texture, has nothing to do with the painting itself. Its a high pass layer, with just enough detail to maintain skin texture, then blended using linear light. This allows you to paint and smooth the skin on the layer below but maintain the realistic texture. Does that make sense? Its an awesome technique really it just requires a lot of guessing, painting, blending, etc...
AS for just continuing to manually sample, that's what I have been doing, I just keep thinking it would be a lot easier and quicker if there was a continuous sample option.
There may not be a way to do it. In the meantime, I've been doing it the best I can. I'll post up the before after in a second.
Message edited by author 2010-02-10 16:24:39. |
|
|
|
02/10/2010 04:29:52 PM · #5 |
Here's the whole shot. 
Here's the before/after detail
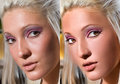
Its not a huge deal but I'm a bit of a perfectionist, its areas like along her right cheek and forehead where I'll end up with a distinct line of tone. Usually I run into it on the broad side with the main shadow, I was able to get this one pretty good though. Always the transition of tones that gives me a bit of a challenge. I figured if there is a continuous average sample that would help eliminate the issue.
Message edited by author 2010-02-10 16:33:51. |
|
|
|
02/10/2010 04:43:38 PM · #6 |
I would take a close look at  lovethelight's tutorial on how she processed her image Stare. She achieves the same thing that you are attempting, with more natural results (IMHO). lovethelight's tutorial on how she processed her image Stare. She achieves the same thing that you are attempting, with more natural results (IMHO).
Not exactly what you were asking, but I found the tutorial very valuable. |
|
|
|
02/10/2010 05:01:18 PM · #7 |
|
|
|
02/10/2010 05:02:11 PM · #8 |
| On the large pic (the full portrait) it just looks really really false. Almost like a girl from an Anime film, but in real life.. SHUDDER! |
|
|
|
02/10/2010 05:37:09 PM · #9 |
Seems a bit plastic looking to me. I like her 'natural' look.
Have you looked at it seems nice, I don't own it but have played with it off and on. |
|
|
|
02/10/2010 05:40:23 PM · #10 |
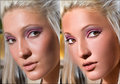
Here's the exact same shot just with the face masked back to no edit.

Out of curiousity, most references have been to the full shot, what about when looking at the closeups side by side. Does everyone feel like its just as fake? I'm so used to editing an image at 100% for print quality, when you make it web quality, I feel like it exagerates the effect? Thoughts?
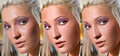
Left is unedit, middle full edit, the right is reduced to 50%
Message edited by author 2010-02-10 17:58:45. |
|
|
|
02/10/2010 07:06:44 PM · #11 |
The 50% reduction is looking better than the 100% edit. But I would try reducing it even a little more. 25-30% and I think it would look pretty good. at 50% it still has a bit of a barbie look to it, but still much better than the 100%.
Originally posted by trnqlty:
Out of curiousity, most references have been to the full shot, what about when looking at the closeups side by side. Does everyone feel like its just as fake? I'm so used to editing an image at 100% for print quality, when you make it web quality, I feel like it exagerates the effect? Thoughts?
Left is unedit, middle full edit, the right is reduced to 50% |
|
|
|
|
02/10/2010 07:12:54 PM · #12 |
| def go down another 25% like Bugz said but I think it is also her hair that is throwing the whole shot off too. Can you darken the hair you have this great big yellow patch at the top of her head it is really obvious that she has it dyed as well maybe bring in some low lights of blonde just to give it some texture as well |
|
|
|
02/10/2010 07:26:12 PM · #13 |
A *much* more natural look can be obtained pretty simply by following this procedure:
- Make a copy of the image on a layer above
- Gaussian blur the copy at about 1.5px radius
- Fade the blur to about 50%
- Gaussian blur the copy to about 3px radius
- Fade this blur to about 25%
- Create a layer mask on the blurred copy
- Paint with a broad, soft brush at reduced opacity on the layer mask to bring back sharpness in the eyes, lips, and hair
- Adjust opacity of the top (blur) layer if desired to moderate the effect
The final result should retain some detail in the skin, while smoothing out harshness. The entire process takes a couple minutes. If desired, larger blemishes may be removed using the clone tool, but this work should now be minimal. Here's how it looks on your example (my edit at left):
 |
|
|
|
02/10/2010 08:08:29 PM · #14 |
it seems the question was more about color correction than methods of smoothing.
What you could do that would save time and effort is to make a gradient map adj layer and use the darkest and brightest points of the skin for the color range, then set the blending mode to color. I find this reduces and evens out the blotchy areas or whatever else and is a lot quicker than most methods.
Also, if you do go too far and remove all detail, you can bring back some texture by adding noise to a duped layer and masking where applicable.
|
|
Home -
Challenges -
Community -
League -
Photos -
Cameras -
Lenses -
Learn -
Prints! -
Help -
Terms of Use -
Privacy -
Top ^
DPChallenge, and website content and design, Copyright © 2001-2024 Challenging Technologies, LLC.
All digital photo copyrights belong to the photographers and may not be used without permission.
Current Server Time: 04/19/2024 10:29:37 AM EDT.


