| Author | Thread |
|
|
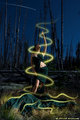
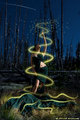
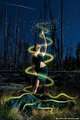
11/11/2009 11:27:10 PM · #1 |
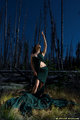
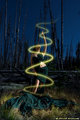
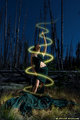
Figured I'd post this here for the heck of it to get some thoughts on it.
I never liked the original but after some playing the other night with it I came up with this:
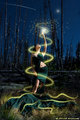
|
|
|
|
11/11/2009 11:28:47 PM · #2 |
| BEAUTIFUL! has a very commercial feel to it...should be an ad for a perfume or something :] |
|
|
|
11/12/2009 09:30:15 AM · #3 |
Originally posted by LMA128:
BEAUTIFUL! has a very commercial feel to it...should be an ad for a perfume or something :] |
Thanks :)
|
|
|
|
11/12/2009 06:01:13 PM · #4 |
as per a couple requests Ill try to post the original tonight
|
|
|
|
11/12/2009 06:26:08 PM · #5 |
Niccccce dude!!!!!!
now was that lightpainting or PS work |
|
|
|
11/12/2009 06:31:36 PM · #6 |
Originally posted by LMA128:
BEAUTIFUL! has a very commercial feel to it...should be an ad for a perfume or something :] |
Yeah, better watermark it before you find it in some fashion magazine ... |
|
|
|
11/12/2009 06:54:00 PM · #7 |
Originally posted by GeneralE:
Originally posted by LMA128:
BEAUTIFUL! has a very commercial feel to it...should be an ad for a perfume or something :] |
Yeah, better watermark it before you find it in some fashion magazine ... |
snickering loudly and very unladylike |
|
|
|
11/12/2009 10:05:13 PM · #8 |
LoL maybe I should watermark it :)
anyway reluctantly here is the original straight out of the box.
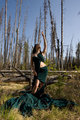
|
|
|
|
11/12/2009 10:11:48 PM · #9 |
| How did you make it look like night and how did you make the PWL? |
|
|
|
11/12/2009 10:17:20 PM · #10 |
PWL?
Ill see if I can do little write up on changing day to night and the glow but in the simplest form I used an old movie trick with sort of darkish blue filters to give the impression of night.
|
|
|
|
11/12/2009 10:19:26 PM · #11 |
Originally posted by dknourek:
PWL?
|
PWL = Paint With Light.
I know it's not an actually PWL but it looks pretty close to it. |
|
|
|
11/12/2009 10:24:20 PM · #12 |
ok give me a day or so adn Ill try to do a tutorial, I usually suck at these types of things but Ill give it a shot ;)
|
|
|
|
11/12/2009 10:45:44 PM · #13 |
Originally posted by dknourek:
ok give me a day or so adn Ill try to do a tutorial, I usually suck at these types of things but Ill give it a shot ;) |
Awesome, I'm sure a lot of us would like that. I've never been able to do the day/night thing right. |
|
|
|
11/13/2009 12:05:09 AM · #14 |
OK hopefully this will help...
First off taking the original photo in Lightroom I open it as a smart object in PS.
Right click the layer and select "New Smart Object Via Copy"
Hiding the new layer I double click the base layer opening it in Adobe Camera RAW.
Under White Balance I drop the colour Temperature down to about 3200 to give it a nice blue cast
Then adjusting the exposure for the mids and shadows and brightness for the highlights till I get the desired night time look on the grass and trees, ignoring the effect on the model and sky.
Then for the sky still in ACR I adjust the luminance and saturation of the BLUE ONLY till I get the effect that I want for an early evening sky.
Next I took my copy of the original layer and edit it for the model to get the desired effect of her being surrounded by light. Once I have her adjusted I created a layer mask to keep the model but explose the night scene behind her, as well as painting in an oval of light at her feet to simulate the light as if it were glowing just around her. and then droping her opacity back just slightly so some of her and the her shadows get a slight blue cast.
Next (this is an important step) I set up my brush tool for this image in particular I used a default size 5 hard round brush. And making sure your default fill colour is white.
Create a NEW blank layer and make sure its active.
Then taking the pen tool I draw the spiral Of light around the model. Once Im happy with the way the path looks, still with the pen tool active I right click the path and select "Stroke Path" in the window that pops up I hit the drop down list and choose "Brush" and making sure "Simulate Pressure" is checked I hit ok. This is why you set up the brush before hand and the Simulate pressure option gives you the nice fade off at the ends of the path. After hitting ok just right click the path again and delete it.
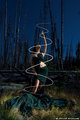
Now Right clicking on the new layer with the stroked path I selected "Blending options" Here I added an outer glow of bright yellow and adjusted the glow to where I was happy. *note: you can change the colour of the new path by also using "Colour overlay" in that same dialogue box.
After that I added a layer mask and simply painted out where I wanted the spiral appear to go BEHIND the model.
I used the same techniques as above for the rest of the glowy lines and fire flys and the stars in the sky used the same techniques except I used single clicks with the mouse to add them making the stars smaller and a little less glowy.
 extra wisps extra wisps
 stars stars
 glowy bugs glowy bugs
Next I wanted it to look as if the glowy spiral was actually giving off light so I added an adjustment layer of brightness/contrast and punched up the brightness a fair bit. Then again adding a layer mask to the adjustment layer I painted in the light cast on to the model to simulate the light from the spiral.
After that adding in the 2 lens flairs for effect, one at her hand and the other at the top of the spiral.

Saving to web and done...
Ill prob come back later to read this again, Im exhausted but hopefully this will get you headed in the right direction...
-dave
|
|
|
|
11/13/2009 12:26:25 PM · #15 |
|
|
|
11/13/2009 12:39:47 PM · #16 |
Thanks for the tutorial and for taking the time to do it. (And I bet it's not easy trying to explain!)
I've been looking to do something like this for a while, although I doubt it'll be this impressive!
Thanks again |
|
|
|
11/13/2009 01:46:43 PM · #17 |
| Thanks for the tutorial. I am the farthest thing from a Photoshop guru and think I understood it, may even give a try to something like this. Excellent work! |
|
|
|
11/13/2009 01:56:49 PM · #18 |
| This is just amazing! I'll never be able to edit like that! |
|
|
|
11/13/2009 02:05:13 PM · #19 |
Thanks guys, its not really that difficult once you try it for your self and establish your own work flow. Like with me I have grown to LOVE layer masks and you can do some pretty cool stuff with them and apply them to almost any type of layer be it an image, adjustment layer, text...
Feel free to post questions of you like and Ill do my best to answer what I can...
|
|
|
|
11/13/2009 04:21:11 PM · #20 |
| Wow, David -- when I said I'd like to see the before-and-after photos, I had no idea there was that much pp involved. I actually thought you had shot at night a long exposure and a moving light source creating the spiral. Well done! |
|
|
|
11/13/2009 05:02:13 PM · #21 |
| Great tutorial. Great effect. Thanks for posting the details and steps. |
|
|
|
11/13/2009 05:12:07 PM · #22 |
WOW what processing! Very cool :) |
|
|
|
11/13/2009 05:15:38 PM · #23 |
| OMG OMG OMG................... I love love love love love this..... it's just amazing !!!!!!! thank you so much for posting the orig and sharing your post steps.... I just can't say enough about how much I love this image.. |
|
|
|
11/13/2009 05:46:26 PM · #24 |
| How do I open something into adobe camera raw to do the editing there ????? |
|
|
|
11/13/2009 05:48:25 PM · #25 |
| Thanks for taking the time to break down the editing steps as much as you did David. Much appreciated and a great result! |
|
Home -
Challenges -
Community -
League -
Photos -
Cameras -
Lenses -
Learn -
Prints! -
Help -
Terms of Use -
Privacy -
Top ^
DPChallenge, and website content and design, Copyright © 2001-2024 Challenging Technologies, LLC.
All digital photo copyrights belong to the photographers and may not be used without permission.
Current Server Time: 04/25/2024 03:36:02 PM EDT.


