| Author | Thread |
|
|
07/28/2009 10:26:06 PM · #1 |
watermark example
All of the tutorials on how to batch watermark your images and create a watermark tell you how to do this using the giant copyright symbol and then they generally take up the entire image.. Can anyone point me to a tutorial on how to do something like this one ??? |
|
|
|
07/28/2009 10:27:58 PM · #2 |
| You broke the page!!!!!!!!!!! lol |
|
|
|
07/28/2009 10:28:53 PM · #3 |
| is it not working...? it works for me.. |
|
|
|
07/28/2009 10:31:45 PM · #4 |
not working for me either
|
|
|
|
07/28/2009 10:33:04 PM · #5 |
|
|
|
07/28/2009 10:33:43 PM · #6 |
lets try this again.. here's a page to her blog..
new watermark example
just go down a tad and the first image of the girl in the stripe shirt is an example of what I'm talking about..
Sorry about that.. :-)
btw: take a peak at her work too !!! She's wonderful and talented.. a natural at portrait photography..
Message edited by author 2009-07-28 22:35:02. |
|
|
|
07/28/2009 10:46:50 PM · #7 |
| add a layer, type your text, then change your opacity |
|
|
|
07/28/2009 10:50:24 PM · #8 |
Originally posted by ericwoo:
add a layer, type your text, then change your opacity |
OK, I get that.. lol.. I need to be more specific.. I want to batch process my images and have the watermark fit each image every time regardless of the size of the image..
And, that doesn't explain how you get the white block background either..
Message edited by author 2009-07-28 22:51:05. |
|
|
|
07/28/2009 11:11:20 PM · #9 |
If you are using PS, you'll need to record an action and make a droplet. Bring up the image you want, then start the recording.
Add layer
Add a rectangle marquis
Fill it with white
Add your test
Merge the rectangle and the test layers
Adjust the opacity of the layer
Flatten and resize the image
Stop the recording
Then make a droplet from the File --> Automate --> Create Droplet tab. Create the droplet, then drop your folder onto that droplet.
If you aren't using PS, I have no idea.
E |
|
|
|
07/28/2009 11:19:45 PM · #10 |
| I am using PS.. I'll try that.. :-).. ty |
|
|
|
07/29/2009 09:45:15 AM · #11 |
| no.. that isn't working.. I need it to fit each picture each time and that only works on some images.. hmmmm.. back to the drawing board.. I'm sure there must be a way to do this in batch processing.. |
|
|
|
07/29/2009 09:49:02 AM · #12 |
Add something to the action which aligns the text layer with the other layers both vertically and horizontally (if you want it in the middle that is).
One thing you might want to do is create the watermark in a separate file. When pasting into each image I believe there's an option to auto size it to fit. Then you can align it. |
|
|
|
07/29/2009 09:52:54 AM · #13 |
you can create the watermark block and text in a seperate file with the block wide enough to cover any width. Combine all the layers but don't flatten the file. You just want everything including the opacity setting in a single layer. Save that file on you hard drive.
Anytime you need it, just open the file and drag the layer over to the image file you want it on.
You can probably automate that process too. Even if you can't, it will only take a second or 2 everytime you want to use it.
ETA: Dang Colette, beat me to it!
Message edited by author 2009-07-29 09:53:50. |
|
|
|
07/29/2009 10:14:10 AM · #14 |
OK... I created the watermark as a it's own file... got that far.. Now, I discovered this option to "place" it on my image... That automatically centers it on every single image regardless of size because I made it soooo huge to begin with.. So, size is not an issue when it comes to being too small... But, I wanted it to stretch from side to side on the image and it's not doing that.. Is there something I'm missing or am I just going to have to adjust each one.. It does only take a few seconds for each one, but I'm finishing up some wedding photos and there's a TON... :-)..
And, I notice that the "place" option centers it every time on the image.. I want it to be placed at the bottom of the image.. I wonder if there's a way for me to adjust this "place" option so it automatically puts it where I want it.. hmmmmm.. anyone use this ???
Thanks everyone.. Your help is what's gotten me through this..
|
|
|
|
07/29/2009 11:29:02 AM · #15 |
| I think using alignment of layers will allow you to place the watermark where you want it. |
|
|
|
07/29/2009 12:26:19 PM · #16 |
Kristin,
That is very similar to the way I display my watermarks.
 . .  . . 
I created a Photoshop project (watermark.psd) with two layers. One is a text layer, and the other is a rectangular box with a background color (grey), with its opacity set to a low setting. Pardon my ambiguity, but I'm nowhere near my computer with Photoshop, so I can't look it up.
Then, I have both projects loaded in PS--the image that I want to watermark and my watermark project. I make sure both layers are selected in my wm project and drag it over to my photograph. I use the transform tool to resize the watermark and text together (make sure they are still both selected in your photograph project). Also, hold the shift key to maintain perspective. Simply drag both around to place it where ever you wish over your photo.
You should have at least three layers in your photograph project (two for the watermark and at least one for your photograph). You can also work on your photograph (edit, add layers, etc.) without it affecting your watermark. To adjust the opacity of the shaded box, simply select only that layer and adjust the opacity slider.
On a side note, ever since I started watermarking about 10 months ago, I have licensed more photos than I ever had. I've made enough money to buy the "Canon EF 70-200mm f/2.8L IS USM" that I always wanted (along with the 1.4x extender)
.
Message edited by author 2009-08-12 20:03:00.
|
|
|
|
07/29/2009 05:50:44 PM · #17 |
| Thank you Les.... Your directions were very easy to follow and it worked like a charm.. :-).. |
|
|
|
07/29/2009 06:27:29 PM · #18 |
| The faint gray stripe is a nice addition -- other than that, I've been using pretty much the same method as you do. I find being able to customize the position and size of the watermark to be "worth" the time, so far (I don't do it much). |
|
|
|
07/29/2009 06:39:02 PM · #19 |
Originally posted by GeneralE:
The faint gray stripe is a nice addition -- other than that, I've been using pretty much the same method as you do. I find being able to customize the position and size of the watermark to be "worth" the time, so far (I don't do it much). |
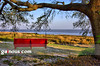
I agree... Here's my version..
 
Some images it would fit perfectly, but landscape cropped images required I stretch it.. You can't tell though.. I like it.. Thanks again for everyone's input & help.. |
|
|
|
07/29/2009 07:53:24 PM · #20 |
Originally posted by kandykarml:
|
Are you using this mainly for watermarking and/or advertising also? If people want to find your website by looking at the picture it's tough to read. |
|
|
|
07/29/2009 08:00:59 PM · #21 |
Originally posted by GeneralE:
The faint gray stripe is a nice addition -- other than that, I've been using pretty much the same method as you do. I find being able to customize the position and size of the watermark to be "worth" the time, so far (I don't do it much). |
Yes, I use the gray stripe as a further deterrent, making it harder for a thief to "erase".
Message edited by author 2009-08-12 20:03:07.
|
|
|
|
07/29/2009 08:04:16 PM · #22 |
Originally posted by kandykarml:
Thank you Les.... Your directions were very easy to follow and it worked like a charm.. :-).. |
My pleasure Kristin!
I will respond to your PM later this evening when I get home. I'm at work and need to wrap up a few things before leaving.
One tip for everyone...place the stripe (or your own watermark graphic) in a strategic position. I've seen some folks put in close to the bottom or top, only to be easily cropped-out by a devious photo-bandit.
Message edited by author 2009-08-12 20:03:15.
|
|
|
|
07/29/2009 08:20:47 PM · #23 |
Originally posted by faidoi:
Are you using this mainly for watermarking and/or advertising also? If people want to find your website by looking at the picture it's tough to read. |
Just like on the stripe layer, you can adjust the opacity of the text layer to make the text more readable. On some extreme contrasts and exposures, you may need a completely different color font. I actually have two PSD watermark projects--one with a lighter font and one with a darker font.
Message edited by author 2009-08-12 20:03:20.
|
|
|
|
07/29/2009 08:25:29 PM · #24 |
Originally posted by faidoi:
Originally posted by kandykarml:
|
Are you using this mainly for watermarking and/or advertising also? If people want to find your website by looking at the picture it's tough to read. |
In this case, I'm only using it to avoid someone printing it.. You bring up a good point though..I will need to make a different one that actually has my full website address on it and is much easier to read.. |
|
Home -
Challenges -
Community -
League -
Photos -
Cameras -
Lenses -
Learn -
Prints! -
Help -
Terms of Use -
Privacy -
Top ^
DPChallenge, and website content and design, Copyright © 2001-2024 Challenging Technologies, LLC.
All digital photo copyrights belong to the photographers and may not be used without permission.
Current Server Time: 04/19/2024 11:04:59 PM EDT.


