| Author | Thread |
|
|
05/09/2009 06:59:53 PM · #1 |
Another one in my occasional series of "how would you edit this?" threads, where I post one of my shots and invite you good people to show me how you would edit it.
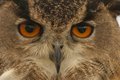
This was almost my FS entry but I could not get it to a point I was happy with it.
Follow the link and click "view full size image" to access the full size original.
You're free to have a try at editing it yourself, although I'd appreciate it if you could post editing steps for my benefit as well as anyone else reading this.
Thanks in advance! |
|
|
|
05/09/2009 07:06:38 PM · #2 |
| You realize, of course, that a post like this is just begging for *unnamed member* to do something with it involving Godzilla. |
|
|
|
05/09/2009 07:22:37 PM · #3 |

Resized for Advanced editing and Challenge rules,
a little clarify...selected saturation..layered gaussian blur..multiply/fade..a few other pings including the cleaning up the eyes...sharpened..bordered submitted...I think it looks better. |
|
|
|
05/09/2009 07:24:07 PM · #4 |
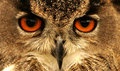
Not sure how this looks since my laptop is not calibrated, but here is my 5min edit:

Cropped- so the eyes are horizontal and to fill the frame.
Shadow/highlights- minor adjustments to bring out some texture
Duplicated layer and converted it to B&W, then set layer to sft light at around 20%
Merged layers- then dodge and burn.
Then I reflected the highlights of the right eye on to the left eye (I'm not sure if thats legal in advanced)
Added border.
|
|
|
|
05/09/2009 07:31:08 PM · #5 |

Reprocessed as HDR and recropped to give it a more aggressive attitude. |
|
|
|
05/09/2009 08:02:57 PM · #6 |
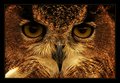
I used Topaz Adjust and the "Dramatic" preset on the whole image along with a touch of the Topaz Denoise.
Masked out they eyes and converted to black and white via Channel Mixer.
Dodged and burned the eyes, around the eyes, and dodged the beak to bring back some of the cool scarring.
I also leveled using the eyes as my horizon, and cropped.
...then I came back and completely redid it from the full sized version with the same basic steps, but added a Smart Sharpen in there due to the resize.

Message edited by author 2009-05-09 21:05:05. |
|
|
|
05/09/2009 08:12:33 PM · #7 |

A few adjustment layers with some dodge and burn. Sharpened and added border. |
|
|
|
05/09/2009 08:24:14 PM · #8 |
crop
levels
curves
decrease brightness & increase contrast
dodge and burn around the eyes and beak
2 USM passes
gaussian blur to the corners |
|
|
|
05/09/2009 08:25:14 PM · #9 |
| in retrospect i really like elsapo's black border **two thumbs up** |
|
|
|
05/09/2009 08:31:07 PM · #10 |
|
|
|
05/10/2009 03:54:17 AM · #11 |
Originally posted by Strikeslip:
 |
lol. I knew this one would come up. |
|
|
|
05/10/2009 03:55:08 AM · #12 |
LOL Thanks all.
I was half expecting a Godzilla edit when I checked in this morning ;-)
Slippy gets the imaginary prize for spotting my reflection in the owl's eyes in the original...funny they don't seem quite the same in his version ;-) |
|
|
|
05/10/2009 09:10:37 AM · #13 |

this is what i got in lightroom with + .5 stop exposure clarity,just a bit a bit of satureation a bit of contrast clip the blacks a bit and just a touch of sharpening |
|
|
|
05/10/2009 09:43:07 AM · #14 |

A combination of contrast masking (cntrl-alt-tilde) and Topaz in layers, crop to symmetrical, vignette, adamus sharpening. I know it's overcooked, was just playing around. Best of these so far, IMO, is SDW's...
R.
Message edited by author 2009-05-10 09:44:48. |
|
|
|
05/10/2009 02:06:33 PM · #15 |
Originally posted by aliqui:
I used Topaz Adjust and the "Dramatic" preset on the whole image along with a touch of the Topaz Denoise.
Masked out they eyes and converted to black and white via Channel Mixer.
Dodged and burned the eyes, around the eyes, and dodged the beak to bring back some of the cool scarring.
I also leveled using the eyes as my horizon, and cropped.
...then I came back and completely redid it from the full sized version with the same basic steps, but added a Smart Sharpen in there due to the resize.
|
OH NOES, you used selective re-sat! Don't you know that's taboo and cliche? lol
|
|
|
|
05/10/2009 02:37:23 PM · #16 |
Curves to increase contrast on overlay, auto levels on luminosity, curves to decrease brightness with circular gradient, slight shadow/highlight, changed eye colour with new layer on color, resize twice, sharpen, border |
|
|
|
05/10/2009 06:04:15 PM · #17 |
Originally posted by K10DGuy:
OH NOES, you used selective re-sat! Don't you know that's taboo and cliche? lol |
O RLY?? |
|
Home -
Challenges -
Community -
League -
Photos -
Cameras -
Lenses -
Learn -
Prints! -
Help -
Terms of Use -
Privacy -
Top ^
DPChallenge, and website content and design, Copyright © 2001-2024 Challenging Technologies, LLC.
All digital photo copyrights belong to the photographers and may not be used without permission.
Current Server Time: 04/23/2024 06:00:08 PM EDT.


