| Author | Thread |
|
|
06/25/2014 08:51:43 AM · #1 |
Expert editing challenges: I don't like 'em but I'm also I'm terrified of them. Plain and simply, I don't know where to start when it comes to making a composed photo like I see being done for all the challenges around here.
So for those of you who are familiar with the process, could you write down a couple of words describing a typical workflow?
I'm not looking for anything detailed - just a general process with some (photoshop) keywords that I can then look up tutorials for, etc.
Thanks, |
|
|
|
06/25/2014 11:13:10 AM · #2 |
My general workflow is:
- Look at the challenge posted
- See that it is Expert
- Move on.
But that's just me :-)
Seriously, I think that the key to Expert is significant effort in up-front planning. If you are planning to use multiple source images, each one must be planned carefully such that it is composed, lit and shot to ensure that it can be edited into the final composition seamlessly. More work up front means *lots* less work on the processing end.
Message edited by author 2014-06-25 11:16:44.
|
|
|
|
06/25/2014 11:18:10 AM · #3 |
What a strange question, I look forward to any answers.
I really have no idea what you really mean. |
|
|
|
06/25/2014 11:27:15 AM · #4 |
| My workflow for Expert is the same as Advanced but I just enjoy the freedom of not having to worry so much about the odd bit of cloning. |
|
|
|
06/25/2014 11:36:48 AM · #5 |
My first thought: c'mon guys, you can do better than that! Second: maybe I'm not being clear. Example:
Originally posted by kirbic:
If you are planning to use multiple source images, each one must be planned carefully such that...it can be edited into the final composition seamlessly. |
What does the editing into the final composition imply? A knowledge of photoshop masks, ...., etc ?
How does one "shrink" an image to fit into something like this? 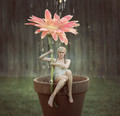
Difficult to dive into the whole thing when you don't even know what it is that you are trying to learn. |
|
|
|
06/25/2014 11:38:07 AM · #6 |
I would look at  gyaban's profile and his descriptions of what he was thinking. He goes through more planning than anyone I know of around here and the results can usually be found on the front page. He also documents his thought process and workflow very well in his descriptions. gyaban's profile and his descriptions of what he was thinking. He goes through more planning than anyone I know of around here and the results can usually be found on the front page. He also documents his thought process and workflow very well in his descriptions.
Originally posted by Dudski:
Expert editing challenges: I don't like 'em but I'm also I'm terrified of them. Plain and simply, I don't know where to start when it comes to making a composed photo like I see being done for all the challenges around here.
So for those of you who are familiar with the process, could you write down a couple of words describing a typical workflow?
I'm not looking for anything detailed - just a general process with some (photoshop) keywords that I can then look up tutorials for, etc.
Thanks, |
|
|
|
|
06/25/2014 11:50:22 AM · #7 |
Originally posted by tate:
I would look at gyaban's profile and his descriptions of what he was thinking. He goes through more planning than anyone I know of around here and the results can usually be found on the front page. He also documents his thought process and workflow very well in his descriptions.
|
Good idea, but I'm looking for something a little bit more general. Specific example: I photograph snowflakes. If I were asked what do I need a knowledge of in order to take photos of snowflakes, here is what I would say.
You need an understanding of:
- direct reflection
- refraction
- DOF vs. magnification vs. aperture
- focus stacking
- magnification vs. effective aperture
- diffraction
- etc...
I'm looking for something similar when it comes to creating a composite image. |
|
|
|
06/25/2014 12:15:35 PM · #8 |
Plan. Always. In details. There is almost zero chance to reach a very good result if you want to create a composite (or even a complex setup photographed in one shot) without knowing in advance absolutely everything about your project. Do not hesitate to draw a sketch, or even better, several sketches until you are happy with the composition. Then, study your lighting. Choose where the light source(s) must be, and stick to the plan. If you photograph different parts, make sure it is always consistent regarding everything: lighting of course, but also distance to the lens, lens focal, lens aperture, point of view, etc. It is also a good time to choose the colors of your image, and try to match them the best you can (for example, use dark outfits if your main character is supposed to wear something dark: even if the colors are not exactly matching, the closer it is in the photo, the easier and better the editing will be).
As you can see, so far, there is NOTHING to learn about editing. And it is pointless to look into the details of the 'liquify' tool for example if you did not follow the previous steps. Mastering the tools themselves will give you nothing without the precise knowledge of what is your goal image.
When you have all the photos ready, it is finally time for processing. There are not that many important things to learn. In fact, I would name 4 things:
- Layers: to understand how you can 'stack' your different photos, and combine them
- Masking: to understand how to isolate certain parts of your different photos
- Various coloring tools: to understand how you can adjust colors of the different parts so that everything fits together in harmony
- Resize and various deform tools: to understand how you can adjust the shapes of your different photo parts so they fit all together
That's pretty much it. Once you know how to deal with these 4 actions, you are mostly set. The good news is, there are many ways of handling those. I would recommend browsing youtube for tutorials. I literally spent dozens of hours looking at them, and trying to use the various tricks in my projects. There is so much information available! You can virtually learn about any Photoshop tool in minutes. Of course, you don't need to look at everything at once! First, learn some basics about layers (if necessary). Play a bit with those, until you are comfortable with the basics. Then, put your camera on a tripod, take a photo of an empty room, then another photo with you sitting inside that same room (without changing the camera settings). Try to combine those 2 shots in Photoshop, using what you learned about layers, and using layer masks. As soon as you don't know something, look at youtube for 2 or 3 tutorials about that particular step. Simply repeat the process as needed. This is exactly how I do it: I never ask myself "How am I going to do it?" before starting a project. It is not important. The most important by far is to know what result you are after. Then, work hard, and search tutorials that will permit you to get that result. It is always possible, it is a matter of time and will.
Finally, some older posts of mine that could be of use:
- This one, in which I expose some tricks I use to find ideas,
- That one, in which I talk about things to keep in mind when creating a composite.
Hope this helps! |
|
|
|
06/25/2014 12:18:22 PM · #9 |
Originally posted by tate:
I would look at gyaban's profile and his descriptions of what he was thinking. He goes through more planning than anyone I know of around here and the results can usually be found on the front page. He also documents his thought process and workflow very well in his descriptions. |
Exceptional advice. Some of Christophe's details may still be a little hard to decipher for those unfamiliar with some of the techniques, but in general his descriptions of his workflow for an image are a wealth of information. Christophe was exactly who I was thinking of when I wrote about planning.
|
|
|
|
06/25/2014 12:20:18 PM · #10 |
Originally posted by gyaban:
Hope this helps! |
YES!!! Thank you, o Master of Composites :)
All that I was looking for in a response, and way more. Much appreciated. |
|
|
|
06/25/2014 03:35:13 PM · #11 |
When you create a composite of many layers, it can often get confusing. A couple of things I do to help is to do my extractions of each element I'm going to use, and save it as it's own file, and only import the extracted piece into the "main" file. I also name each layer in the main file (foot, tree, clouds, etc.)
Good luck, and have fun!
Save often....
|
|
|
|
06/25/2014 03:43:29 PM · #12 |
i disagree with some of the comments here. you must know the tools in photoshop very well in order to plan how to accomplish a manipulation. the thing with photoshop is, there are countless ways to do the same thing. creativity in photoshop (arguably, creativity in anything) arises from a strong technical knowledge platform that is really well ingrained.
for example, somebody had a font that they wanted me to work on. it was a thin font, and they want the same typeface but italicized and bolded. the first thing that popped into my head was the skew tool for italicizing the text. bolding it was an interesting problem, but because i am so familiar with photoshop, it didn't take me more than a few seconds to realize that bolding can be simulated through the 'stroke' function in the layer effects panel. just stroke the font with a thick outline, make the outline the same colour as the font colour, and you have a bolded font.
im sure there are many other ways to simulate a bolded font, but it's this kind of "outside the box thinking" that you need to be creative with photoshop, and you first need to be really familiar with the functionality of the software.
Message edited by author 2014-06-25 15:44:14. |
|
|
|
06/25/2014 04:02:48 PM · #13 |
I think these DPC Tutorials may address these issues, at least in part ...
Multiple Personality Editing
Cloning Tutorial
Message edited by author 2014-06-25 16:03:11. |
|
|
|
06/25/2014 05:27:34 PM · #14 |
| I was about to write my workflow but no chance to explain better than Christophe :) |
|
|
|
06/25/2014 08:23:07 PM · #15 |
Strictly fwiw...worth 1k also has a plethora of tuts, though some go back several years and thus may refer to complex series of actions that are no longer necessary under the new PS modes.
And again strictly fwiw, I would say that if I were to try to replicate Samantha's new profile pic, I'd a) shoot a potted daisy against a very rainy backdrop; and b) take a shower, wet hair profusely, dress appropriately, sit on a chair or similar so legs look draped over the pot's edge and position hands on a lampstand or similar tall object so they would look natural wrapped around the flower's stem.
Then I'd make the daisy/rain (assuming it's all one shot and not two) the bg, extract tool on myself in another layer, then use the place tool atop the bg and scale myself appropriately.
But usually, for Expert, all I do is plain ol' Advanced plus basic resizing/warping tricks ;-)
Of course, you can always pm Samantha herself, I'm sure she'll be glad to help. |
|
|
|
06/26/2014 08:14:10 AM · #16 |
| Appreciate the input guys. I'll be bookmarking this thread and coming back to it regularly. I've decided that a little self-kick-in-the-ass is needed to get me into those expert challenge - and this is it. |
|
|
|
06/26/2014 10:46:10 AM · #17 |
That's why Christophe is the master, him and Samantha both nail the details.
I love expert for this reason, it forces me to focus on details. I also get to learn techniques i otherwise would never know about and those techniques have often carried over to my normal editing process.
Generally, i'll come up with an idea and figure out how to shoot and edit it and if i can't figure out how i'll Google some tutorials on how to accomplish what I want.
Message edited by author 2014-06-26 10:46:39. |
|
Home -
Challenges -
Community -
League -
Photos -
Cameras -
Lenses -
Learn -
Prints! -
Help -
Terms of Use -
Privacy -
Top ^
DPChallenge, and website content and design, Copyright © 2001-2024 Challenging Technologies, LLC.
All digital photo copyrights belong to the photographers and may not be used without permission.
Current Server Time: 04/19/2024 07:36:44 AM EDT.


