| Author | Thread |
|
|
03/12/2010 02:41:13 PM · #151 |
jminso...
Bet I can out-cheap you. B-}
My SB-20 is on a tabletop stand, sitting on top of 3 5-gallon buckets. Besides that, I have a 250-watt heater halogen lamp and one of those clamp-on silver reflectors like you see on a construction site. Do you think if I got one of those slaves (just the screw-in bulb part), like you have in your lighting kit, that it would work in the clamp-on reflector, or is the sensor not sensitive enough to sense a flash if it's in the reflector housing? |
|
|
|
03/12/2010 02:58:56 PM · #152 |
Originally posted by e10icus:
jminso...
Bet I can out-cheap you. B-}
My SB-20 is on a tabletop stand, sitting on top of 3 5-gallon buckets. Besides that, I have a 250-watt heater halogen lamp and one of those clamp-on silver reflectors like you see on a construction site. Do you think if I got one of those slaves (just the screw-in bulb part), like you have in your lighting kit, that it would work in the clamp-on reflector, or is the sensor not sensitive enough to sense a flash if it's in the reflector housing? |
As long as the light can get to the strobe it should be fine. You can always get one pretty cheap to try out. Mine fire everytime even having them sort of out of the way. The only times they have not fired are when I tried using a makeshift snoot to use on it since that covered the sensor. Again I am no expert and I am just starting to play around with this stuff. I am tempted just to buy 2 more speedlites to use instead of the strobes but that doesn't come cheap plus they really eat through batteries. |
|
|
|
03/12/2010 06:06:35 PM · #153 |
Originally posted by jminso:
I am tempted just to buy 2 more speedlites to use instead of the strobes but that doesn't come cheap plus they really eat through batteries. |
If you go to the flickr strobist forum, do a search on YongNuo. They're basically SB-600 clones that run for about 40 bucks on e-bay. The flickr strobists are eating them up like candy, and seem to be happy with them. I think I'm gonna end up with one or two of them. |
|
|
|
03/13/2010 10:20:28 AM · #154 |
Originally posted by jminso:
I am tempted just to buy 2 more speedlites to use instead of the strobes but that doesn't come cheap plus they really eat through batteries. |
I see you are a canon shooter, so might want to look into used 430EX flashes. They are just about as powerful as the 580EX, but they cannot act as a controlling flash like the 580. I upgraded a couple of 430EX I to 430EX II because they make less electronic noise which helps with the range of the new pocketwizards. The 430EX I unit are fantastic and maybe you can find some bargains out there. The benefits of the canon units include a full 5 stop range of manual control in 1/3 stop increments, they put out a lot of light and the are surprisingly miserly with batteries. I have gone through 3 hour strobist style shoots with models where I used flash on 600 frames and the recycle time had not even started to slow. Of course a good set of NMiH batteries is required. The other advantage to the canon flash is that you can toss in on the camera and use ETTL at some point if you need to and you can toss in a ST-E2 as some point if you want to control the flash from the camera.
|
|
|
|
03/16/2010 03:33:53 PM · #155 |
OK. Here's my first shot at this strobist stuff. I got the angle of the light from the "Lighting 102 - Position" exercise on the strobist site. No umbrella, so it's really "hard" light, to say the least, but I think I like the effect here. My thoughts are that without a second light behind him, there is no shape to his head as it just mixes in with the black background. Also, I'm getting a lot of noise where the light "falls off" on the left side. I know I was shooting at ISO 80 (my Oly e-10 has weird ISO settings) with the speedlight about 3 feet away from subject, camera right at 45^, slightly higher than subject. Shutter speed was either 1/125 or 1/250 and aperature was either 5.6 or 8. Power on SB-20 was at 1/16 or 1/8. (I'm going to have to start paying more attention, or making less adjustments - one or the other) B-}
Any and all comments, critiques, suggestions are very much appreciated.

edit: I just noticed a highlight on the left of his left sleeve that must be coming from a floor lamp that's about 5 feet behind him 300^ camera left.
Message edited by author 2010-03-16 15:38:00. |
|
|
|
03/17/2010 02:14:19 PM · #156 |
You people are a baaaad influence on me!!!! I went to drop off something having to do with my Quantum strobe at the local camera shop. Anyway, thinking about this thread, I ended up spending $120 on a flash, and a think to slave it to the flash on my camera. But, anyway, I can't wait to play with it! Yay!!! My poor daughter-in-law! LOL!
Message edited by author 2010-03-17 18:52:12. |
|
|
|
03/17/2010 09:27:51 PM · #157 |
Not really sure if this is considered strobist but I guess someone could make it and use it for something.
//www.diyphotography.net/homestudio/blz/home-made-cheap-diy-backdrop-stand
|
|
|
|
03/17/2010 10:58:24 PM · #158 |
Originally posted by e10icus:
OK. Here's my first shot at this strobist stuff. I got the angle of the light from the "Lighting 102 - Position" exercise on the strobist site. No umbrella, so it's really "hard" light, to say the least, but I think I like the effect here. My thoughts are that without a second light behind him, there is no shape to his head as it just mixes in with the black background. Also, I'm getting a lot of noise where the light "falls off" on the left side. I know I was shooting at ISO 80 (my Oly e-10 has weird ISO settings) with the speedlight about 3 feet away from subject, camera right at 45^, slightly higher than subject. Shutter speed was either 1/125 or 1/250 and aperature was either 5.6 or 8. Power on SB-20 was at 1/16 or 1/8. (I'm going to have to start paying more attention, or making less adjustments - one or the other) B-}
Any and all comments, critiques, suggestions are very much appreciated.
edit: I just noticed a highlight on the left of his left sleeve that must be coming from a floor lamp that's about 5 feet behind him 300^ camera left. |
Thanks for sharing--left a note. |
|
|
|
03/20/2010 11:56:02 PM · #159 |
Can I play too?
I took these today. I had the Vivitar flash on a light stand with an umbrella and we used my Sigma on camera flash and bounced it off the reflector. We randomly moved both the light stand and the reflector around as much as space allowed just to see how it affected light.
   
This one happened when we moved the reflector so I was holding it above the camera/flash. We were both thinking we kind of liked the hardlight.
 |
|
|
|
03/21/2010 03:17:34 AM · #160 |
Nice set. If you only have the two flashes, I'd maybe use one flash for the umbrella, reflector for fill and use the second flash for rim light to separate her from the black background.
Message edited by author 2010-03-21 03:19:11. |
|
|
|
03/21/2010 07:46:41 AM · #161 |
My concern was when we tried to do shots only using the flash/umbrella - they were really dark - like that flash doesn't throw that much more light than my 150 watt light bulb.
So, use the reflector for the flash that also has the umbrella? I'm waiting for a wireless flash trigger to come in, so I can move my Sigma off camera too. The slave I have right now is dependent on another flash firing for it to work - which would be my on camera flash at the moment. |
|
|
|
03/23/2010 02:03:47 AM · #162 |
Originally posted by ragamuffingirl:
My concern was when we tried to do shots only using the flash/umbrella - they were really dark - like that flash doesn't throw that much more light than my 150 watt light bulb.
So, use the reflector for the flash that also has the umbrella? I'm waiting for a wireless flash trigger to come in, so I can move my Sigma off camera too. The slave I have right now is dependent on another flash firing for it to work - which would be my on camera flash at the moment. |
What were your settings? I'm curious because your flash should give off a decent amount of light for a headshot. More than a 150watt bulb, I think.
eta: Did you try a crop besides 4x5 on your first set? I think a ratio closer to 1:1.5 would suit your subject better(like the last one).
Message edited by author 2010-03-23 02:17:45. |
|
|
|
03/23/2010 02:16:08 AM · #163 |
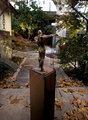
A poor man's multiple flash set up.
I was taking some architectual type shots for a friend. and he wanted some of his yard art included, which posed a lighting problem. I didn't have enough flashes to light the trees and surroundings adequately so I needed to improve.
1. Camera on tripod. 2. Dial in the correct flash power to highlight the sculpture and some of the darker areas, particularly the leaves on the ground and the trees in the background. 3. Trip the shutter and run to a new location, aiming the flash at whatever needs illuminated. 4. Rinse. Repeat.
I believe i fired 6 or 7 frames in this sequence, then picked out the 4/5 that worked and did a quick composite in photoshop. The editing was quick and easy, just masked out the parts from each image that I didn't want to show.
Tada! the effect of 5 flashes for the price of one.
It was early morning and if i were to repeat this shot I would shoot it before the sky became so light, plus I would underexpose ambient to retain color in the sky. |
|
|
|
03/23/2010 02:29:57 AM · #164 |
Here's a quick question for the Gurus: I'm trying to setup the following image:

What kinda lighting setup do I need?
I have 2 Canon 550 ex's connected via a cheap(ish) wireless trigger, a plexiglass fishtank, Canon 24-105 f4 L IS lens at 70mm (IIRC), a white sheet as the background (alternated with a black sheet at times). The master flash is on manual, 1/32, zoom 70mm, and shooting at 1/200 @f22.
I originally had both flashes pointing to the front of the fishtank, and quickly moved one of them behind the fishtank, bouncing off the bedsheet.
The results have been... well, "interesting". It took a long time to eliminate the shadows cast from the tank on the background sheet...but if I do remove them, the background is way too bright for the foreground to register any colours..
I'm being a cheapo till I figure these things out, but what I need to understand is:
1. Where do I place the flashes? I can simulate our basement as a dark room in evenings.
2. Should I replace the sheet with (say) styro foam boards as some web articles demonstrate?
Many thanks!
Manav
PS: I did comment on Irene's image, but I'm guessing she's busy cooking up some fantastic images for current challenges!
Message edited by author 2010-03-23 02:30:31. |
|
|
|
03/23/2010 07:06:34 AM · #165 |
Originally posted by mpeters:
A poor man's multiple flash set up.
I was taking some architectual type shots for a friend. and he wanted some of his yard art included, which posed a lighting problem. I didn't have enough flashes to light the trees and surroundings adequately so I needed to improve.
1. Camera on tripod. 2. Dial in the correct flash power to highlight the sculpture and some of the darker areas, particularly the leaves on the ground and the trees in the background. 3. Trip the shutter and run to a new location, aiming the flash at whatever needs illuminated. 4. Rinse. Repeat.
I believe i fired 6 or 7 frames in this sequence, then picked out the 4/5 that worked and did a quick composite in photoshop. The editing was quick and easy, just masked out the parts from each image that I didn't want to show.
Tada! the effect of 5 flashes for the price of one.
It was early morning and if i were to repeat this shot I would shoot it before the sky became so light, plus I would underexpose ambient to retain color in the sky. |
Just a thought Mark, what if you just decreased your shutter speed and let natural light illuminate the yard and just dial down the flash to illuminate whatever you need lit. you might have to gel your flash(or not) but all you need is one shot.
Or if you're worried about blowing out the sky, you could fire off a shot for the sky and another like I mentioned and then post the rest.
|
|
|
|
03/23/2010 07:32:20 AM · #166 |
Originally posted by manavg:
Here's a quick question for the Gurus: I'm trying to setup the following image:
What kinda lighting setup do I need? |
Can't help you with that one, but below this 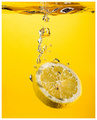 I posted a setup I posted a setup |
|
|
|
03/23/2010 09:24:25 AM · #167 |
Just wondered if any strobists out there had any thoughts on this:
Interfit Strobies
I know you can make your own, but these look interesting |
|
|
|
03/23/2010 10:21:18 AM · #168 |
Seems like a lot of money to buy stuff which eats your strobe light ;-) I bet you could make similar things much cheaper. Or have a look at the Honl speedstrap, gels, grids, snoots... much cheaper and better value.
Message edited by author 2010-03-23 10:21:38. |
|
|
|
03/23/2010 10:45:37 AM · #169 |
Originally posted by h2:
Originally posted by manavg:
Here's a quick question for the Gurus: I'm trying to setup the following image:
What kinda lighting setup do I need? |
Can't help you with that one, but below this I posted a setup |
Aha! Awesome. I've had my fair share of problems while trying to work on this... so thank you for that!
Btw, how much water did you have in the fishtank? :-) |
|
|
|
03/23/2010 10:50:55 AM · #170 |
Full, to have maximum way for the drowning lemon.
Message edited by author 2010-03-23 10:51:10. |
|
|
|
03/23/2010 02:43:14 PM · #171 |
Originally posted by cheekymunky:
Just wondered if any strobists out there had any thoughts on this:
Interfit Strobies
I know you can make your own, but these look interesting |
The snoot and grid might be interesting, but the beauty dish and softbox are a little small to be affective. When I was at the WPPI convention a couple of weeks ago many manufacturers where trying to jump on the strobist bandwagon with attachments for hot shoe strobes. Unfortunately, many seemed to be focused on the hype of small flashes rather than understanding what the photographer is trying to do. The size of your light source is key to the quality of light. In general, bigger will give soft light with soft edges on the shadows. Small gives hard light with crisp edges on the shadows. The choice depends on the photographers goal.... But, making a beauty dish or softbox that small seems a little pointless to me. Just my opinion of course...
As for the DIY comment.... a lot of people spend time creating things that look like 'pro' tools but cost less. I'm starting to realize that in many cases the pro tool, or the DIY equivalent, wasn't really required in the first place.
Message edited by author 2010-03-24 19:01:37.
|
|
|
|
03/24/2010 02:32:56 PM · #172 |
Make your own backdrop support:
Found this on ebay as I was just watching the end of them and thought WOW I can't believe someone is buying this.
//cgi.ebay.com/Backdrop-Clip-Set-for-Background-support_W0QQitemZ220574923212QQcmdZViewItemQQptZLH_DefaultDomain_0?hash=item335b4a39cc
You can go to the local $1 store and pick all this up for about $3. If anyone would like to make it.
|
|
|
|
03/24/2010 02:52:03 PM · #173 |
Originally posted by Nusbaum:
.... The size of your light source is key to the quality of light. In general, bigger will give soft light with soft edges on the shadows. Small gives hard light with crisp edges on the shadows. The choice depends on the photographers goal.... |
That helps explain this big sucker:
 |
|
|
|
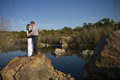
04/01/2010 03:48:21 AM · #174 |
Here are two shots using my CheetahQbox(24") with cybersync and 580.
The box was to the left, about 10' from the couple. One shot is with my 17-40, the other with a 70-200.
While the effect of the light isn't great, it does give the couple a little POP! The difference with/without is subtle although much more visible in the zoomed shot.
  |
|
|
|
04/01/2010 03:50:24 AM · #175 |
Originally posted by LVicari:
Originally posted by mpeters:
A poor man's multiple flash set up.
I was taking some architectual type shots for a friend. and he wanted some of his yard art included, which posed a lighting problem. I didn't have enough flashes to light the trees and surroundings adequately so I needed to improve.
1. Camera on tripod. 2. Dial in the correct flash power to highlight the sculpture and some of the darker areas, particularly the leaves on the ground and the trees in the background. 3. Trip the shutter and run to a new location, aiming the flash at whatever needs illuminated. 4. Rinse. Repeat.
I believe i fired 6 or 7 frames in this sequence, then picked out the 4/5 that worked and did a quick composite in photoshop. The editing was quick and easy, just masked out the parts from each image that I didn't want to show.
Tada! the effect of 5 flashes for the price of one.
It was early morning and if i were to repeat this shot I would shoot it before the sky became so light, plus I would underexpose ambient to retain color in the sky. |
Just a thought Mark, what if you just decreased your shutter speed and let natural light illuminate the yard and just dial down the flash to illuminate whatever you need lit. you might have to gel your flash(or not) but all you need is one shot.
Or if you're worried about blowing out the sky, you could fire off a shot for the sky and another like I mentioned and then post the rest. |
I think my problem was only having one flash to use and wanting to light up the different tree/foliage in the yard in addition to the sculpture. I could have done better with the sky though. I didn't worry too much about the sky because it was a tiny part of the picture. When I printed, I cropped out most if not all of the sky. |
|
Home -
Challenges -
Community -
League -
Photos -
Cameras -
Lenses -
Learn -
Prints! -
Help -
Terms of Use -
Privacy -
Top ^
DPChallenge, and website content and design, Copyright © 2001-2024 Challenging Technologies, LLC.
All digital photo copyrights belong to the photographers and may not be used without permission.
Current Server Time: 04/25/2024 01:47:08 AM EDT.


