| Author | Thread |
|
|
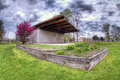
05/05/2009 09:23:27 PM · #51 |
Originally posted by cgino:
Here are a couple I did recently using the technique described here. |
I love that StuckInCustoms blog! That HDR tutorial was one of the first I came across, but as yet I haven't come close to reproducing that look.
|
|
|
|
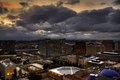
05/05/2009 11:55:51 PM · #52 |
HDR 01 (What not to do):
 |
|
|
|
05/06/2009 12:49:20 AM · #53 |
Here is one I did a couple of months ago.
spizzer
 |
|
|
|
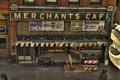
05/06/2009 10:42:49 AM · #54 |
Not sure if it's too late to join, but if not, count me in please!
Message edited by author 2009-05-06 13:55:37. |
|
|
|
05/06/2009 10:50:13 AM · #55 |
| i want to join! i havent shot any HDR in aaaages |
|
|
|
05/06/2009 11:09:13 AM · #56 |
| Everyone who is interested just join in! We're happy to have you onboard! |
|
|
|
05/06/2009 11:13:04 AM · #57 |
Here are a few sample images I shot in July '08 that I just reprocessed as single-image HDRs. Originals and details are included, I welcome all comments/questions!!
  |
|
|
|
05/06/2009 11:27:23 AM · #58 |
| Joanna - in your steps you said "I bracketed this in PS in increments of 20 as follows: -60, -40, -20, 0, +20, +40, +60." How do you do that in PS? |
|
|
|
05/06/2009 11:29:58 AM · #59 |
Originally posted by Ken:
HDR 01 (What not to do):
|
I noticed this comment of yours in the photographer's notes:
"Just a comment here on bracketing. Some believe in bracketing just enough to have something not underexposed and not overexposed. Others believe to bracket as wide as possible and combine as many as practical. The reasoning behind this is to average the noise."
For what it's worth, it's an absolute fact that using individual images "beyond the range" in your merge is a bad idea in HDRI imaging. Let me try to explain:
The basic idea is that the darkest image in your merge should be the one that correctly captures the bright areas as you want them to appear, and the brightest image in your merge should be the one that renders the dark areas as you want them to appear. Now, in this hypothetical "optimum merge", the middle tones now have the largest possible tonal range into which they are being compressed.
If, hypothetically, you included a dark frame that was a full stop darker than it needed to be, and a bright frame that was a full stop brighter than it needed to be, then what you've accomplished is twofold: you've produced a merged image that requires contrast enhancement to brighten the brights and darken the darks, both of which will tend to be muddy otherwise, and you've robbed the rest of the tones of two full stops of expression in the center of the range, as the merge software will compress between the extremes into the same middle-gray tonalities. So what's going to happen is that the local-area contrast in tone mapping will have to be pushed to extremes to separate those tones, and as a rule excessive noise in HDRI comes mostly from excessive tweaking of the local-area contrast, which causes altogether too much enhancement-of-noise-as-contrast-details in what ought to be the smooth areas of the image, like the sky.
Now, if what you're suggesting is that it is usually beneficial to include more exposures between the established "correct" extreme exposures, then yes, that's true, with the caveat that (as you pointed out in your notes), additional exposures often introduce additional blurring in areas of motion, like moving clouds, water ripples, or wind-tossed foliage. So, in my experience, when working with landscapes, it's usually better to minimize the number of captures, using only enough of them to cover the range adequately with a 1-stop differential between exposures, and I've found that this often means you can get away with two exposures comfortably, and usually three is sufficient. If there's a lot of mid-dark tone detail to be captured, half-stop exposure differentials can be quite useful, however.
Hope this is helpful...
R.
Message edited by author 2009-05-06 11:31:32. |
|
|
|
05/06/2009 12:25:54 PM · #60 |
heres essentially my only HDR
 |
|
|
|
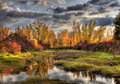
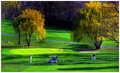
05/06/2009 02:53:52 PM · #61 |
I really like HDR, but I'm not crazy about some of the effects that it can give. I love very natural looking HDR shots, which is what I try to achieve when I do them. Here's one that I really like:
 |
|
|
|
05/06/2009 04:06:56 PM · #62 |
I wanted to include this image as an example of how single-image HDR generation can work extremely well, as indicated by the original. I used a simple 7-stop bracketing technique in PS and generated the images in Photomatix. The end result was quite astounding as it eliminated the over-exposed areas and defined all of the detail in the image. This required very little editing in PS. Comments/questions welcome.
Postscript: Would'ja believe.. this is the result of 5 days of rainfall!! Before and after shots of the same waterfall.. same view.
 
Message edited by author 2009-05-08 18:47:18. |
|
|
|
05/06/2009 07:42:50 PM · #63 |
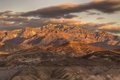 This is from Zabriske Point at Death Valley. 3 shots +2/-2 combined in Photomatix. This is from Zabriske Point at Death Valley. 3 shots +2/-2 combined in Photomatix.
Message edited by author 2009-05-07 14:45:19. |
|
|
|
05/06/2009 08:49:13 PM · #64 |
Finally, here I am!
Here are a couple of night HDRs combined in Photomatix and edited in Photoshop CS3.

This one is 9(!) exposures... which was simply an experiment to see if it made a difference to the resulting image... I believe I like the 3~5 exposure range better.
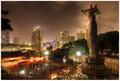
This is 5 exposures and there's a tutorial video on my blog explaining how it was done. |
|
|
|
05/06/2009 09:40:04 PM · #65 |
Can I throw this in just to get impressions? I have the hardest time trying to get the right look.....8>(

|
|
|
|
05/06/2009 10:38:05 PM · #66 |
heres on i took a week or so ago, local workshop had some nice detailed subjects in it, 3 images merged and tone mapped using 'gtpsfgui' and fattal tone mapping, alpha and beta turned all the way up and colour saturation up rather high too, then sharpened up in gimp.

//www.dpchallenge.com/image.php?IMAGE_ID=788975 |
|
|
|
05/06/2009 10:56:05 PM · #67 |
Justin.. this is the way it should look.
 |
|
|
|
05/06/2009 11:10:00 PM · #68 |
Originally posted by franktheyank:
This is from Zabriske Point at Death Valley. 3 shots +2/-2 combined in Photomatix. |
|
|
|
|
05/06/2009 11:20:35 PM · #69 |
| my bad, how do i link the image like that? |
|
|
|
05/06/2009 11:25:15 PM · #70 |
| Am I the only one that dislikes when the clouds go deep black on one side? (really good photos otherwise) |
|
|
|
05/06/2009 11:46:19 PM · #71 |
Originally posted by Niten:
Am I the only one that dislikes when the clouds go deep black on one side? (really good photos otherwise) |
That can be controlled in the tone mapping process by adjusting the controls so there are no severe darks in the finished image.. perhaps shadow or black balance. |
|
|
|
05/07/2009 01:22:07 AM · #72 |
Outtake from Trees challenge. I thought the sun was too shiny on the grass, perhaps I shouldn't separate the bracket ratio as much with grassy landscapes. Used JPEG too, I usually try using RAW files for HDR images. |
|
|
|
05/07/2009 01:44:52 AM · #73 |
Here's an image done with 6 bracketed shots.
(thanks Jo for the tutorial in basic dpchallenge.)
Message edited by author 2009-05-07 01:46:10. |
|
|
|
05/07/2009 05:15:58 AM · #74 |
I wanna play, too!
Here's my first (well, my first that I actually kept...) ;) HDR image.
Original: 
HDR-ified: 
(external links; feel free to add comments there, though).
Processed from -2, 0, +2 EV exposures with Photomatix Pro. Used detail enhancer. I tried to keep it as realistic as possible. I'm amazed at the difference between this and the "normal exposure" shot, especially in the details revealed in the nearby rock face in the bottom-right corner of the frame. Noise reduction and sharpening in Noise Ninja.
|
|
|
|
05/07/2009 10:57:23 AM · #75 |
Originally posted by power47:
my bad, how do i link the image like that? |
Justin.. you have to use the tabs at the top of the Message window, the second tab from the right is for Insert Thumbnail Link to Site Image. Click that tab and a small window will appear with a Script Prompt that tells you to enter the ID of the image found at the end of the image page URL. This is the 6-digit number at the end of yur image URL which is 788975. Just type in or paste that 6-digit number and click OK and it will come up in the Message window. You can add some text if you want and click Post and it will appear at the end of the message thread.
In the meantime, you need to delete the one that's currently in there as it is too large for the page.
Thanx, Jo
|
|
Home -
Challenges -
Community -
League -
Photos -
Cameras -
Lenses -
Learn -
Prints! -
Help -
Terms of Use -
Privacy -
Top ^
DPChallenge, and website content and design, Copyright © 2001-2024 Challenging Technologies, LLC.
All digital photo copyrights belong to the photographers and may not be used without permission.
Current Server Time: 04/23/2024 10:41:19 PM EDT.


