| Author | Thread |
|
|
10/20/2008 03:28:28 PM · #26 |
The imagesetter I have at work is set to 2400 dpi. I can probably make these for anyone who sends me an image generated by the linked website, but I should probably collect a buck or two to cover the cost of the boss' film.
 freakin_hilarious: My guess is that it is more likely that the problem is a slight difference in the sensor-to-zone plate distance -- 50mm is a fairly coarse measurement when you are looking at objects the size of that pattern. For example, you might fasten it to the inside of the lens cap instead of the outside (or vice versa if that's how you have it now). freakin_hilarious: My guess is that it is more likely that the problem is a slight difference in the sensor-to-zone plate distance -- 50mm is a fairly coarse measurement when you are looking at objects the size of that pattern. For example, you might fasten it to the inside of the lens cap instead of the outside (or vice versa if that's how you have it now).
Can someone post a diagram of how to set this up? |
|
|
|
10/20/2008 03:29:34 PM · #27 |
Originally posted by Melethia:
OK, now to find someone with a drill.... I think my neighbor has one. I used to do math... but I'm guessing the best way to find the center of the body cap is lines that cross in the middle? And now to figure where to get a little piece of flat metal. Surely I have something I can disassemble.... :-) |
If first you drill about a 1/4" hole in the center of the body cap it doesn't have to be exact. (but yes, to find the center draw 3 lines from edge to edge going close to the center. The center will be the center of the triangle that is formed.) I drilled the hole first and then smoothed it out with a very fine piece of emery paper. Mostly this removed the burrs and the raised CANON lettering, leaving a flat area to tape the metal piece to.
To make the actual pinhole, I cut a small piece of metal (about 3/4" square) out of an aluminum coke can (wear gloves) Then rounded off the edges (so not to ruin my manicure by slicing the end of my finger off while making the pinhole).
Make the pinhole with the smallest needle you can find and put a piece of wood under the metal when you poke the hole so you don't dent the metal. I pushed the needle through the center of the metal until it just barely went through and then sanded (very fine emery cloth) the back of where the needle went through. Then I pushed the needle (barely) though from the other side and lightly sanded. The idea is to get as small of hole as possible and to make it as round as possible. I used a magnifying glass to check the hole for roundness.
After making the hole in the metal, I taped the metal to the front of the body cap. I think I'll take it off and try it on the inside to see if it is any sharper. It is just easier to tape it on the outside. I used duct tape, but any lightproof tape will work.
I then made sort of a "lenscap" by placing a bandaid over the hole when I'm not making the actual exposure. I haven't noticed any extra sensor dust by using the pinhole (and at f/250 you will really see sensor dust!), but I think it is wise to keep the hole covered somehow when you are not using the camera. |
|
|
|
10/20/2008 04:19:08 PM · #28 |
Originally posted by GeneralE:
The imagesetter I have at work is set to 2400 dpi. I can probably make these for anyone who sends me an image generated by the linked website, but I should probably collect a buck or two to cover the cost of the boss' film.
freakin_hilarious: My guess is that it is more likely that the problem is a slight difference in the sensor-to-zone plate distance -- 50mm is a fairly coarse measurement when you are looking at objects the size of that pattern. For example, you might fasten it to the inside of the lens cap instead of the outside (or vice versa if that's how you have it now).
Can someone post a diagram of how to set this up? |
Good point. I'll have to try some different distances to see what that does! |
|
|
|
10/20/2008 04:30:38 PM · #29 |
| Great detailed directions, Steve. Now I just need to find my spare body cap. I actually use the others on the ends of my lenses that aren't on a camera. I know I have one somewhere. It's just a matter of where I put it... I do have very tiny needles, though. One of my long lost hobbies is/was quilting. |
|
|
|
10/20/2008 04:40:29 PM · #30 |
Well, about a year ago I started an album here for my winter pinhole project but only managed one shot lol. Am already thinking of subjects to shoot and thought I'd try and master this as my first submission in the SC ;)

|
|
|
|
10/20/2008 04:46:19 PM · #31 |
Originally posted by freakin_hilarious:
Here's how I made my zone plate:
First, I measured the distance from the sensor plane to the outside of my body cap (50mm). Second, I went to this site, plugged in 50mm for the focal length and saved the file it created for me. Third, I started a thread in which  GeneralE volunteered to print the zone plate for me at super high res (I think it was about 1200dpi). You the man, Paul! When I got the zone plate in the mail, I drilled a hole in the body cap (about 1/4" in diameter) somewhere vaguely close to the center. I then taped the zone plate film over the hole and started shooting! GeneralE volunteered to print the zone plate for me at super high res (I think it was about 1200dpi). You the man, Paul! When I got the zone plate in the mail, I drilled a hole in the body cap (about 1/4" in diameter) somewhere vaguely close to the center. I then taped the zone plate film over the hole and started shooting!
As a side note, I'm not super impressed with the zone plate so far. Rather than getting a nice soft image, it is giving me some multiple image/ghosting kind of thing. The film itself looks just like the image that web site created for me, so it doesn't appear to be a printing issue (you still the man, Paul!). I'm guessing the image generated for the web site is lacking a bit. I did choose the non anti-aliased version, so I may try again with the anti-aliasing turned on to see what I get. Overall, it's fun and free to do it myself (with help, obviously), but I imagine a purchased zone plate would give superior results.
My one zone plate image that's online at the moment:

Karen: have you tried the one I mailed you, and if so, what are your thoughts?
How I made my pinhole:
Since I already had a body cap with a big ol' hole in it, I taped a piece of black cardstock over the hole and poked a tiny hole in the center with a sewing needle. I didn't do any calculations on this one and it works great!
I'll post some pics of the setup sometime soon for those interested. |
I did put together one from the zone plate you sent me - I also have the ready-made one from pinholersource.org - what I noticed is that my home grown one has a lot more diffusion and ghosting, likely, I believe, because I made too big a hole in my body cap and the part of the film that the zone plate is on is visible and is not light tight. I tried covering as much of this excess as possible, front and back, with gaffer's tape, but it still doesn't yield the relatively "cleaner" diffraction of my ready-made one from Pinhole Resource. I plan to create another, smaller body cap hole (I have several generic space body caps here at home for just this purpose) and try to remount the zone plate again and see if I get it better the 2nd time around. |
|
|
|
10/20/2008 04:46:42 PM · #32 |
ok i just finished my frist trial.
i didn't have a camera cap handy so i had to improvise with a jam cab, some vietnamiese aluminium foil, cardboard and duct tape (of course), so here's what my brandnew pinhole lens looks like:
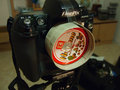 pretty cool, no? haha pretty cool, no? haha
i find the resulting pictures pretty soft tho. i mean it's supposed to look soft, but not THAT soft, right? my guess is, that the focal lenght/pinhole diameter ratio isn't right?

|
|
|
|
10/20/2008 04:47:20 PM · #33 |
Originally posted by GeneralE:
The imagesetter I have at work is set to 2400 dpi. I can probably make these for anyone who sends me an image generated by the linked website, but I should probably collect a buck or two to cover the cost of the boss' film.
freakin_hilarious: My guess is that it is more likely that the problem is a slight difference in the sensor-to-zone plate distance -- 50mm is a fairly coarse measurement when you are looking at objects the size of that pattern. For example, you might fasten it to the inside of the lens cap instead of the outside (or vice versa if that's how you have it now).
Can someone post a diagram of how to set this up? |
I have heard that all Canon DSLRs are a standard 44mm from sensor to lens. |
|
|
|
10/20/2008 04:54:11 PM · #34 |
| Looks like I've got some experimenting to do, for sure! I probably had some light spillage as well, Karen. I'll have to try to minimize light spillage and move that thing around and see what I get. When I measured, by the way, I went from the mark on the camera body that designates the sensor plane to the outside of the body cap. I could certainly be off by a mm or 2, though. |
|
|
|
10/20/2008 04:59:16 PM · #35 |
Christoph, probably your only chance to own some 'L' Glass - you just have to draw a red line around that masterpeace ;)
On a slightly more serious note I sent an old lens cap off to an online site and they sent it back with drilled hole for about a tenner - will try find them again (though that was in the days when I had more money than sense lol).
Originally posted by Mephisto:
ok i just finished my frist trial.
i didn't have a camera cap handy so i had to improvise with a jam cab, some vietnamiese aluminium foil, cardboard and duct tape (of course), so here's what my brandnew pinhole lens looks like:
pretty cool, no? haha
i find the resulting pictures pretty soft tho. i mean it's supposed to look soft, but not THAT soft, right? my guess is, that the focal lenght/pinhole diameter ratio isn't right?
|
|
|
|
|
10/20/2008 05:12:05 PM · #36 |
Originally posted by freakin_hilarious:
Looks like I've got some experimenting to do, for sure! I probably had some light spillage as well, Karen. I'll have to try to minimize light spillage and move that thing around and see what I get. When I measured, by the way, I went from the mark on the camera body that designates the sensor plane to the outside of the body cap. I could certainly be off by a mm or 2, though. |
Don't forget, you can use an extension tube as well, so you could theoretically have a zone plate for several combinations of sensor-to-lens measurements; if you had a zone plate for 44mm, to suit the Canon, and a 12mm and/or 25mm extension, you could also have zone plates rated for 56mm and 69mm.
I would imagine if you're off by a mm or two it would not make too much difference?...but maybe 6mm difference is too much. From what I've read, zone plate use does require "focusing" so perhaps the accuracy with the mm measurement is more critical.
Message edited by author 2008-10-20 17:12:17. |
|
|
|
10/20/2008 05:13:40 PM · #37 |
haha cool thx ecce, please post the link if you find it, even tho i think my ambition will force me to solve this problem myself...
what really came to my mind when i thought about this whole pinhole experience was that it'd be really cool to put some of the photographic paper (12x16") i have liing about somewhere, put it in a big box, fix a pinhole lens infront of the box, take some photos and develop the shit. could produce some awesome results i think...
|
|
|
|
10/20/2008 05:15:48 PM · #38 |
Originally posted by Mephisto:
ok i just finished my frist trial.
i didn't have a camera cap handy so i had to improvise with a jam cab, some vietnamiese aluminium foil, cardboard and duct tape (of course), so here's what my brandnew pinhole lens looks like:
pretty cool, no? haha
i find the resulting pictures pretty soft tho. i mean it's supposed to look soft, but not THAT soft, right? my guess is, that the focal lenght/pinhole diameter ratio isn't right?
|
That a really Jam nice cap.... |
|
|
|
10/20/2008 05:25:34 PM · #39 |
Don't think this is the company I used but Mr google will help ;) sample linkie. However, I do like the truly retro idea of a hand crafted jam jar pinhole on my 1DnMKII - would look awesome ;)
Originally posted by Mephisto:
haha cool thx ecce, please post the link if you find it, even tho i think my ambition will force me to solve this problem myself...
what really came to my mind when i thought about this whole pinhole experience was that it'd be really cool to put some of the photographic paper (12x16") i have liing about somewhere, put it in a big box, fix a pinhole lens infront of the box, take some photos and develop the shit. could produce some awesome results i think... |
|
|
|
|
10/20/2008 05:50:06 PM · #40 |
Originally posted by Mephisto:
haha cool thx ecce, please post the link if you find it, even tho i think my ambition will force me to solve this problem myself...
what really came to my mind when i thought about this whole pinhole experience was that it'd be really cool to put some of the photographic paper (12x16") i have liing about somewhere, put it in a big box, fix a pinhole lens infront of the box, take some photos and develop the shit. could produce some awesome results i think... |
yeah, "real" pinhole cameras use film or photo paper as negatives and have a few advantages over digital pinholes. One huge advantage is you can bend your focal plane (i.e., the Oatmeal Box Pinhole) to get a super wide angle.
eta: the Oatmeal site also has great instructions on building the pinhole.
Message edited by author 2008-10-20 18:04:42. |
|
|
|
10/20/2008 05:53:14 PM · #41 |
I don't suppose you could jam a sensor into an oatmeal box....
I have lots more reading to do. And some tools to appropriate. But it does sound like a great deal of fun. |
|
|
|
10/20/2008 05:54:20 PM · #42 |
Originally posted by pointandshoot:
Originally posted by Mephisto:
haha cool thx ecce, please post the link if you find it, even tho i think my ambition will force me to solve this problem myself...
what really came to my mind when i thought about this whole pinhole experience was that it'd be really cool to put some of the photographic paper (12x16") i have liing about somewhere, put it in a big box, fix a pinhole lens infront of the box, take some photos and develop the shit. could produce some awesome results i think... |
yeah, "real" pinhole cameras use film or photo paper as negatives and have a few advantages over digital pinholes. One huge advantage is you can bend your focal plane (i.e., the Oatmeal Box Pinhole) to get a super wide angle. |
also I'd take film grain over hefty doses of long-exposure digital noise any day...sometimes the noise works, sometimes it doesn't
I recommend this book for some pretty amazingly creative applications of pinhole photography.
crap...I just actually looked at the that link and see it's out of print and some seller is trying to fob it off for $192 - outrageous! It's a $15 book, at most...
Message edited by author 2008-10-20 17:55:32. |
|
|
|
10/20/2008 08:58:47 PM · #43 |
| bump to troll for more participants... |
|
|
|
10/20/2008 10:42:25 PM · #44 |
I have a couple of junk box lenses, so I may try making a pinhole insert that will fit into the lens body, allowing me to "focus" the thing a bit.
Since the "plate" thing operates like a fresnel lens, I may also try doing something with a fresnel too, but not for this S C since it's about shooting with no "glass" involved.
|
|
|
|
10/20/2008 10:49:51 PM · #45 |
| We are all about shooting with air. |
|
|
|
10/20/2008 10:51:49 PM · #46 |
| Who wouldda thunk that one of the advantages of buying an expensive SLR is that you can shoot with no lens ... :-( |
|
|
|
10/20/2008 10:54:47 PM · #47 |
| Well, after we all have dirty sensors to clean we might be re-thinking this challenge. |
|
|
|
10/21/2008 01:32:04 PM · #48 |
| bump to get some more eyes, and maybe, participants... |
|
|
|
10/21/2008 01:55:24 PM · #49 |
I have a question: my S3 can, in its "SuperMacro" mode, actually focus on the front surface of the lens. If I put one of these zone plates (or a pinhole) there, on the surface of the lens, might I have the optical equivalent of a pinhole/zoneplate camera, since it would be focused on the filter?
Also, what's a typical starting test exposure for one of these? |
|
|
|
10/21/2008 02:01:49 PM · #50 |
Originally posted by GeneralE:
I have a question: my S3 can, in its "SuperMacro" mode, actually focus on the front surface of the lens. If I put one of these zone plates (or a pinhole) there, on the surface of the lens, might I have the optical equivalent of a pinhole/zoneplate camera, since it would be focused on the filter?
Also, what's a typical starting test exposure for one of these? |
Well, it still goes through a lens, so I don't know. I'd be interested to see what you come up with though, even if it is more "pinhole-inspired" rather than pinhole. Give it a try, I'd love to see the results.
Exposure for a zone plate can be 1 second or less, in bright conditions, pinhole is usually greater than a second, but for me it's always trial and error to find the right exposure setting. With pinhole with bright conditions, I usually start with 2 seconds and then check my results and adjust. I believe there are some exposure calculators out there...here's one. The problem I've seen with other calculators is that they appear to need to the relative f/stop of your pinhole, and I never seem able to figure that one out. |
|


