| Author | Thread |
|
|
05/28/2008 02:09:37 PM · #1 |
OMG rejection hurts! Lol! Well it's kinda sobering anyway! I submitted my first ever set of 4 photographs to Alamy yesterday for review and unfortunately they were rejected! The reason they gave for the one image (poor exposure) makes sense now that's it's been pointed out to me because the pic does seem kinda underexposed.
The Alamy guidelines read as follows:
Exposure
The histogram is a graphical representation of the tonal values in an image. Check, and if necessary correct, exposure using the histogram (Levels). For most images the black point should be at or near 0, with the white point at or near 255. At Alamy we expect the black/white points to be within 5% of these values, i.e. black at Level 12 or below, and white at Level 243 or above. There are exceptions of course - for example, extreme high-key or low-key shots, and misty, atmospheric images may not contain the entire tonal range from black to white. This is perfectly OK.
In Levels, if most of the tonal values in the histogram are bunched up towards the left, the image is probably under-exposed. If bunched up towards the right, it's probably over-exposed. Use the centre slider (gamma) - or for more control use Curves - to try to improve matters, but there's a limit to how far you can go before image quality deteriorates. Raw shooters should go back to the original Raw file and make corrections there.
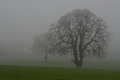
Now this is all a bit too confusing for me as I am new to Photoshop CS3. Could anyone explain how I go about adjusting the black and white levels to the values above? The image below is the one I submitted which was rejected due to poor exposure. Any advice would be appreciated.
 |
|
|
|
05/28/2008 02:22:03 PM · #2 |
Open the shot in CS3. On the right should be a tab with a histogram - a chart. Select "levels adjustment" - you'll get a popup window showing the histogram for levels. Move the little triangle sliders in to where the data "starts" - in the case of this shot, there's a big empty nothing on the right side - meaning you need more on the "light" end. As you slide that triangle at the right side over to the left, you'll see the picture get lighter. Adjust to taste. Once you've made the adjustments and hit OK, you'll see the histogram has spread out more, covering a broader range, which is what I think Alamy is saying.
There are other ways to increase the range - in RAW you can increase exposure. You can also use curves adjustments, but try the levels first. |
|
|
|
05/28/2008 02:28:05 PM · #3 |
Melethia describes it very well but a picture is a 1000 words....so

The histogram is the graph inset in the image. By opening the levels adjustment, you end up with the above graph. Move the white slider in(the one on the right hand side) until the edge of histogram. This will brighten your shot. You can then adjust the midtones (gray) and dark (black) similary by moving the sliders. |
|
|
|
05/28/2008 02:34:13 PM · #4 |
Thanks  melethia and melethia and  bassbone! bassbone!
Tried what you both suggested. Didn't know it was quite so easy. Silly question, but does the middle slider need to stay on 1.00 if the image is to be considered 'correctly exposed'? Second question, would there be any reason (maybe a setting) why I would not see the 'Input' information with the value boxes on my histogram like the one in your example? |
|
|
|
05/28/2008 02:38:14 PM · #5 |
I've never been able to figure out screenshots - thanks, Peter!
No, you don't have to leave the middle slider on 1 if you don't want to - the right end is for lights, left end for darks, and middle slider for midtones. There are times when you may want to adjust the midtones as well as the light/dark ends of the scale.
Not sure why you don't see the value boxes... |
|
|
|
05/28/2008 02:41:43 PM · #6 |
Themiddle slider is moved to fit the result you want with the image.
If you actually notice in the Levels dialogue box, there are three eyedroppers (white, gray and black).
The white/ clear one can be clicked on and then click on the whitest spot on the photo.
The gray eyedropper is for the midpoint exposure of the image. In addition, the mid point eyedropper impacts more than just exposure but also the hue of the image. Depending on what color you click on with the eyedroppers, you can adjust the overall color of the image.
Similarly for the black eyedropper - click on the darkest spot in teh image and the histogram shifts again.
Originally posted by Trinity_12_12:
Thanks melethia and bassbone!
Tried what you both suggested. Didn't know it was quite so easy. Silly question, but does the middle slider need to stay on 1.00 if the image is to be considered 'correctly exposed'? Second question, would there be any reason (maybe a setting) why I would not see the 'Input' information with the value boxes on my histogram like the one in your example? |
|
|
|
|
05/28/2008 02:42:38 PM · #7 |
Originally posted by Melethia:
I've never been able to figure out screenshots - thanks, Peter!
|
Control-Shift-PrintScreen - at least on my IBM PC |
|
|
|
05/28/2008 02:47:47 PM · #8 |
I've just opened up quite a few of my photos and checked the histograms and I'm amazed at what a slight adjustment in the levels can do. I must say, I Googled these questions before I posted on DPC and couldn't find a satisfactory answer. That's what I love about this site! So many awesome and knowledgeable photographers in one place and everyone willing to help! What more could you ask for? :-)
Thank you everyone! |
|
|
|
05/28/2008 02:58:12 PM · #9 |
Originally posted by Trinity_12_12:
I've just opened up quite a few of my photos and checked the histograms and I'm amazed at what a slight adjustment in the levels can do. I must say, I Googled these questions before I posted on DPC and couldn't find a satisfactory answer. That's what I love about this site! So many awesome and knowledgeable photographers in one place and everyone willing to help! What more could you ask for? :-)
Thank you everyone! |
Worldwide peace.
Levels is an amazing tool that you need to master for great results. If you want to have even greater control over your image, start playing with the curves tool as well. I find these two go hand in hand. It's a little more complicated but very much worth the time. I used to be a levels junkie until I discovered the curves tool and its capabilities at enhancing an image or just correcting colour nuances. Have fun.
Here's a video tutorial if you have the time.
Curves video tutorial |
|
|
|
05/28/2008 03:05:27 PM · #10 |
Thanks  jac, taking my laptop to bed for some bedtime 'reading' with this tutorial! Lol. jac, taking my laptop to bed for some bedtime 'reading' with this tutorial! Lol. |
|
|
|
05/28/2008 03:30:29 PM · #11 |
| Here's a Tutorial on Curves right here at DPC. Curves do much the same thing as Levels, but with far greater control -- check 'em out ... |
|
|
|
05/28/2008 03:48:54 PM · #12 |
Originally posted by GeneralE:
Here's a Tutorial on Curves right here at DPC. Curves do much the same thing as Levels, but with far greater control -- check 'em out ... |
I have been using levels and then using curves after levels. Is that a redundancy that might introduce more potential for noise, posterizing, or other bad stuff in images? |
|
|
|
05/28/2008 04:11:05 PM · #13 |
I will sometimes use more than one Curves Adjustment Layers, especially if I'm working with individual color channels. Any color/tone adjustment has the potential to accentuate any noise present, but should not create any where it doesn't already exist.
If you're into that sort of thing, Curves are great for distorting colors, not only to correct them but to create wild digital art.
See some examples here. |
|
Home -
Challenges -
Community -
League -
Photos -
Cameras -
Lenses -
Learn -
Prints! -
Help -
Terms of Use -
Privacy -
Top ^
DPChallenge, and website content and design, Copyright © 2001-2024 Challenging Technologies, LLC.
All digital photo copyrights belong to the photographers and may not be used without permission.
Current Server Time: 04/24/2024 09:23:23 PM EDT.


