| Author | Thread |
|
|
01/29/2008 09:33:02 PM · #1 |
There has been a lot of forum posts about HDRI. I thought I'd offer this up to anyone interested.
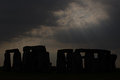
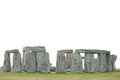
The Shot
My wife and I were on a bus tour to Stonehenge while on vacation in the UK. We arrived in the afternoon after visiting Windsor and Bath. We were at Stonehenge for about 40 minutes. The light was pretty good but there were clouds rolling in.
As the clouds rolled in, my wife noticed a break in the clouds behind us. I ran around to the other side to get the light behind the stones. I had my 5D set to autobracket the exposures in 1-stop increments. normal, -1, +1. I laid down on the ground to get the horizon low in the shot and include the light at the top. (I'm sure the other tourist loved that!)
The Post Processing
Back home (and several months later) I opened each exposure in Photoshop using the RAW converter. Needing more range than the 3 exposures gave me, I made 2 images from the darkest exposure, 1 from the normal exposure and 2 from the lightest exposure. In the lightest and darkest images, I adjusted the exposure in the RAW converter to get a darker image and a lighter image. This gave me 5 images of different exposures to work with, a 5-stop range.
 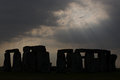   
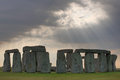
I saved each one in TIF format. Then I used PhotoMatix for the HDR and Tone Mapping. In PhotoMatix, I combined all 5 images using the Generate command in the HDR menu. The result is a very odd looking image:

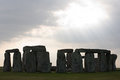
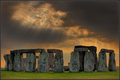
I'm not sure what's going on in PhotoMatix, but all the pixel data must still be in the file. Then I select Tone Mapping from the HDR menu and after adjusting the sliders a bit, I get this:
I save that image as a TIF and go back to Photoshop.
The tone mapping left a red fringe around the stones. I spent a bit of time cloning the red fringe out.
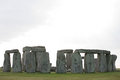
In Photoshop I masked off the stones using the pen tool. This creates a clipping path. I saved the path so I could use it again. I turned the path into a selection with a slight feathering. I inverted the selection and unselected the ground leaving just the sky in the selection. Levels, Brightness Contrast, color ballance layers on the sky.
I activated the path again and turned it into a selection for just the stones. I added adjustment layers for levels and brightness/contrast.
I then increased the saturation on the grass to make it greener.
Some dodge and burn and general clean up left me with my image. The last thing I did was invert the image horizontally because I liked the composition better with the light in the upper left than in the upper right.
There you have it! Utilizing the new rules and every other tool available in Advanced Editing and I get a Yellow ribbon!!!
|
|
|
|
01/29/2008 09:41:54 PM · #2 |
Originally posted by scarbrd:
There you have it! Utilizing the new rules and every other tool available in Advanced Editing and I get a Yellow ribbon!!! |
That is so cool, thanks for sharing. I'm going to "watch" this thread so I can refer back to it later. Thanks again -BB
|
|
|
|
01/29/2008 10:08:59 PM · #3 |
| This would make a great tutorial. Some of the best examples of source images and how they blend to form the final product! |
|
|
|
01/29/2008 10:43:03 PM · #4 |
| I usually save my RAW converted files as Jpegs before opening them in Photomatix. Do find much benefit to bring TIFFs to Photomatix instead of Jpegs? |
|
|
|
01/29/2008 10:52:21 PM · #5 |
Originally posted by yakatme:
I usually save my RAW converted files as Jpegs before opening them in Photomatix. Do find much benefit to bring TIFFs to Photomatix instead of Jpegs? |
Tiffs have 16 bits of data, jpeg has 8. Naturally, the more data photomatix is able to extract the better.
Still, it is much much better to import RAW files directly into photomatix, so long as they've been bracketed properly. |
|
|
|
01/29/2008 10:59:51 PM · #6 |
|
|
|
01/29/2008 11:16:58 PM · #7 |
Originally posted by LanndonKane:
Originally posted by yakatme:
I usually save my RAW converted files as Jpegs before opening them in Photomatix. Do find much benefit to bring TIFFs to Photomatix instead of Jpegs? |
Tiffs have 16 bits of data, jpeg has 8. Naturally, the more data photomatix is able to extract the better.
Still, it is much much better to import RAW files directly into photomatix, so long as they've been bracketed properly. |
I opened them in Photoshop first since I wanted to have some exposure adjustments on 2 of the files. Not sure I can I can do that in PhotoMatix. This may not be necessary, but it made sense at the time.
Lanndon is correct, I saved them as TIFs to preserve the 16 bit data.
Message edited by author 2008-01-29 23:24:49. |
|
|
|
01/29/2008 11:38:13 PM · #8 |
David, that's great! Ask Langdon to turn it into a "How'd They Do That" - you'll get a $5 credit and the site'll get a permanent record instead of this great info disappearing into the mists of history.
|
|
|
|
01/30/2008 07:36:01 AM · #9 |
Originally posted by levyj413:
David, that's great! Ask Langdon to turn it into a "How'd They Do That" - you'll get a $5 credit and the site'll get a permanent record instead of this great info disappearing into the mists of history. |
Thanks Jeff, I'll look into it. |
|
|
|
01/30/2008 08:17:06 AM · #10 |
|
|
|
01/30/2008 08:35:25 AM · #11 |
Originally posted by scarbrd:
Originally posted by LanndonKane:
Originally posted by yakatme:
I usually save my RAW converted files as Jpegs before opening them in Photomatix. Do find much benefit to bring TIFFs to Photomatix instead of Jpegs? |
Tiffs have 16 bits of data, jpeg has 8. Naturally, the more data photomatix is able to extract the better.
Still, it is much much better to import RAW files directly into photomatix, so long as they've been bracketed properly. |
I opened them in Photoshop first since I wanted to have some exposure adjustments on 2 of the files. Not sure I can I can do that in PhotoMatix. This may not be necessary, but it made sense at the time.
Lanndon is correct, I saved them as TIFs to preserve the 16 bit data. |
Great explanation. Great image. Nice example of not-overcooked HDRI.
In theory, if you work directly from RAW and have bracketed exposures, you shouldn't need to create the "pseudo-bracketed" variations to extend it; all that information, obviously, is in the RAW files from which you are working, and from which Photomatix will extract the HDRI composite. So you're not actually giving the program any more information bu doing the bracketing by hand. Also, latest version of Photomatix Pro has a radio button for removing fringing, and in my experience it works pretty well.
R.
|
|
|
|
01/30/2008 09:15:46 AM · #12 |
Originally posted by Bear_Music:
....... Also, latest version of Photomatix Pro has a radio button for removing fringing, and in my experience it works pretty well. |
Oh Snap, I didn't know that! I have version 2.5.3. I guess I have to look more closely, or download a newer version. Thanks, Bear!
|
|
|
|
01/30/2008 09:58:52 AM · #13 |
Originally posted by Bear_Music:
Great explanation. Great image. Nice example of not-overcooked HDRI.
In theory, if you work directly from RAW and have bracketed exposures, you shouldn't need to create the "pseudo-bracketed" variations to extend it; all that information, obviously, is in the RAW files from which you are working, and from which Photomatix will extract the HDRI composite. So you're not actually giving the program any more information bu doing the bracketing by hand. Also, latest version of Photomatix Pro has a radio button for removing fringing, and in my experience it works pretty well.
R. |
Thanks Bear, I will always defer to your expertise in HRDI!
Your comments about opening the bracketed RAW files directly in PhotoMatix certainly makes sense. In retrospect I would have done it that way, I wasn't sure, so I went with what I knew. I've learned a lot looking at your images. Still a ways to go before I feel I have a good handle on the process.
Question: If this works for bracketed images, wouldn't the same be true for a single RAW exposure? Is it still advisable with a Single RAW exposure to create several TIFs with different exposeure values from the RAW converter and then combine them in PhotoMatix?
I thought I had the latest version of PhotoMatix, I'll check tonight. The red fringe is worse on images with hot hightlights, in my experience.
|
|
|
|
01/30/2008 10:17:14 AM · #14 |
Originally posted by scarbrd:
Question: If this works for bracketed images, wouldn't the same be true for a single RAW exposure? Is it still advisable with a Single RAW exposure to create several TIFs with different exposeure values from the RAW converter and then combine them in PhotoMatix? |
I've had MUCH better results by manually splitting off different exposures from a single RAW file in ACR and then recombining them in Photomatix, as compared to simply opening the RAW file in Photomatix. The shot below is my example:
This makes me suspect the same may be true for bracketed RAW shots.
By manually splitting (+/-2) Bracketed RAW shots in ACR, the exposures go from -6 to +6, or so it leads me to believe in the software, by opening the RAW file shot at -2 and moving the slider to -4 in ACR gives a -6, or so I think. Then working my way up, using the RAW shots closest to the exposures I'll be setting them to in ACR before exporting TIFFs. The shot below is my example, though there's a bit of camera-shake due to cars passing over the bridge while I was taking the braketed exposures. If memory serves, I tried doing this by opening the three RAW shots in Photomatix and the results weren't nearly as good.

It's unfortunate, as splitting out the TIFFs adds about 10 or 15 minutes to the workflow. :-(
Maybe I could be doing something better?
|
|
|
|
01/30/2008 11:19:57 AM · #15 |
Originally posted by Strikeslip:
I've had MUCH better results by manually splitting off different exposures from a single RAW file in ACR and then recombining them in Photomatix, as compared to simply opening the RAW file in Photomatix. The shot below is my example:
This makes me suspect the same may be true for bracketed RAW shots.
|
That was my thought as well, but what Bear and Lanndon says makes sense. If I get some time I'll run a test using both methods.
Good stuff! |
|
|
|
01/30/2008 11:29:16 AM · #16 |
Originally posted by Strikeslip:
Originally posted by scarbrd:
Question: If this works for bracketed images, wouldn't the same be true for a single RAW exposure? Is it still advisable with a Single RAW exposure to create several TIFs with different exposeure values from the RAW converter and then combine them in PhotoMatix? |
I've had MUCH better results by manually splitting off different exposures from a single RAW file in ACR and then recombining them in Photomatix, as compared to simply opening the RAW file in Photomatix. The shot below is my example:
This makes me suspect the same may be true for bracketed RAW shots.
By manually splitting (+/-2) Bracketed RAW shots in ACR, the exposures go from -6 to +6, or so it leads me to believe in the software, by opening the RAW file shot at -2 and moving the slider to -4 in ACR gives a -6, or so I think. Then working my way up, using the RAW shots closest to the exposures I'll be setting them to in ACR before exporting TIFFs. The shot below is my example, though there's a bit of camera-shake due to cars passing over the bridge while I was taking the braketed exposures. If memory serves, I tried doing this by opening the three RAW shots in Photomatix and the results weren't nearly as good.
It's unfortunate, as splitting out the TIFFs adds about 10 or 15 minutes to the workflow. :-(
Maybe I could be doing something better? |
Think about it- forming differently exposed tiffs from a single raw file can technically only reveal the same dynamic range is the original raw file. What makes this method look better (usually) than simply loading a raw file into photomatix is that ACR has good noise reduction, and you can make further adjustments to each conversion. Still, it's much better to properly bracket raw files, as each raw file bracketed is another 32-bits of information to work with. So really, you can't compare the results of making an HDR from 5 different raw conversions from the same file, and making an HDR with 5 seperate raw files.
Message edited by author 2008-01-30 11:30:33. |
|
|
|
01/30/2008 12:03:22 PM · #17 |
Originally posted by LanndonKane:
....snip.....So really, you can't compare the results of making an HDR from 5 different raw conversions from the same file, and making an HDR with 5 seperate raw files. |
You misread my post. Give your head a shake and take another shot at it. ;-)
|
|
|
|
01/30/2008 12:07:11 PM · #18 |
Originally posted by Strikeslip:
Originally posted by LanndonKane:
....snip.....So really, you can't compare the results of making an HDR from 5 different raw conversions from the same file, and making an HDR with 5 seperate raw files. |
You misread my post. Give your head a shake and take another shot at it. ;-) |
Hold on... processing data...
You're saying that if you split off tiffs from bracketed raw shots, the effect is better than if you import the raws straight into photomatix. Probably, because if you split off tiffs from more than one raw, photomatix has more files to work with- say double the amount. But if you conciously take three bracketed shots at the scene, lets say, knowing that later you're going to make 6 conversions out of tiffs, it would be advisable just to go ahead and take 3 extra bracketed raws.
I think I got it that time :P
Message edited by author 2008-01-30 12:14:32. |
|
|
|
01/30/2008 12:07:23 PM · #19 |
Originally posted by Bear_Music:
Also, latest version of Photomatix Pro has a radio button for removing fringing, and in my experience it works pretty well. |
I'm not seeing this at all. Am I missing it?
|
|
|
|
01/30/2008 12:39:11 PM · #20 |
Originally posted by LanndonKane:
Originally posted by Strikeslip:
Originally posted by LanndonKane:
....snip.....So really, you can't compare the results of making an HDR from 5 different raw conversions from the same file, and making an HDR with 5 seperate raw files. |
You misread my post. Give your head a shake and take another shot at it. ;-) |
Hold on... processing data...
You're saying that if you split off tiffs from bracketed raw shots, the effect is better than if you import the raws straight into photomatix. Probably, because if you split off tiffs from more than one raw, photomatix has more files to work with- say double the amount. But if you conciously take three bracketed shots at the scene, lets say, knowing that later you're going to make 6 conversions out of tiffs, it would be advisable just to go ahead and take 3 extra bracketed raws.
I think I got it that time :P |
I think you got it, and I agree that taking the extra camera-bracketed RAWs is the best, ya. :-)
I think this simplifies my earlier post:
A) I (personally) get better results by splitting 1 RAW file into 9 TIFFs (-4,-3,-2,-1,0,+1,+2,+3,+4) and combining those TIFFs in Photomatix. I get worse results by loading that same, single RAW file into Photomatix.
B) I (personally) get better results by splitting 3 RAW files into 13 TIFFS (-2RAW gives -6,-5,-4,-3,-2 TIFFs; 0RAW gives -1,0,+1 TIFFs; +2RAW gives +2,+3,+4,+5,+6 TIFFs) and combining those TIFFs in Photomatix. I get worse results by loading the 3 bracketed RAW files into Photomatix.
But maybe I'm doing something wrong, or missing something somewhere. I'd much prefer just putting the RAW files into Photomatix as it would be easier. It does make good sense that the RAW file has all the info in it, and splitting to other exposures should be counterproductive. Maybe splitting exposures out manually encourages Photomatix to use a wider exposure range??? I don't know. :-(
|
|
|
|
01/30/2008 12:49:42 PM · #21 |
| Every time i try this process (saving different exposure from 1 raw file) I get a erroe message saying that there is not enough range to combine the photos. What am I doing wrong? I have tried five different exposures should i be trying more or is there something else I am missing? |
|
|
|
01/30/2008 12:54:20 PM · #22 |
Originally posted by Strikeslip:
Originally posted by LanndonKane:
Originally posted by Strikeslip:
Originally posted by LanndonKane:
....snip.....So really, you can't compare the results of making an HDR from 5 different raw conversions from the same file, and making an HDR with 5 seperate raw files. |
You misread my post. Give your head a shake and take another shot at it. ;-) |
Hold on... processing data...
You're saying that if you split off tiffs from bracketed raw shots, the effect is better than if you import the raws straight into photomatix. Probably, because if you split off tiffs from more than one raw, photomatix has more files to work with- say double the amount. But if you conciously take three bracketed shots at the scene, lets say, knowing that later you're going to make 6 conversions out of tiffs, it would be advisable just to go ahead and take 3 extra bracketed raws.
I think I got it that time :P |
I think you got it, and I agree that taking the extra camera-bracketed RAWs is the best, ya. :-)
I think this simplifies my earlier post:
A) I (personally) get better results by splitting 1 RAW file into 9 TIFFs (-4,-3,-2,-1,0,+1,+2,+3,+4) and combining those TIFFs in Photomatix. I get worse results by loading that same, single RAW file into Photomatix.
B) I (personally) get better results by splitting 3 RAW files into 13 TIFFS (-2RAW gives -6,-5,-4,-3,-2 TIFFs; 0RAW gives -1,0,+1 TIFFs; +2RAW gives +2,+3,+4,+5,+6 TIFFs) and combining those TIFFs in Photomatix. I get worse results by loading the 3 bracketed RAW files into Photomatix.
But maybe I'm doing something wrong, or missing something somewhere. I'd much prefer just putting the RAW files into Photomatix as it would be easier. It does make good sense that the RAW file has all the info in it, and splitting to other exposures should be counterproductive. Maybe splitting exposures out manually encourages Photomatix to use a wider exposure range??? I don't know. :-( |
A) Yes, this is usually the case with advanced raw converters.
B) Just a large scale example of the above- personally, I don't think 3 raw files is enough to get a good HDR looking shot if you're just importing the raws directly. I usually bracket 5 or 7. |
|
|
|
01/30/2008 12:56:56 PM · #23 |
Originally posted by LanndonKane:
.....snip..........
B) Just a large scale example of the above- personally, I don't think 3 raw files is enough to get a good HDR looking shot if you're just importing the raws directly. I usually bracket 5 or 7. |
I wish I'd done that for my second example above. :-/
|
|
|
|
01/30/2008 12:58:24 PM · #24 |
Originally posted by LVicari:
Every time i try this process (saving different exposure from 1 raw file) I get a erroe message saying that there is not enough range to combine the photos. What am I doing wrong? I have tried five different exposures should i be trying more or is there something else I am missing? |
I've never had that message. I've never input exposures separated by more than one stop.
|
|
|
|
01/30/2008 01:36:11 PM · #25 |
Originally posted by LVicari:
Every time i try this process (saving different exposure from 1 raw file) I get a erroe message saying that there is not enough range to combine the photos. What am I doing wrong? I have tried five different exposures should i be trying more or is there something else I am missing? |
Are you working with Photomatix, or with Photoshop's HDR process? This happens with Photoshop's version, because it is trying to place the exposures based on EXIF data, and that remains the same. You have to strip the EXIF from the images before combining them, in PS HDR...
R.
Message edited by author 2008-01-30 13:36:42.
|
|


