| Author | Thread |
|
|
12/01/2007 09:58:05 AM · #1 |
You gotta try this:
1 - Open image in PS
2 - Hit 'Q' to enter Quickmask mode
3 - with Rectangle Marquee tool, draw a rectangle not quite as large as your image (think of it as a picture frame, you are drawing the inside opening)
4 - Choose Edit/Fill/Black
5 - Press ctrl + 'D' to deselect the rectangle
6 - Choose Filter/Distort/Ocean Ripple
7 - Press ctrl + 'F' to repeat the ocean ripple command twice (this thickens your border a bit)
8 - Press 'Q' to exit Quickmask mode (this leaves a selected frame)
9 - Press 'Delete' to empty the selected area
10 - Ctrl + 'D' to unselect
That's it! Enjoy.
|
|
|
|
12/01/2007 10:01:12 AM · #2 |
This example shows a very subtle version of the border described, but with sliders and other effects you can make your border any way you like it.

|
|
|
|
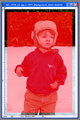
12/01/2007 10:32:51 AM · #3 |
Thanks. I just tried it. Very quick and easy. Here is another example.
 |
|
|
|
12/01/2007 10:56:06 AM · #4 |
Thanks for sharing, Cindi. :)
Add 15 more seconds and do it on a new empty layer, and at step 9 edit/fill/any color, and it's got a customizable color and it's reversible.
Message edited by author 2007-12-01 10:56:32.
|
|
|
|
12/01/2007 11:24:39 AM · #5 |
Originally posted by levyj413:
Thanks for sharing, Cindi. :)
Add 15 more seconds and do it on a new empty layer, and at step 9 edit/fill/any color, and it's got a customizable color and it's reversible. |
Yup, yup... lots of variations. Its a good starting place to figure out lots of border styles. :)
|
|
|
|
12/01/2007 11:27:02 AM · #6 |
I like yours a lot, Cindi. How did you get it randomized, so it looks more like torn paper?
|
|
|
|
12/01/2007 11:31:02 AM · #7 |
Originally posted by levyj413:
I like yours a lot, Cindi. How did you get it randomized, so it looks more like torn paper? |
Just goofing with the sliders while in the Ocean Ripple dialogue box.
|
|
|
|
12/01/2007 11:41:47 AM · #8 |
or u can look for actions/frames then u pick one like, spatter,stroke,waves and just push play button..there u go! :)
Message edited by author 2007-12-01 11:42:46. |
|
|
|
12/01/2007 11:42:56 AM · #9 |
Originally posted by idnic:
3 - with Rectangle Marquee tool, draw a rectangle not quite as large as your image (think of it as a picture frame, you are drawing the inside opening) |
Great tip! In place of Step 3, you can do the following to make the border area a precise size and exactly centered:
-SelectAll
-Select > Border (n pixels)
-Select > Inverse |
|
|
|
12/01/2007 11:51:56 AM · #10 |
|
|
|
12/01/2007 07:08:49 PM · #11 |
I saved my favorite settings as an action, so I can batch process with it. :)
|
|
|
|
12/01/2007 07:59:53 PM · #12 |
Cindi,
Thanks so much, I am always looking for things like this.
And this is why I love this place, people willing to contribute great ideas.
Thanks again.
|
|
|
|
12/01/2007 08:04:41 PM · #13 |
Originally posted by idnic:
I saved my favorite settings as an action, so I can batch process with it. :) |
Looks cool, like a deckled edge.
Care to email the action or maybe we this site could house "fave actions" somewhere for download.
thx |
|
|
|
12/01/2007 08:12:19 PM · #14 |
tisk tisk Cindi, such sloppy work! :-)
|
|
|
|
12/01/2007 09:45:17 PM · #15 |
| This is great! Thanks, Cindi!! I seem to be doing something wrong with it somewhere. Everytime I try it, my mask winds up going off the page to the right and bottom side. What am I missing here??? Thanks! |
|
|
|
12/02/2007 04:25:39 PM · #16 |
Originally posted by amandak:
This is great! Thanks, Cindi!! I seem to be doing something wrong with it somewhere. Everytime I try it, my mask winds up going off the page to the right and bottom side. What am I missing here??? Thanks! |
Me too, what he said.
|
|
|
|
12/02/2007 04:45:39 PM · #17 |
Worked for me. When you draw the selection rectangle, keep it inside the image borders - don't take it all the way to the bottom right corner - you should end up with something like this before exiting quickmask mode:
Edit: Great tip, CindiLou Who.
Message edited by author 2007-12-02 16:46:23. |
|
|
|
12/02/2007 05:08:45 PM · #18 |
OK, stay away from the bottom right and it works. Great!
|
|
|
|
12/02/2007 05:12:51 PM · #19 |
| When I use the rectangular marquee tool, I *did* center it. I'm wondering if my settings are throwing it off somehow??? When you run the ocean ripple filter, what settings are you using? Thanks. |
|
|
|
12/02/2007 06:42:09 PM · #20 |
Originally posted by amandak:
When I use the rectangular marquee tool, I *did* center it. I'm wondering if my settings are throwing it off somehow??? When you run the ocean ripple filter, what settings are you using? Thanks. |
You should be able to see the effect on the black mask in preview while you adjust the settings. None of the settings should affect it in the way you describe. Try a smaller rectangle. Hope that helps. |
|
|
|
12/02/2007 07:01:40 PM · #21 |
| I've looked at the preview, and tried both larger and smaller rectangle sizes. I can see it happen in the preview window when I change the settings, but when I decrease the settings it's like I can barely see the effect of the border.... :( |
|
|
|
12/02/2007 07:03:56 PM · #22 |
| Amanda - what version of Photoshop? |
|
|
|
12/02/2007 07:06:38 PM · #23 |
| Try a compensating offset - leave more border on the right and bottom... |
|
|
|
12/02/2007 07:44:46 PM · #24 |
| I'm using CS2. How do I do an offset?? Thanks so much! |
|
|
|
12/02/2007 11:44:09 PM · #25 |
| Thanks for all the advice. Can't wait to try this. |
|
Home -
Challenges -
Community -
League -
Photos -
Cameras -
Lenses -
Learn -
Prints! -
Help -
Terms of Use -
Privacy -
Top ^
DPChallenge, and website content and design, Copyright © 2001-2024 Challenging Technologies, LLC.
All digital photo copyrights belong to the photographers and may not be used without permission.
Current Server Time: 04/20/2024 11:50:15 AM EDT.


