| Author | Thread |
|
|
10/07/2007 04:33:11 PM · #26 |
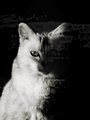
Hope anyone can post...here is the very first picture I have done which I think has a textured background, done just last week, I did mess up a little, didn't entirely erase, you can see some on his face, ooops. It was just for fun, trying to teach myself new things.
 |
|
|
|
10/07/2007 06:47:44 PM · #27 |
Originally posted by liberty:
Hope anyone can post...here is the very first picture I have done which I think has a textured background, done just last week, I did mess up a little, didn't entirely erase, you can see some on his face, ooops. It was just for fun, trying to teach myself new things.
|
This is for everyone who wants to learn, to have a play, to show what they're doing with textures/overlays, to share ideas.  liberty I really love what you did with Sid The Kid!! liberty I really love what you did with Sid The Kid!! |
|
|
|
10/07/2007 06:53:38 PM · #28 |
| The other thing is that a lot of the results of these experiments would be great for making prints, posters, series of cards ....... that type of thing. Apart from DPC Prints, there are a number of sites where you can put your art work onto items, create a gallery and begin to sell. 2 that come to mind are Zazzle and Cafe Press I'm sure there are a lot more out there. |
|
|
|
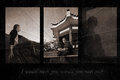
10/07/2007 07:25:49 PM · #29 |
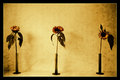
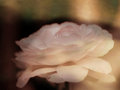
Here's one I did a week or so ago.

And one with 5 pictures overlaid on top of it.

And again... another one i did quite a while ago by using a brick wall and my face. Moo.
Message edited by author 2007-10-07 19:27:02.
|
|
|
|
10/07/2007 07:38:23 PM · #30 |
| Very cool ideas with the portraits. What did you use for textures on that first shot Timeless? It's gorgeous!! |
|
|
|
10/07/2007 09:02:21 PM · #31 |
I want to play, but have no idea how, and will start with something simple if anyone has any ideas for me please. Thanks Deb for your email and will get back to you soon re Acids..... I often find it hatd to interperate what I read, and find it much better with people telling me how to do new things. I kind of panic a litttle, if I not sure how to do things.
I look forward to learning some new techniques from the peopli I love and admire at DPC, like all of you in this thread.
I am so green with layers..... I think some of my own images wiuld be good for layers, and I love to have someone look at my portfolio, and tell me which ones. Maybe some of the ones in textures and abstract may be good for layers.
|
|
|
|
10/07/2007 09:07:07 PM · #32 |
Originally posted by suemack:
Not really a side challenge, but in a way it is. This is an off-shoot of the ideas that are pinging round in the Slice of Life side challenge
Textured layers .....tips, tricks, examples of the layer and the finished work. Sharing of ideas, getting creative in photoshop and having fun. You can post as few or as many as you want.
Since I started the thread I guess I'd better kick it off with a pic.
[thumb]596497[/thumb]
If I've got this in the wrong part of the forum feel free to move it SC thanks. |
ok ... so how do I create an overlay??? I love the look of these images and would love to try it on my own ... but have no clue where to start! |
|
|
|
10/07/2007 09:09:08 PM · #33 |
| LOL I wrote a detailed post in the first page have a look there! |
|
|
|
10/07/2007 11:20:04 PM · #34 |
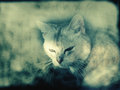
Ok I thought I'd play .. since I have nothing else to do right now. I wish I had a better picture to play with but this will have to do.
 |
|
|
|
10/08/2007 02:42:21 AM · #35 |
sherpet and pamelasue This is a great explanation of where to start with textured overlays. If you're not sure of anything just yell and one of us will see if we can help. We're all learning here together :D
Message edited by author 2007-10-08 02:42:55. |
|
|
|
10/08/2007 03:30:28 AM · #36 |
Thanks I am going to give this a shot later after I have processed my entry for one of the current challenges.
|
|
|
|
10/08/2007 04:19:06 AM · #37 |
I do mine a different way that seems easier than the above.
Open a picture as the background
Open the picture you want to be pasted over it. Ctrl+A, then Ctrl+C to copy. Click on the background picture and ctrl+v to add the second picture as a layer to the original one.
Change the blending mode to 'soft light' and adjust opacity to taste.
Use a layer mask and paint with a soft black brush (50% opacity, 70% flow and 0% hardness for example) all the bits you want to keep untouched by the textures layer.
Flatten image when you're happy.
easy as that. |
|
|
|
10/08/2007 04:27:07 AM · #38 |
| I will add to my post 2 places that you can find textures here at grungetextures.com and here in Goodman's portfolio she has clearly stated several times she is happy for people to uise them :) |
|
|
|
10/08/2007 04:35:19 AM · #39 |
You can always do in the camera.
Life is just an illusion!

|
|
|
|
10/08/2007 05:09:30 AM · #40 |
|
|
|
10/08/2007 05:11:13 AM · #41 |
Originally posted by Judi:
You can always do in the camera.
Life is just an illusion!
|
That's awesome Judi! I'd love to know how you achieved it. |
|
|
|
10/08/2007 05:56:26 AM · #42 |
take a look at these amazing images...
TAKE A LOOK
thanks to rkt for pointing them out. |
|
|
|
10/08/2007 06:18:20 AM · #43 |
Originally posted by goodman:
take a look at these amazing images...
TAKE A LOOK
thanks to rkt for pointing them out. |
Wow! |
|
|
|
10/08/2007 07:37:38 AM · #44 |
I have a few different ways of texturing, but mostly I use trial and error. All my grunge/textures are things I've shot while out on various shoots. I'm happy to share the techniques if anyone would like to know how they're done. Examples:
I'm working on some more tutorial vids... but it's taking some time... |
|
|
|
10/08/2007 08:02:21 AM · #45 |
Thanks! I'm headin off to work, but will give it a try when I get some time ...
Originally posted by suemack:
sherpet and pamelasue This is a great explanation of where to start with textured overlays. If you're not sure of anything just yell and one of us will see if we can help. We're all learning here together :D
|
|
|
|
|
10/08/2007 10:10:29 AM · #46 |
|
|
|
10/08/2007 10:36:08 AM · #47 |

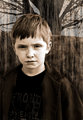
WOW! Everything in this thread is impressive. I tried to make this look like an 'old master' oil painting. The texture is a weathered railroad tie. If you have any comments, I would be grateful. I'm delighted to find this thread, as I enjoy doing these. I will describe how I did it, if anyone's interested. |
|
|
|
10/08/2007 02:19:12 PM · #48 |
Originally posted by pixelpig:
WOW! Everything in this thread is impressive. I tried to make this look like an 'old master' oil painting. The texture is a weathered railroad tie. If you have any comments, I would be grateful. I'm delighted to find this thread, as I enjoy doing these. I will describe how I did it, if anyone's interested. |
I'd be very interested in learning how you did this, it's awesome! |
|
|
|
10/08/2007 02:21:50 PM · #49 |
Would be great to hear more, I'm still trying to figure out what works, what doesn't ...... and why it didn't work. |
|
|
|
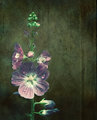
10/08/2007 06:51:38 PM · #50 |
Originally posted by suemack:
Originally posted by pixelpig:
WOW! Everything in this thread is impressive. I tried to make this look like an 'old master' oil painting. The texture is a weathered railroad tie. If you have any comments, I would be grateful. I'm delighted to find this thread, as I enjoy doing these. I will describe how I did it, if anyone's interested. |
I'd be very interested in learning how you did this, it's awesome! |
When I first tried this I didn't properly understand the power of layers & mine all turned out flat, low-contrast. Icky. But now I have learned enough to challenge myself & I find these layered images great fun to do, very satisfying.
It helps to remember to shoot for BG while you're out doing other things. Cracked asphalt, old bricks, weathered wood, dried mud--anything w/no compelling focal point. For my lilies, I shot the weathered railroad tie used as a border in the garden. I edit the subject photo first. For this I made the BG black because of the way black works when using layer blending. I edited the texture separately, adjusting the size of the detail, the resolution, & the dimensions to make a 'drop in' match for the subject.
I used 4 layers. 2 layers of the subject blended to maximize FG detail.
I dropped the texture layer on top of this, adjusting blend modes & erasing a bit here & there to maximize FG detail. I added a 4th layer on top, w/added color & omni light--only to the BG area (not the flowers).
Hope this is useful! |
|
Home -
Challenges -
Community -
League -
Photos -
Cameras -
Lenses -
Learn -
Prints! -
Help -
Terms of Use -
Privacy -
Top ^
DPChallenge, and website content and design, Copyright © 2001-2024 Challenging Technologies, LLC.
All digital photo copyrights belong to the photographers and may not be used without permission.
Current Server Time: 04/19/2024 09:38:31 PM EDT.