|
| Author | Thread |
|
|
09/12/2007 04:43:28 AM · #1 |
I recently started working with a company as a photographer and designer, most clients are Hotels. I'm familiar with the HDR technique, this allows me to use available light and have some decent shots, since I have limited equipment.
Once I was talking to a hotel manager and he said to me: "Every light in the room should be on... or so they say". I had always done it this way, but it was a thing of instinct, I hadn't given it much thought. So, are there any more of these rules/guidelines? and also I'd like to know if you know of any available resources on the web for architecture photography, mainly interiors.
Any tip/resources on photographing hotel rooms will be very much helpful and apprecciated.
Thanks a lot, Ed. |
|
|
|
09/12/2007 06:50:46 AM · #2 |
Hi Eduardo.
I would agree with the hotel manager.
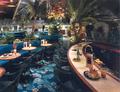
I like to make use of all available light sources, irrespective of whether it's night or day. With a closed aperture this can provide pretty starlight effects - and I find that these are quite popular with most designers tasked with making up hotel advertising brochures.
Where a room has nice, heavy, dark drapes (curtains) I would close them (in the day) to help simulate a night-time effect. This can help bring out detail in the curtains.
Then, to help beef up the lighting in a room, I use small, halogen spot lights, or daylight balanced energy saving bulbs to bump up the shaded areas, and to bring out detail that could otherwise go missing.
The interior decorators who furnish rooms often go to great lengths to find specific pieces of material, furniture and other objects, and these need to be brought out in order to better "tell a story".
I've included some ideas to help you see what I did on a recent shoot.
image 1
image 2
image 3
image 4
image 5
They may not be in line with suggestions offered by others, or even by the "pros", but it's what I do, and it makes my clients happy!
Good luck!
Message edited by ursula - Please post larger images as links or thumbnails. |
|
|
|
09/12/2007 07:35:32 AM · #3 |
Wow ... awesome response! Thanks for sharing not only instruction but examples too!
|
|
|
|
09/12/2007 07:39:59 AM · #4 |
| Just be careful with light colour casts. You can fix it if all the lights are the same, but if you have a mixture of daylight and different artificial lights, you're never going get a proper white balance. This is fine if you're going to exploit the warmth of tungsten, as that looks quite good sometimes, but flourescents are the real killer. |
|
|
|
09/12/2007 07:43:03 AM · #5 |
What are the shots being used for?
I used to work on Architectural shoots where we'd often bring in many cases of equipment and spend several hours getting the lights set up before even shooting a frame.
If you have the room lit, these little slave lights can add light just about anywhere you need it. They're great for filling in all those dark areas that need just a bit more or adding some ambiance to a room. The 120V AC slaves with the screw base are good to use as replacements for lightbulbs in existing light fixtures. The battery powered ones can be used to add fill where no such light fixtures exist. Get lots of warming/CC gels for them (and any other strobes) if you want to match incandescent lights. Of course, if you use them without, they may need some filtration to match sunlight as well.
|
|
|
|
09/12/2007 12:44:01 PM · #6 |
| Wow, I don't have words to express my gratitude, thank you so much for such detailed answers. I'm speechless! |
|
|
|
09/12/2007 01:42:22 PM · #7 |
You're getting good advice here. I'm a retired architectural photographer, so I have done a lot of this. Using "available light" is almost always best; in rooms, the built in lighting is the available light of course. Floods for fill, the little portable lights to scatter as needed, both good.
Watch out for light reflections from shiny surfaces, such as in one of the otherwise excellent shots below. Polarizer often, but not always, helps.
Take shots from other angles than eye level; it frequently pays to get down lower, for example, makes the room more intimate.
Move potted plants around, especially tall ones, so you can use them to cover parts of empty ceilings.
Plan your shooting for which way the room's windows are oriented; west windows, shoot in morning — east windows, afternoon — north windows anytime — south windows vary with time of year.
If working with dSLR and don't have tilt/shift lens, use wider lens than you need (if possible) and orient vertically, then crop out unneeded foreground to square or horizontal. This will allow you to keep verticals oriented properly.
If you must have convergence, more is often better than less. A little bit looks like a mistake, a lot looks intentional. However, PS perspective and skew tools allow you to correct much of this in post-processing, up to a point.
You really, really, really need a 10-22 zoom if you don't alreadyhave one, to do hotelinteriors.
Good luck,
Robt.
Available light, 4x5 view camera (scan from transparency), 30 min exposure.
|
|

|
|
Current Server Time: 04/23/2024 07:32:44 PM  |
Home -
Challenges -
Community -
League -
Photos -
Cameras -
Lenses -
Learn -
Prints! -
Help -
Terms of Use -
Privacy -
Top ^
DPChallenge, and website content and design, Copyright © 2001-2024 Challenging Technologies, LLC.
All digital photo copyrights belong to the photographers and may not be used without permission.
Current Server Time: 04/23/2024 07:32:44 PM EDT.
|


