| Author | Thread |
|
|
02/22/2008 06:25:29 PM · #1 |
Here is my attempt at it...
Not a big difference, but I think it does look better. Thank you so much for the turoial Cindi!
From another girl with a strange name,
Tiny =) |
|
|
|
01/18/2008 12:10:23 PM · #2 |
| Til Tuesday? That takes me back... good memories for sure. Awesome name. |
|
|
|
01/18/2008 11:24:36 AM · #3 |
Originally posted by cryingdragon:
Originally posted by ClubJuggle:
No problem! Totally unrelated, your copyright notice reminds me of 'Til Tuesday.
~Terry |
I'd be sure that clients knew that was the copyright, not a delivery time :) |
Baaa ha...so true. Actually, that was the concetp on my site originally...a play on words, things were 'done' by me, and I shipped on Tuesday, so it all had to be 'done' by then ;) LOL
|
|
|
|
01/18/2008 11:10:25 AM · #4 |
Originally posted by ClubJuggle:
No problem! Totally unrelated, your copyright notice reminds me of 'Til Tuesday.
~Terry |
I'd be sure that clients knew that was the copyright, not a delivery time :)
|
|
|
|
01/18/2008 11:08:57 AM · #5 |
Originally posted by TireSandals:
I think you are on to something. You are using some of the same technique s as those colored contact lenses. They add a dark line over the limbus (the junction between the cornea and the sclera) and several radial lines over the iris to increase the contrast. Burning the limbus does basically the same thing.
However, taking away all the secondary reflections left the eye looking flat. I think you could get away with a single reflection if that reflection is over the pupil. In your case, I would take away both the reflections on the model's right (in both the right and left eyes), but not the dots over the pupils.
Burning a little eye makeup is a great idea too. Thank you so much for sharing your hard work. Its easy to poke a couple of holes, building the tutorial was the tough part.
~Nick |
I agree flat eyes look dialated and flat.
Other then that it's a great improvement.
I would like to see the central highlights from the original pupils. The eye on the left also had one to the left. That one could stay or go. |
|
|
|
01/18/2008 01:20:41 AM · #6 |
Originally posted by fotomann_forever:
Originally posted by Tuesday:
LOL! My parents named me after a Lynyrd Skynyrd song :X LOL "Tuesday's Gone".
*Tuesday* |
Your parents ROCK! :-D
Welcome to DPC. |
I have to say, they really do LOL...I hated the name as a child (you can imagine why), but now, I truly appreciate that it's unique ;) LOL
Thanks for the welcome...I kind of poked around looking for a place to post 'intros' but couldn't really see anywhere that felt like it was where 'it' is done, so I'm just going to inject myself on conversations and wiggle in :P |
|
|
|
01/18/2008 01:16:23 AM · #7 |
Originally posted by Tuesday:
LOL! My parents named me after a Lynyrd Skynyrd song :X LOL "Tuesday's Gone".
*Tuesday* |
Your parents ROCK! :-D
Welcome to DPC.
|
|
|
|
01/18/2008 12:06:08 AM · #8 |
Originally posted by ClubJuggle:
No problem! Totally unrelated, your copyright notice reminds me of 'Til Tuesday.
|
LOL! My parents named me after a Lynyrd Skynyrd song :X LOL "Tuesday's Gone".
"Done By Tuesday" is/was the name of my online shop, UNFORTUNATELY I didn't realize I was going to love photography as much as I do, or I would have started out with just my name, but initially I was only taking pictures of the items I made, and there is the occassional issue of people snatching photos, blah blah blah, I do teeter back and forth with using a different copyright for just 'photos'...my name perhaps, but meh. LOL.
*Tuesday* |
|
|
|
01/17/2008 11:51:03 PM · #9 |
| Great tutorial. Thank you. :) |
|
|
|
01/17/2008 11:46:03 PM · #10 |
No problem! Totally unrelated, your copyright notice reminds me of 'Til Tuesday.
~Terry
|
|
|
|
01/17/2008 11:37:11 PM · #11 |
Thanks Terry :D it really is. I'm excited to see what else I can do now LOL :D Especially with the eyes on my kids' pictures! :D
Thanks for the edit too ;) |
|
|
|
01/17/2008 11:03:04 PM · #12 |
Welcome to the forums!
Nice work... it's amazing what a big difference a small edit can make!
~Terry
|
|
|
|
01/17/2008 10:54:06 PM · #13 |
Okay, this is my first 'forum' post, so howdy ;) LOL
Now. I just found this tutorial this evening and gave it a try on my self portrait for today! The photo has been adjusted (curve mostly) but I didn't do anything specific to the eyes at all. So the 'original' isn't 100% original, if you know what I mean, LOL...but still.
I found the tutorial immensely helpful as I am oh so very new to all this stuff :P
so, here are the shots...
before:
[thumb]634519[/thumb]
after...subtle difference, but it's the oomph type thing I wanted to learn about :D
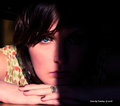
Thanks for the tutorial :D
Tuesday
Message edited by ClubJuggle - Changed large images to links. |
|
|
|
10/16/2007 10:43:02 PM · #14 |
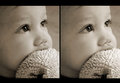
I made her eyes a little bright
 |
|
|
|
10/16/2007 10:05:55 PM · #15 |
Whoa those eyes are intense- borderline creepy actually.
I kinda prefer the original, the eyes are much more natural.
Just my opinion of course, and it is a pretty nifty technique.
EDIT: Hmm maybe it's the cloned highlight in the pupil that's making it seem odd, the pupils ar very large and the highlight balances out all that negative space.
Message edited by author 2007-10-16 22:07:27. |
|
|
|
10/16/2007 09:58:44 PM · #16 |
|
|
|
10/16/2007 09:47:20 PM · #17 |
WOW WOW WOW!!!
I love this! I am glad I found this because I was looking for something to make my model's eyes pop!
|
|
|
|
02/17/2007 06:32:51 PM · #18 |
| Gotta question......how do i how do I get to the paintbrush/pallette to change eye colour after changing blending mode to colour would appreciate any help thanks :) |
|
|
|
02/13/2007 09:08:13 PM · #19 |
I think you are on to something. You are using some of the same technique s as those colored contact lenses. They add a dark line over the limbus (the junction between the cornea and the sclera) and several radial lines over the iris to increase the contrast. Burning the limbus does basically the same thing.
However, taking away all the secondary reflections left the eye looking flat. I think you could get away with a single reflection if that reflection is over the pupil. In your case, I would take away both the reflections on the model's right (in both the right and left eyes), but not the dots over the pupils.
Burning a little eye makeup is a great idea too. Thank you so much for sharing your hard work. Its easy to poke a couple of holes, building the tutorial was the tough part.
~Nick
Message edited by author 2007-02-13 21:10:56. |
|
|
|
12/30/2006 06:40:09 PM · #20 |
Originally posted by moniepenny:
Is this legal in advanced editing challenges? |
Yeah
|
|
|
|
12/30/2006 05:42:14 PM · #21 |
Is this legal in advanced editing challenges?
|
|
|
|
12/19/2006 09:09:53 AM · #22 |
| out of curisoity do you have any other preferred techniques for other parts of the face - especially lipos, teeth, wrinkles ? |
|
|
|
12/19/2006 08:59:44 AM · #23 |
the eye to frame right. you got it ;}
Originally posted by levyj412:
And from step 4 to 5, it looks like you also dodged the inside of your left eye (image right; anyone ever figured out a good language for describing which side of someone's body you mean when they face the camera?).
|
|
|
|
|
12/19/2006 06:18:57 AM · #24 |
| fantastic - really useful tutuorial - thanks for taking the time |
|
|
|
11/29/2006 01:54:27 AM · #25 |
Cindi, you wanted to know if we'd used it. Yep - during the 30-day self-portrait challenge on my Emotion Wheel shot. I didn't burn my eyelids, but you told us in that thread about the color mode. In fact, I just used the color mode in my light on white entry, and I never would've known about it without you. :)
I do have a few suggestions for the tutorial.
It's most helpful in each step if literally nothing else changes.
From step 2 to step 3, though, you changed the overall contrast in addition to changing the iris color. And then the contrast returned in step 4.
And from step 4 to 5, it looks like you also dodged the inside of your left eye (image right; anyone ever figured out a good language for describing which side of someone's body you mean when they face the camera?).
I know these sound small, but when you're only talking small changes from step to step anyway, they get distracting. And for people just learning the difference between dodge and burn, seeing two changes at once makes the point less clear.
I hope you know I appreciate your taking the time; you're inspiring me to write one myself. But I also hope you take this as constructive criticism to improve an already-great addition to DPC. :)
|
|
Home -
Challenges -
Community -
League -
Photos -
Cameras -
Lenses -
Learn -
Prints! -
Help -
Terms of Use -
Privacy -
Top ^
DPChallenge, and website content and design, Copyright © 2001-2024 Challenging Technologies, LLC.
All digital photo copyrights belong to the photographers and may not be used without permission.
Current Server Time: 04/24/2024 11:45:31 PM EDT.


