| Author | Thread |
|
|
10/05/2015 06:31:34 PM · #1 |
Ok, I am confused. As usual. I am trying to do more stuff with layers in PS, but a lot of times end up with almost transparent segments of a layer, even though I have opacity and fill both set to 100%. According to my PS book for PS Dummies, this happens when a pixel contains no colour. So how is that possible?
And what do I do to ensure that I don't get things happening like what's going on here, where the toe of the slipper pf the girl on the left is partially transparent?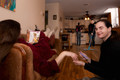 |
|
|
|
10/05/2015 06:39:03 PM · #2 |
Originally posted by snaffles:
... I have opacity and fill both set to 100%. |
What is the "blending mode" of the layer? |
|
|
|
10/05/2015 06:41:55 PM · #3 |
Originally posted by GeneralE:
Originally posted by snaffles:
... I have opacity and fill both set to 100%. |
What is the "blending mode" of the layer? |
Normal. That's pretty much all I ever use. |
|
|
|
10/05/2015 06:47:27 PM · #4 |
| When you made the selection did you feather it or use a soft-edged-brush to create the selection mask? |
|
|
|
10/05/2015 07:05:42 PM · #5 |
With the layer that has the "invisible slippers", what are you using to select that portion of the photo? Some tools may look like they selected that portion of the image you're trying to layer in while not actually doing that. If you want to be sure, immediately underneath that layer insert and all white or all black layer and see what shows after making all other layers visible. If you don't see it then it was never selected.
|
|
|
|
10/05/2015 07:38:07 PM · #6 |
You are most likely using some degree of "feathering" in your selection; that accounts for it. To see what I mean, open a plain photoshop document with a white BG and use the brush to PAINT black on the white BG. In the upper left of the PS screen you'll see a dropdown to adjust brush size and "hardness"; the softer a brush is, the more "feathered" it is. So set up the brush to have a lot of feathering and see how it's black only in the middle and grey along the edges as you draw.
That's "feathering", and any selection you make in PS can be feathered as you see fit; it's one of the customizable aspects of the thing. Feathering is *good*, because hard-edge selections usually look very unnatural. It's just a matter of learning what degree of feathering works for what sort of project. |
|
|
|
10/05/2015 07:43:13 PM · #7 |
*sigh* I wish I could say what tools I used on which layers, but I don't remember.
What I usually do, as opposed to the whole tedious process of selecting a layer, is to just place a layer in, reduce opacity to 50% and erase all the crap I don't need. But usually I do use a soft brush, like 20% or less, to do the erasing with. Then I bump the opacity back to 100% and most of the time, wala, it looks good. It's when it doesn't look good that I start getting pissy, impatient and then just go ahead and enter anyway, because by then I'm fed up and feeling taxed because I don't know what I've done wrong, let alone know how to correct it. PSing is mostly very abstract for me, and I am a fairly concrete thinker, so PS is tough to learn. |
|
|
|
10/05/2015 09:05:48 PM · #8 |
| Oooh, I know the answer to this one: If you wash your feet every once in a while, they don't erode your slippers. |
|
|
|
10/05/2015 09:51:35 PM · #9 |
Originally posted by skewsme:
Oooh, I know the answer to this one: If you wash your feet every once in a while, they don't erode your slippers. |
Hmmm...that's an idea :-) |
|
|
|
10/05/2015 10:20:26 PM · #10 |
Originally posted by snaffles:
*sigh* I wish I could say what tools I used on which layers, but I don't remember.
What I usually do, as opposed to the whole tedious process of selecting a layer, is to just place a layer in, reduce opacity to 50% and erase all the crap I don't need. But usually I do use a soft brush, like 20% or less, to do the erasing with. Then I bump the opacity back to 100% and most of the time, wala, it looks good. It's when it doesn't look good that I start getting pissy, impatient and then just go ahead and enter anyway, because by then I'm fed up and feeling taxed because I don't know what I've done wrong, let alone know how to correct it. PSing is mostly very abstract for me, and I am a fairly concrete thinker, so PS is tough to learn. |
Instead of erasing use a layer mask. Makes it that much easier to add back what you accidentally erased. And re-erase what you accidentally added back in. And... ;)
Seriously, though, I never use the eraser - masks are so much easier. |
|
|
|
10/05/2015 10:49:50 PM · #11 |
Originally posted by backdoorhippie:
Originally posted by snaffles:
*sigh* I wish I could say what tools I used on which layers, but I don't remember.
What I usually do, as opposed to the whole tedious process of selecting a layer, is to just place a layer in, reduce opacity to 50% and erase all the crap I don't need. But usually I do use a soft brush, like 20% or less, to do the erasing with. Then I bump the opacity back to 100% and most of the time, wala, it looks good. It's when it doesn't look good that I start getting pissy, impatient and then just go ahead and enter anyway, because by then I'm fed up and feeling taxed because I don't know what I've done wrong, let alone know how to correct it. PSing is mostly very abstract for me, and I am a fairly concrete thinker, so PS is tough to learn. |
Instead of erasing use a layer mask. Makes it that much easier to add back what you accidentally erased. And re-erase what you accidentally added back in. And... ;)
Seriously, though, I never use the eraser - masks are so much easier. |
If it's not clear, you do this on the image you are going to copy, before you paste into the composite. FWIW we have two or three tutorials on using Layer Masks to make/control selections. |
|
|
|
10/06/2015 12:59:09 AM · #12 |
At first, it's easiest to use Photoshop in ways that are familiar, with the tools that are familiar like "brush" and "eraser." It's familiar to edit by the way it looks.
Photoshop uses math. This tutorial on blending modes does a good job of explaining it. The realization that photoshop is math, that digital editing is math, changed everything for me. |
|
|
|
10/06/2015 06:59:00 AM · #13 |
Originally posted by GeneralE:
Originally posted by backdoorhippie:
Originally posted by snaffles:
*sigh* I wish I could say what tools I used on which layers, but I don't remember.
What I usually do, as opposed to the whole tedious process of selecting a layer, is to just place a layer in, reduce opacity to 50% and erase all the crap I don't need. But usually I do use a soft brush, like 20% or less, to do the erasing with. Then I bump the opacity back to 100% and most of the time, wala, it looks good. It's when it doesn't look good that I start getting pissy, impatient and then just go ahead and enter anyway, because by then I'm fed up and feeling taxed because I don't know what I've done wrong, let alone know how to correct it. PSing is mostly very abstract for me, and I am a fairly concrete thinker, so PS is tough to learn. |
Instead of erasing use a layer mask. Makes it that much easier to add back what you accidentally erased. And re-erase what you accidentally added back in. And... ;)
Seriously, though, I never use the eraser - masks are so much easier. |
If it's not clear, you do this on the image you are going to copy, before you paste into the composite. FWIW we have two or three tutorials on using Layer Masks to make/control selections. |
Or not. As I looked at her image it looks as if 2 or 3 of the elements were shot in the same room with the same camera position and lighting (the mop/sweep is the only one that looks truly pasted in). In cases like this I'll simply stack each separate shot with all but the base layer masked out. I then simply paint in the elements I want from each layer using the mask. It makes for a bigger file, but once I'm satisfied with the result I can apply the mask as a selection, invert it and then cut/delete the unused portion of the layer from the file. Works great for group portraits where you can't get everyone to look normal at the same time.
|
|
|
|
10/06/2015 07:41:20 AM · #14 |
| Thanks for the feedback and will give Layer Masks a go later on. My efforts are thwarted somewhat by the fact that PS for Dummies is very badly written and seems to assume a lot of basic PS knowledge. Looks more like a book for helping develop PS skills you already had. And I am notoriously bad at math, though better than I used to be. |
|
|
|
10/06/2015 07:52:26 AM · #15 |
| There are some really good video tutorials out there on compositing. IIRC there are a few really detailed ones on Lynda.com that are worth the watch. We're talking hours with exercise files instead of a 20 minute run and gun. If you're so inclined they offer a 30 day free trial. Some of the best photography ed stuff out there, and for those of us who can read it 20 times and be left scratching our heads, but watch and do it once and remember forever it's a great asset. |
|
|
|
10/07/2015 08:11:37 AM · #16 |
//www.https://youtu.be/QgmTl2Hbdsc
Loads of stuff on ut about masks.
Message edited by author 2015-10-07 08:12:22. |
|
Home -
Challenges -
Community -
League -
Photos -
Cameras -
Lenses -
Learn -
Prints! -
Help -
Terms of Use -
Privacy -
Top ^
DPChallenge, and website content and design, Copyright © 2001-2024 Challenging Technologies, LLC.
All digital photo copyrights belong to the photographers and may not be used without permission.
Current Server Time: 04/25/2024 03:17:28 AM EDT.


