| Author | Thread |
|
|
07/11/2014 11:28:59 PM · #1 |
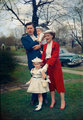
My grandfather's sister was showing a faded old photo when a negative slipped out of the envelope. I made an offhand remark that I could probably scan the film and get better results than the original print, so she gave it to me. Turns out that my old scanner doesn't have a transparency function like I thought it did. Uh, oh! Undeterred, I put the orange tinted negative over a medium blue gel to balance the color and shot it on a softbox with my camera. Invert the result in Photoshop and bingo! I just had to correct the white balance a little and duplicate the layer in multiply mode for contrast. The color was all there. Unfortunately, a zillion scuffs and scratches on the film were were also there and took me a long time to retouch. Just thought it might be a good tip in case anyone else runs into a negative with no film scanner around.
 |
|
|
|
07/11/2014 11:54:01 PM · #2 |
|
|
|
07/12/2014 12:39:39 AM · #3 |
What a fantastic idea! Thanks! I'll have to try it.
Can you be more descriptive with the "I shot it on my softbox" portion...?
Message edited by author 2014-07-12 00:40:36. |
|
|
|
07/12/2014 12:58:28 AM · #4 |
Originally posted by tanguera:
Can you be more descriptive with the "I shot it on my softbox" portion...? |
Sure. Like this:
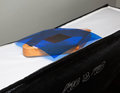
The gel doesn't completely offset the strong orange color cast, but it gets close enough. When converting from RAW, use the white balance tool on the border of the film to neutralize the color and then adjust exposure to make the highlights nearly white and the shadows nearly black. Invert in Photoshop and you should be in the ballpark.
Message edited by author 2014-07-12 01:03:29. |
|
|
|
07/12/2014 01:46:01 AM · #5 |
| Did you have the softbox on the model light? Or did you strobe it? |
|
|
|
07/12/2014 01:54:32 AM · #6 |
| Strobe. That light is better balanced and you need the power to get through several layers of colored acetate with a small aperture and fast shutter speed (this was handheld). |
|
|
|
07/12/2014 10:12:35 AM · #7 |
| If the scratches are on the base side, try rubbing the film against your nose before scanning (or photographing). Might make your retouching a bit easier. |
|
|
|
07/12/2014 10:21:54 AM · #8 |
That's a good trick, and you ended up with a great old family photo.
That looks like a 48 Buick in the background. |
|
|
|
07/12/2014 11:02:44 AM · #9 |
| Last question (maybe...) Was the film lying a layer of glass or other rigid transparent material set over the rack? |
|
|
|
07/12/2014 11:04:32 AM · #10 |
Originally posted by MelonMusketeer:
That looks like a 48 Buick in the background. |
Close. It seems to be a 1950 Buick (different grill), so the photo was taken a little later than I had guessed. |
|
|
|
07/12/2014 11:05:20 AM · #11 |
Originally posted by tanguera:
Last question (maybe...) Was the film lying a layer of glass or other rigid transparent material set over the rack? |
Nope. Open rack > gel > film. |
|
|
|
07/12/2014 11:13:18 AM · #12 |
| Oh! The film was on top of the rack gel! Doh!! If only my eyes worked... |
|
|
|
07/18/2014 08:12:27 PM · #13 |
| I just got word that the mom in that photo received her 10x12" framed print yesterday and cried for a long time. So, either mission accomplished or I ruined it. |
|
|
|
07/18/2014 09:07:52 PM · #14 |
|
|
|
07/19/2014 07:54:25 AM · #15 |
| Recovering a great memory like that for someone is one of the most rewarding things you can do as a photographer. Thanks for the "how to" info. |
|
Home -
Challenges -
Community -
League -
Photos -
Cameras -
Lenses -
Learn -
Prints! -
Help -
Terms of Use -
Privacy -
Top ^
DPChallenge, and website content and design, Copyright © 2001-2024 Challenging Technologies, LLC.
All digital photo copyrights belong to the photographers and may not be used without permission.
Current Server Time: 04/19/2024 05:24:03 PM EDT.


