| Author | Thread |
|
|
06/22/2013 05:19:58 PM · #1 |
Ok, I've used LR for years...pretty good at it even though I've always felt it slow as a pig (especially compared to RawShooter). But it works.
I watched the recent CreativeLive seminar on LR5 and although I knew much of what he said, I did pick up a few tips, but most valuable, I learned a bit more about what's behind the scenes. For example, I didn't realize that all the adjustments were simply additive...you could double the effect by using two adjustments, or counter the effect of a global adjustment by adding a local adjustment that was simply the negative value of what you did globally.
One other thing he advised that helped: he calls it the "tango" that you apply to every image. But the main part of it is simply to start by letting LR auto adjust. Then fix from there. It generally is a good starting point, on the first group of sliders, even if you often have to change the exposure adjustment (adjust for midtone values only). Then use the highlights and shadow and black to tweak the ends of the curve.
But most importantly, he inspired me to try to use only LR as much as possible. Although it's still pretty slow, I love the idea of not aggregating huge PSD or TIFF files with my photos, and having everything "re-editable". Plus then I feel better about not upgrading to CS6!
SO: I dedicate this thread as a club for people to share tips, and PHOTOS PROCESSED WITH LR only. NO FILTERS. No Photoshop. Show us what you can do with JUST LIGHTROOM. And share any tips.
No need to sign up...just post your tips and LR only photos here as you want! |
|
|
|
06/22/2013 05:25:41 PM · #2 |
It's slow, until you can perfect one photo then apply all those changes to the next 15 shot at the same time. That kinda makes up for it!
Don't suppose you have a link for that seminar? |
|
|
|
06/22/2013 05:27:33 PM · #3 |
This is a tip, and a bit of an exception to below. I also recently found a great tip on how to really do HDR, getting the most of it, while producing very natural images. (I forget now where I read this...will add a credit later, if I find it).
The method is simple if you have Photomatix. The trick is to simply not to use Photomatix, but to use an extra plugin they provide that installs into LR and adds a menu item to the export menu called "Merge to 32 bit HDR". Take your bracketed exposures, select them, select "Merge to 32 bit HDR". Now when you're done, you'll have a new 32 bit negative that has more dynamic range than any of your individual bracketed photos. That's your new "negative". Now do your editing in LR as always, but now you have a true 32 bit per channel negative to help with your adjustments.
And they come out without looking like HDR. (Well, you can always tonemap it, to get the HDR look if you like that.) But not for this thread...we'll allow the 32 bit "starting" negative here...since it's just a better negative, not really processing by other software. |
|
|
|
06/22/2013 05:29:01 PM · #4 |
Originally posted by chesire:
It's slow, until you can perfect one photo then apply all those changes to the next 15 shot at the same time. That kinda makes up for it!
Don't suppose you have a link for that seminar? |
Sure, it was free when live, and costs money now, but here it is: //www.creativelive.com/courses/lightroom-5-optimizing-enhancing-retouching-unleashed-jack-davis
|
|
|
|
06/22/2013 05:33:28 PM · #5 |
| I use Capture One Pro, any chance you'd want me to join? |
|
|
|
06/22/2013 05:37:42 PM · #6 |
One other tip, I learned today because I needed it.
If you have lots of bracketed exposures, there's no way to easily select the +0 ones versus the +2 stop or -2 stop (or whatever you are bracketing).
Tip #1: Set your camera to put the +0 first. I didn't do that on my D600, and instead set it for -2 first, then 0, then +2. However, when you stack these, you are left with -2 on top. Hard to then rate your shots. This can be fixed by selecting the second shot, and then promoting it to the top.
There's a keyboard shortcut for this (Shift-S), but it doesn't work in grid mode on more than one shot at a time. So first you need a trick to mark all the normal exposures, so you can filter and show only those. The search engine does not let you search by exposure comp.
Tip #2: Set your screen so you have three thumbnails across for your set of bracketed shots (virtually all of mine). Then using the Paint tool in the Grid mode (the spray can), spray it to set something you CAN search for. I just added the keyword exposure00. You just paint the keyword on (unfortunately, it doesn't autoscroll down, so it's still a bit of work). Then once painted, you can select by keyword, then go to the first one. Press Shift-S, then right arrow, repeat as quickly as you can and LR will let you. Ok, that's all a bit of effort, but it works. Better to set your camera to do it right in the first place!
ETA: Painter tutorial: https://www.video2brain.com/en/lessons/using-the-painter-tool
Message edited by author 2013-06-22 17:43:30. |
|
|
|
06/22/2013 05:41:26 PM · #7 |
Originally posted by Cory:
I use Capture One Pro, any chance you'd want me to join? |
I have no objections since philosophically it's the same idea, but part of the idea was to use this for tips as well as photos. Not sure how that will work out with multiple software programs. But you're welcome to try.
|
|
|
|
06/22/2013 07:44:09 PM · #8 |
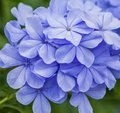
Fully processed in LR. Not that it has a to on it, but did do some blurring and lowering of the exposure on the edges. |
|
|
|
06/22/2013 09:05:31 PM · #9 |
i m spending most of my editing time in LR lately. My last entry was only edited in LR i m pretty sure.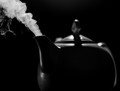
My next free study takes advantage of LR's gradient editing tools. I can't show it just yet but i shall post it when the time comes. I think its a good starting point.
Message edited by author 2013-06-22 21:06:28. |
|
|
|
06/22/2013 11:48:37 PM · #10 |
Here's one I like right from lightroom. Mostly using presets, but a few tweaks. I like the new spot removal algorithms in lightroom, seems to work a bit better and doesn't leave as much of a blotch.
 |
|
|
|
06/23/2013 08:23:28 AM · #11 |
i'm game for this. i'm going to be working on trying to stay exclusively in LR with my editing as much as possible now so this thread is SC is right up my alley.
btw, before and after will really help this thread out. |
|
|
|
06/23/2013 10:22:22 AM · #12 |
Hopefully I won't drive you all nuts, but where I sit right now this is the perfect challenge for me. How to get better and remember what does what.
So this morning as I was fooling around I had a visitor sitting next to me marking up my computer! What better oppertunity?
 and the original and the original 
LR Processing steps
Auto Tone
Add Graduated Filter
Update Exposure Adjustment on the Grad Filter to even up the shadows
Add a little clarity +31
Add a little vibrance +29
Luminance Smoothing +25
Luminance Smothing +29
Play with Crop until I get the part I wanted
Export with 800px long side 72 dpi and optimized to 300
Oooo just got visited by a second little monster.
 Unedited Unedited 
Message edited by author 2013-06-23 11:41:57. |
|
|
|
06/23/2013 12:32:25 PM · #13 |
|
|
|
06/23/2013 01:22:24 PM · #14 |
i struggled with a slow LR to get this but i attempted to redo a former challenge entry i used PS for to see how well LR could handle portrait retouching.
IMO, it looks more natural, not quite as polished although i probably could have really added on the polish if i wanted to. funny how my new retouch is a bit toned back. i guess im learning to get a more natural look and not porcelain doll the image so much.
original

new edit in only LR

and my original challenge entry done in PS.
 |
|
|
|
06/23/2013 02:12:56 PM · #15 |
A couple more:

I've used lightroom to organize and do initial exposure and color adjustments. I haven't played with the gradients or brushes much. The only tip I've found so far was in Serge's video (thanks  Bear_Music); I didn't know about using the alt key (option on the Mac) to show blown out hightlights and shadows. Very valuable. Bear_Music); I didn't know about using the alt key (option on the Mac) to show blown out hightlights and shadows. Very valuable. |
|
|
|
06/23/2013 03:19:03 PM · #16 |
Heres an example of one of my first gradient experiments, some adjustment brush in there too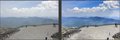 |
|
|
|
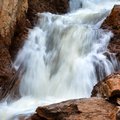
06/23/2013 06:47:47 PM · #17 |
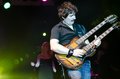
Here are some I just did this weekend soley in LR. Really didnt do a lot just some Noise Reduction and Vignettes. This was a Pink Floyd tribute band called Think Floyd, they were pretty amazing.
BTW LR did an amazing job handling the WB shifts.
  
  
Message edited by author 2013-06-23 18:49:38. |
|
|
|
06/23/2013 09:00:10 PM · #18 |
Before and after shots would be much appreciated for this thread...
Before

After

My workflow:
White Balance Adjustment
Set Black and White points
Adjust Highlights and Shadows
Pushed Clarity and Vibrance
Adjusted exposure and contrast
Slight S shaped tone curve adjustment
Luminance shift to purples and magentas
Sharpened
added gradient to sky for exposure, saturation and contrast adjustments
added gradient to ground for exposure and clarity adjustment
added brush adjustment to bench for clarity and sharpness
added vignette
Saved!
|
|
|
|
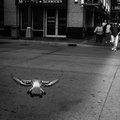
06/25/2013 06:23:19 PM · #19 |
Here's one...
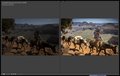
Nothing too exciting, but I used perspective control to fix distortion of the horse hitting the bottom right of the frame, in conjunction new aspect ratio control to bring things into visual order (in my eye at least).
Also, the spot cleaner for cleaning of my D600 birthmark spots, and used the new radial filter to bring him out of the shade and for general lighting adjustments
Here's another before and after:
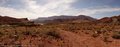
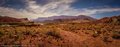
That's a RX100 panorama (so I couldn't fit it in before and after view easily!)
Message edited by author 2013-06-25 18:41:18. |
|
|
|
06/26/2013 11:35:22 PM · #20 |
Today's Tip: Did you know that (at least on the PC) you can get finer resolution of the sliders by holding the shift key? Without it, for example, the sliders jump numbers, sometimes by two or more. I'm not sure this is on purpose, since I don't think Mac LR works this way. But in any case, for the PC, holding shift gives you increments of 1 on the sliders, rather than the irregular increments.
And a question: I had my metadata template for import set to add a copyright message. I was under the impression I could do:
Copyright {YYYY} @ Neil R. Shapiro, All Rights Reserved
And it would fill in the YYYY. But it didn't work, at least in my last import which was in LR5. Anyone know if this should work, or what I'm doing wrong? |
|
|
|
06/28/2013 09:49:33 AM · #21 |
This sounds interesting to me... I've been doing a lot with Lightroom only lately. Specifically a wedding I shot a couple weeks ago. There are a few shots that will need work I can't do with LR, but only about 6 or so of the 250 I'm touching.
I've done a couple re-edits of some older shots w/ only LR just to see if they turned out better. One is my current Hidden Gem entry. I couldn't go back through all my catalog, so I picked an image I'd posted here that had lots of comments and lots of views (you can go figure out which it is if you're enterprising) I kinda like the new edit better.
If I think of it, I'll try to post another before/after example tonight while working on my free study entry.
|
|
|
|
06/30/2013 11:55:56 PM · #22 |
So I finally remembered to upload the photo I mentioned earlier. As you can tell, I missed a great shot by not having a flash, but I'm amazed at what came out in the end... It obviously needs more noise reduction, but that's the best I could get in LR5
raw:  processed : processed : 
And here's one I did last night:
raw:  processed : processed : 
Message edited by author 2013-06-30 23:56:42. |
|
|
|
07/26/2013 07:52:24 PM · #23 |
Here's our new Foster Dog Tyrion

Editing all in Lightroom
The background is his cone of shame (fixed yesterday), and he's in a crate that is way to big for him. But he seems to like us. |
|
Home -
Challenges -
Community -
League -
Photos -
Cameras -
Lenses -
Learn -
Prints! -
Help -
Terms of Use -
Privacy -
Top ^
DPChallenge, and website content and design, Copyright © 2001-2024 Challenging Technologies, LLC.
All digital photo copyrights belong to the photographers and may not be used without permission.
Current Server Time: 04/19/2024 03:05:44 AM EDT.


