| Author | Thread |
|
|
04/09/2013 11:17:32 PM · #1 |
There is a problem that I can't seem to solve with the lenses that I cobble up from odds and ends glass.
There must be a paint or some kind of material that can be applied to the inside of lens tubes made from PVC pipe or aluminum that will absorb most or all of the stray light to improve contrast in the images.
Sharpie dry marker and "flat black" paint both seem to have too much shine when they dry.
Has anyone else encountered and solved this problem or have a good tip or suggestion that has been shared before ? |
|
|
|
04/09/2013 11:34:25 PM · #2 |
| Your best bet would be black flocked paper or velvet and double sided carpet tape. Second choice would be black suede or chalkboard textured paint. |
|
|
|
04/09/2013 11:37:47 PM · #3 |
A flat black or gray should work. :-(
-There is some paint made to provide a chalkboard-like surface which might work.
-You could add some granular/gritty material (ground charcoal, graphite powder?) to provide an uneven surface.
-You could apply several layers of paint, and then run some fine sandpaper or steel wool through the tube. |
|
|
|
04/09/2013 11:51:05 PM · #4 |
Might I suggest using powdered carbon black and a sprayed on adhesive? (black paint would be a fine adhesive)
The idea would be to create a felt-like surface, so something really fibrous as a charcoal (think palm frond bases) might be the best possible idea, but that would involve you actually charcoalifying the palm yourself I'm sure.
Instead, I'd try to just buy real carbon black, or I'd powder up some charcoal.
Remember that carbon black is the standard for light absorption, and has an albedo of almost 0 - so beating it would be pretty damned tough.
Message edited by author 2013-04-09 23:52:30. |
|
|
|
04/09/2013 11:58:53 PM · #5 |
| Krylon Ultra-Flat #1602, applied in several thin coats, works very well. |
|
|
|
04/09/2013 11:59:44 PM · #6 |
Be careful with any of these -- carbon black (a.k.a. soot) is one of the constituents of air pollution most responsible for lung disease, and I'd figure powdered graphite to be the same.
Grinding up some charcoal and sprinkling it onto wet black paint as Cory suggests maybe be the low-cost and simple route, plus you can celebrate with some BBQ afterward ...
Keep us updated! |
|
|
|
04/10/2013 12:09:37 AM · #7 |
Here's the current project lens. I'm working on it to use for the "outdoor macro" challenge.
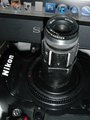
It also seems to have a "hot spot" in the center of the image, which I am not sure what's causing that. Maybe I'm using it too far from the sensor , which in this case is around 4 inches. The tube is a female 1/2" slip to thread adapter, screwed on a 1/2 inch male pipe adapter which is in turn glued to a body cap. The front element in the lens is a little less than 3/8" in diameter.
Cory seems to have an interesting idea about the carbon black, but it's messy. It's otherwise known as fingerprinting powder or dust. Since I play drums with the local county sheriff's band, it should not be too hard to get a small supply. I could paint the inside of the tube with some kind of glue, and work the dust into the glue by capping one end with masking tape, dropping in the powder, then cap the other and shake it up. I sure would not want that stuff floating around and getting on the sensor though.
On second thought, maybe scraping the flock off a piece of paper and gluing it in would work, and be safer for the camera.
Here is a shot done with it a couple of minutes after the glue between the pipe fitting and body cap hardened.

You can see the "hot spot" in this one, between the blade and the center of the seed.
|
|
|
|
04/10/2013 12:45:04 AM · #8 |
Originally posted by MelonMusketeer:
I sure would not want that stuff floating around and getting on the sensor though. |
Exactly why I didn't suggest that or something like flat black paint over sandpaper. Loose particles will inevitably wind up on your sensor or lens elements. The "proper" solution is flocking paper. You apply double sided carpet tape to the inside of the tube, wrap your paper around a dowel or cardboard tube and then roll it onto the tape. The "easy" approach is chalkboard or suede paint that gives a rough texture and flat black color. Krylon and Rustoleum both offer a black camouflage paint specifically designed to kill reflections, and their non-skid paints would probably work, too. |
|
|
|
04/10/2013 12:45:30 AM · #9 |
Thanks Robert. I thought you might have an easy solution to the super flat black problem.
Do you have any thoughts about the "hot spot" problem. It's a tessar lens, and the hot spot seems to be there at all apertures from f4.5 through f16.
Here's a straight from the camera, straight on, shot of an ordinary hand grinder wheel, so you can see what's going on. This was done with on cam flash, but the problem is there with or without flash.

 Scalvert posted while I was uploading the sample shot. Thanks also, for your input on this. Scalvert posted while I was uploading the sample shot. Thanks also, for your input on this.
Message edited by author 2013-04-10 00:49:06. |
|
|
|
04/10/2013 04:37:24 PM · #10 |
A little late to chime in, but here goes...
As Shannon posted, flocked paper or velvet would perform better than paint (it's why all of Canon's hoods are flocked on the inside). Another old trick is to groove the inside of the hood and then use a flat paint. The grooves should have a triangular profile, as if you threaded it. That way, the forward facing side of each peak reflects light back out of the hood, and the rear-facing side remains shadowed, and therefore much darker. You could easily achieve this by running a threading tool up the inside of your manufactured hood, then painting the resulting grooved surface with flat black paint.
|
|
|
|
04/10/2013 04:54:17 PM · #11 |
This is what they recommend for flocking telescopes. The stuff from Martha Stewart is really meant for crafts/decorating and I'd hesitate to use it for any optical purposes as I'd be worried about the "velvety" stuff coming loose inside my lens.
Message edited by author 2013-04-10 17:01:11. |
|
|
|
04/10/2013 06:51:34 PM · #12 |
| Waddy, I don't understand the hot spot, sorry... I know we used that paint, or a similar one, when rebuilding old lenses and enlargers, way back when. Seemed to work fine. I'm not aware of anyone, ever, f;locking the inside of a lens barrel. Seems crazy to me. It's a recipe for junk to flake off and get on the elements. It even happens with PAINT, over time, which is why we had to rebuild.... |
|
|
|
04/10/2013 11:55:42 PM · #13 |
Thanks everyone. I will continue to work on it and learn as I go. What I find out, I will share here.
The next step is to shorten the tube between the lens and the lens cap to about 1/2 it's current length and see how the hot spot changes.
That will allow for longer focusing distances, and hopefully make it easier to use as well. Hand holding at 1 1/4 inches from the subject is sort of crazy re getting a focused shot. The cool thing about this tiny lens though, is that you can put it right inside a flower or small area like it is, because the front of the lens is the size of a 2 litre bottle cap.
ETA, Here is a shot, totally OOF showing the center hot spot, and the way the light falls off toward the rest of the frame.
My suspicion is that this lens is made for a system needing a smaller image circle, like possibly a microfilm reader or reducer/enlarger of some kind.
Another possibility is that I can't see something going on in the glass, like a bubble or haze causing diffraction or light scattering.

Message edited by author 2013-04-11 00:06:55. |
|
|
|
04/11/2013 10:55:21 AM · #14 |
I suspect that you are right and the hot spot is caused by falloff in the image circle of the lens.
However, I've also seen similar hot spots from several of my Canon EF lenses when using them on my IR converted 10D.
Message edited by author 2013-04-11 10:55:45. |
|
|
|
04/12/2013 12:30:45 AM · #15 |
Ok, the problem is solved. The distance from the lens to the sensor was too long.
I shortened the lens tube to about half it's original length, which reduced the lens to sensor distance by about 1/3. It's great now. DOF is certainly shallow at that range though. Focus is around 1.25 inches from the front of the lens.
Here's a test shot from this afternoon. This dial indicator went through a fire before I got it. It still works fine though, and I use it with my small lathe. The diameter of the dial is about the same as a milk jug cap.
Shot hand held, with on cam flash.

|
|
Home -
Challenges -
Community -
League -
Photos -
Cameras -
Lenses -
Learn -
Prints! -
Help -
Terms of Use -
Privacy -
Top ^
DPChallenge, and website content and design, Copyright © 2001-2024 Challenging Technologies, LLC.
All digital photo copyrights belong to the photographers and may not be used without permission.
Current Server Time: 04/25/2024 11:57:44 AM EDT.


