| Author | Thread |
|
|
10/15/2012 02:17:16 AM · #76 |
|
|
|
10/15/2012 09:15:56 AM · #77 |
I bought a curiosity item with a 50/ f1.4 manual Nikkor on it. It's called a "depth of field converter". The seller says that it's used with video cameras to change depth of field.
It's just a tube screwed together in four sections, with the Nikon lens mount on one end, a ground glass in the 2nd section, on which the image forms. The 3rd section is a short tube with a magnifying lens, about +4 or 5, and the final piece is an adapter, 52mm female filter thread to 72 mm male filter thread.
The only way I figure that it would be used is to mount the item on a video camera having a 72mm filter thread, and video the shallow DOF image projected on the ground glass. All of the sections screw together with 52mm filter thread. So far, the only use I have found is to use the magnifying lens as a close up filter.
I can't get a clear image off the ground glass yet, but I think that it may be a matter of figuring out the right lens to use it with. So far, I have tried it by removing the 52/72 step up ring and screwing the unit on the 35 f2, the 50 f1.4, and 105 f2.8 Micro Nikkor and with each, the focus seems to be beyond infinity.
I'm going to keep tinkering with it to see what it can do. It may be that the image from the front lens is not clearly focusing on the ground glass, or possibly I'm looking at such a small area of the ground glass that it looks OOF.
In any case, the Nikkor 50 f1.4 that was on it is beautiful and completely functional, so it was worth the $50. I will convert it from non Ai to Ai so I can use it directly on my camera later. The high diopter magnifying lens seems to work great as well. Maybe I can burn some ants with that when not shooting pix.
One other thing, the image on the ground glass is inverted, so the video images would have to also be inverted. Maybe it came from Australia, and the images shot there with it would be right side up here in the states?
If anyone has any information about the DOF converter, I would appreciate knowing how it's supposed to work, or what it's specific purpose would be. I suspect that it's for getting shallow DOF by using the 1.4 lens to make a shallow DOF image on the ground glass then videoing that image with the higher f# lens on the video camera.
ETA, found it on wiki. Got the info I was looking for.
Message edited by author 2012-10-15 12:28:57. |
|
|
|
10/15/2012 06:50:52 PM · #78 |
Originally posted by MelonMusketeer:
One other thing, the image on the ground glass is inverted, so the video images would have to also be inverted. Maybe it came from Australia, and the images shot there with it would be right side up here in the states? |
Send it all to me and I'll try it out for you ;-)
Good luck with your tinkering, oh, and we need pictures, pictures of your curiosity item, and hopefully then some pictures taken with it.
|
|
|
|
10/15/2012 11:21:21 PM · #79 |
Hard to tell with pictures/diagrams, but if you're trying to photograph an image "projected" on a ground-glass you might try using a macro lens/setting; it sounds like the ground glass is pretty close to the main lens on your camera.
Hard to see you you can get a very clear image that way.
PS: If you want to send it to me, my camera will focus down to 0" in "SuperMacro" mode, and I already have a 52mm adapter ring for it.
Message edited by author 2012-10-15 23:23:20. |
|
|
|
10/16/2012 12:09:57 AM · #80 |
I've been reading about the DOF thing. It seems that it's used to be able to get shallower DOF with video cams that are not equipped with large aperture lenses. I can see how it would probably work ok for that back before HD video. The limit of resolution in it will be in how fine the grain of the ground glass is, and even then, some strangeness will be showing up in still shots done with it.
Maybe I can figure out a way to use it effectively with one of my telescopes and my P&S Fuji cam for shooting bright objects like Jupiter or the Moon. My little P&S should have no problem at all getting focus on the ground glass if a telescope will make an image on the glass. |
|
|
|
10/16/2012 12:54:50 AM · #81 |
|
|
|
10/16/2012 08:01:55 AM · #82 |
Ready to go!
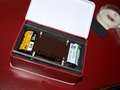 
A few realizations came about as I was building and testing it: The "lens" is a fisheye, and I'm finding it hard to keep my hands out of the picture. Also, at f/8 with 100 speed film (even the expired stuff which tends to be slower), sunny days might be out. The shutter is very variable and not very fast. More details in the images above.
I don't have high hopes, but I am rather excited. Going to take it out today and hopefully have results to post by the end of the week... |
|
|
|
10/16/2012 08:37:29 AM · #83 |
| Thanks Brian, this is gonna be fun. Was wondering about light leaks. Could be nice effects. |
|
|
|
10/16/2012 08:38:48 AM · #84 |
 cut plastic taped to top of camera cut plastic taped to top of camera |
|
|
|
10/16/2012 09:42:46 AM · #85 |
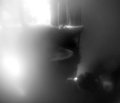
From the Beatles challenge.

Message edited by author 2012-10-16 09:43:41. |
|
|
|
10/16/2012 09:01:22 PM · #86 |

Something from the vast archive -- while we wait to get the film back. |
|
|
|
10/16/2012 11:47:28 PM · #87 |
|
|
|
10/17/2012 07:28:28 PM · #88 |
|
|
|
10/17/2012 08:21:50 PM · #89 |
|
|
|
10/17/2012 09:58:06 PM · #90 |
|
|
|
10/19/2012 08:34:58 PM · #91 |
|
|
|
10/20/2012 02:57:38 PM · #92 |
|
|
|
10/20/2012 06:04:10 PM · #93 |
| Tonight's the night! I'll be developing the film I shot using the box of foam and tape. |
|
|
|
10/20/2012 07:12:29 PM · #94 |
Really looking forward to this!
|
|
|
|
10/20/2012 07:14:48 PM · #95 |
How did you allow for the thickness of the exposed film to increase the diameter of the film in the take up spool?
Message edited by author 2012-10-20 19:16:42. |
|
|
|
10/20/2012 09:19:47 PM · #96 |
Originally posted by Digipixer:
How did you allow for the thickness of the exposed film to increase the diameter of the film in the take up spool? |
Come again? |
|
|
|
10/20/2012 10:25:20 PM · #97 |
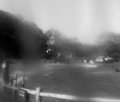
It worked! The exposures are all over the place (as I expected). And I need to work on the "ticker" -- lots of overlapping frames and gaps between frames. But I see at least a few promising things.
The film is drying. I'll scan tonight or tomorrow and start posting some results. Might take it out for another shoot next week...
|
|
|
|
10/21/2012 07:04:12 PM · #98 |
Waiting .... tapping fingers on desk ....
|
|
|
|
10/21/2012 07:38:34 PM · #99 |
Originally posted by bvy:
lots of overlapping frames and gaps between frames. But I see at least a few promising things.
The film is drying. I'll scan tonight or tomorrow and start posting some results. Might take it out for another shoot next week... |
This is whaat I ment by allowing for the diameter of the film on the takeup reel as the film is wound. The exposed frames after a while will overlap. |
|
|
|
10/21/2012 08:26:06 PM · #100 |
Originally posted by Digipixer:
Originally posted by bvy:
lots of overlapping frames and gaps between frames. But I see at least a few promising things.
The film is drying. I'll scan tonight or tomorrow and start posting some results. Might take it out for another shoot next week... |
This is whaat I ment by allowing for the diameter of the film on the takeup reel as the film is wound. The exposed frames after a while will overlap. |
I think I understand what you mean now. As the film advances, the sprocket holes strike a "ticker" (just a cut and shaped piece of scrap film) inside the camera. So I count twelve ticks between frames -- versus counting some number of whole or fractional turns of the advance crank. The problem is, the ticks aren't very audible, especially outside in the city. So I need to improve this.
Scanning now. I ran out of hard disk space (just bad timing) so I'm having to do some shuffling of files and folders and drives to reclaim some space. Stand by... |
|
Home -
Challenges -
Community -
League -
Photos -
Cameras -
Lenses -
Learn -
Prints! -
Help -
Terms of Use -
Privacy -
Top ^
DPChallenge, and website content and design, Copyright © 2001-2024 Challenging Technologies, LLC.
All digital photo copyrights belong to the photographers and may not be used without permission.
Current Server Time: 04/25/2024 02:33:50 AM EDT.