| Author | Thread |
|
|
10/07/2010 09:41:24 AM · #251 |
07 - Chinse Lantern
 |
|
|
|
10/07/2010 09:56:39 AM · #252 |
|
|
|
10/07/2010 09:59:41 AM · #253 |
|
|
|
10/07/2010 10:18:00 AM · #254 |
Day 7
 |
|
|
|
10/07/2010 10:29:10 AM · #255 |
 ............ ............
Message edited by author 2010-10-07 18:49:11. |
|
|
|
10/07/2010 12:11:23 PM · #256 |
I normally wouldn't post 3 pictures, but I need some expert help on how to take this type of picture better. I tried some a couple weeks ago they didn't turn out at all. So this time I tried several different apeture settings and different ISO settings and they were still not quite what I wanted. I put the settings for each shot, I would love to know what you would have done differently or what settings you usually use for a sunrise shot.
[thumb]913368[/thumb]
[thumb]913369[/thumb]Oops I was cleaning out my portfolio, and didn't realize it would affect this post. I really only wanted to keep one of these shots in, and everyone seemed to like the one below the best.

Of course even with their inperfections I still think they are beautiful. These are taken right from my house, I was doing my morning run and had to run home a little faster so I wouldn't miss the shot.
Message edited by author 2010-10-08 01:37:50. |
|
|
|
10/07/2010 02:24:02 PM · #257 |
|
|
|
10/07/2010 03:09:50 PM · #258 |
Originally posted by sjhuls:
I normally wouldn't post 3 pictures, but I need some expert help on how to take this type of picture better. I tried some a couple weeks ago they didn't turn out at all. So this time I tried several different apeture settings and different ISO settings and they were still not quite what I wanted. I put the settings for each shot, I would love to know what you would have done differently or what settings you usually use for a sunrise shot. |
Changing the ISO isn't accomplishing anything, nor will changing the aperture accomplish anything, unless you are in manual mode, which I'm sure you're not. What you need to do is called "EV Compensation" and it's easy to adjust. Check your manual and read up on it.
In a nutshell, here's what's happening:
Your camera doesn't know if it's metering bright light reflected off a dark surface or weak light reflected off a brighter surface; it doesn't know if you're shooting a white wall or a black wall. So it assumes that the average of all the values being metered is a medium gray, and it gives you an exposure based on that. If you filled the frame with a white wall you'd get a gray wall. If you filled the frame with a black wall you'd get a gray wall. You wouldn't be able to tell them apart, theoretically. Make the frame half black and half white, and both would render accurately.
So when you point the camera at dark things it overexposes. When you point it at bright things it underexposes. In the case of your sunrise, the bright part is so much brighter that the dark part underexposed badly. The way to fix it, when shooting, is to use EV compensation to add a stop or two more exposure. Your manual will explain this. Just changing the aperture, or the ISO, accomplishes nothing, because the camera will still make the same metering assumptions.
R. |
|
|
|
10/07/2010 04:36:24 PM · #259 |
Originally posted by Bear_Music:
Originally posted by sjhuls:
I normally wouldn't post 3 pictures, but I need some expert help on how to take this type of picture better. I tried some a couple weeks ago they didn't turn out at all. So this time I tried several different apeture settings and different ISO settings and they were still not quite what I wanted. I put the settings for each shot, I would love to know what you would have done differently or what settings you usually use for a sunrise shot. |
Changing the ISO isn't accomplishing anything, nor will changing the aperture accomplish anything, unless you are in manual mode, which I'm sure you're not. What you need to do is called "EV Compensation" and it's easy to adjust. Check your manual and read up on it.
In a nutshell, here's what's happening:
Your camera doesn't know if it's metering bright light reflected off a dark surface or weak light reflected off a brighter surface; it doesn't know if you're shooting a white wall or a black wall. So it assumes that the average of all the values being metered is a medium gray, and it gives you an exposure based on that. If you filled the frame with a white wall you'd get a gray wall. If you filled the frame with a black wall you'd get a gray wall. You wouldn't be able to tell them apart, theoretically. Make the frame half black and half white, and both would render accurately.
So when you point the camera at dark things it overexposes. When you point it at bright things it underexposes. In the case of your sunrise, the bright part is so much brighter that the dark part underexposed badly. The way to fix it, when shooting, is to use EV compensation to add a stop or two more exposure. Your manual will explain this. Just changing the aperture, or the ISO, accomplishes nothing, because the camera will still make the same metering assumptions.
R. |
And don't forget to check your EV value before your next shoot or you might get disappointing results, especially if you change from outdoor to indoor. Happened to me many times :(. |
|
|
|
10/07/2010 05:16:58 PM · #260 |
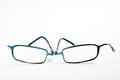
Oct 07 - Reading glasses |
|
|
|
10/07/2010 05:32:04 PM · #261 |
I am in manual mode, otherwise I would not be able to adjust the apeture or the ISO. You are right about the metering, I did not check my metering, I so far have not thought to even check it. I will pay more attention to that in the future. Thanks for you help.
Originally posted by tome:
Originally posted by Bear_Music:
Originally posted by sjhuls:
I normally wouldn't post 3 pictures, but I need some expert help on how to take this type of picture better. I tried some a couple weeks ago they didn't turn out at all. So this time I tried several different apeture settings and different ISO settings and they were still not quite what I wanted. I put the settings for each shot, I would love to know what you would have done differently or what settings you usually use for a sunrise shot. |
Changing the ISO isn't accomplishing anything, nor will changing the aperture accomplish anything, unless you are in manual mode, which I'm sure you're not. What you need to do is called "EV Compensation" and it's easy to adjust. Check your manual and read up on it.
In a nutshell, here's what's happening:
Your camera doesn't know if it's metering bright light reflected off a dark surface or weak light reflected off a brighter surface; it doesn't know if you're shooting a white wall or a black wall. So it assumes that the average of all the values being metered is a medium gray, and it gives you an exposure based on that. If you filled the frame with a white wall you'd get a gray wall. If you filled the frame with a black wall you'd get a gray wall. You wouldn't be able to tell them apart, theoretically. Make the frame half black and half white, and both would render accurately.
So when you point the camera at dark things it overexposes. When you point it at bright things it underexposes. In the case of your sunrise, the bright part is so much brighter that the dark part underexposed badly. The way to fix it, when shooting, is to use EV compensation to add a stop or two more exposure. Your manual will explain this. Just changing the aperture, or the ISO, accomplishes nothing, because the camera will still make the same metering assumptions.
R. |
And don't forget to check your EV value before your next shoot or you might get disappointing results, especially if you change from outdoor to indoor. Happened to me many times :(. |
|
|
|
|
10/07/2010 05:55:28 PM · #262 |
 sjhuls, Some of the impressive sunrise and sunset shots here are done by shooting a "bracket" of exposures at + 0 and - EV's, then layering them in processing to get the best parts of all three blended into one finished image. It's tough for a camera to get all the levels of light that are in a scene like the one you posted with one shot. sjhuls, Some of the impressive sunrise and sunset shots here are done by shooting a "bracket" of exposures at + 0 and - EV's, then layering them in processing to get the best parts of all three blended into one finished image. It's tough for a camera to get all the levels of light that are in a scene like the one you posted with one shot.
|
|
|
|
10/07/2010 05:57:37 PM · #263 |
Originally posted by sjhuls:
I am in manual mode, otherwise I would not be able to adjust the apeture or the ISO. You are right about the metering, I did not check my metering, I so far have not thought to even check it. I will pay more attention to that in the future. Thanks for you help.
Originally posted by tome:
Originally posted by Bear_Music:
Originally posted by sjhuls:
I normally wouldn't post 3 pictures, but I need some expert help on how to take this type of picture better. I tried some a couple weeks ago they didn't turn out at all. So this time I tried several different apeture settings and different ISO settings and they were still not quite what I wanted. I put the settings for each shot, I would love to know what you would have done differently or what settings you usually use for a sunrise shot. |
Changing the ISO isn't accomplishing anything, nor will changing the aperture accomplish anything, unless you are in manual mode, which I'm sure you're not. What you need to do is called "EV Compensation" and it's easy to adjust. Check your manual and read up on it.
In a nutshell, here's what's happening:
Your camera doesn't know if it's metering bright light reflected off a dark surface or weak light reflected off a brighter surface; it doesn't know if you're shooting a white wall or a black wall. So it assumes that the average of all the values being metered is a medium gray, and it gives you an exposure based on that. If you filled the frame with a white wall you'd get a gray wall. If you filled the frame with a black wall you'd get a gray wall. You wouldn't be able to tell them apart, theoretically. Make the frame half black and half white, and both would render accurately.
So when you point the camera at dark things it overexposes. When you point it at bright things it underexposes. In the case of your sunrise, the bright part is so much brighter that the dark part underexposed badly. The way to fix it, when shooting, is to use EV compensation to add a stop or two more exposure. Your manual will explain this. Just changing the aperture, or the ISO, accomplishes nothing, because the camera will still make the same metering assumptions.
R. |
And don't forget to check your EV value before your next shoot or you might get disappointing results, especially if you change from outdoor to indoor. Happened to me many times :(. |
|
I think you are most likely in aperture priority (Av) You set the aperture and the ISO and the camera will choose a shutter speed according to it's metering. The "Exposures" you have posted are all virtually the same, just different iso, aperture and shutter to give the same exposure, ie the same amount of light on the sensor
Try shooting in full manual (M) on the dial
eg
1/100 f/5.6 ISO 200 will give exactly the same exposure as 1/100 f8 ISO 400 which is exactly the same as 1/100 f11 ISO 800
If you shot at 1/100 f5.6 ISO 400 your shot would be brighter as you've doubled the sensitivity of the sensor. If you shot at 1/50 f5.6 ISO 400 you've doubled the amount of light on the sensor
As Bear says, you can achieve the same in Av using the exposure compensation, but in Av the camera is always going to adjust the shutter speed to give the same exposure |
|
|
|
10/07/2010 06:03:49 PM · #264 |
 MelonMusketeerI have just now been researching EV on my camera and I don't think it has a very sofisticated system. I would love to try, bracketing some shots but don't have the software to process it, do you know if this can be done in photoshop? MelonMusketeerI have just now been researching EV on my camera and I don't think it has a very sofisticated system. I would love to try, bracketing some shots but don't have the software to process it, do you know if this can be done in photoshop?
Originally posted by MelonMusketeer:
sjhuls, Some of the impressive sunrise and sunset shots here are done by shooting a "bracket" of exposures at + 0 and - EV's, then layering them in processing to get the best parts of all three blended into one finished image. It's tough for a camera to get all the levels of light that are in a scene like the one you posted with one shot. |
Message edited by author 2010-10-07 18:18:05. |
|
|
|
10/07/2010 06:11:38 PM · #265 |
bobonacusMe being new at this I forgot to post some additional info that might be helpful. I was in full M mode and shooting in RAW so in post processing I manipulated the exposures to a more pleasing level. That is why they look almost the same. Still even with my manipulating I could not make them be excactly what I was looking for so, so I figured I must have messed up somewhere in the actual shooting, with my levels.
Message edited by author 2010-10-07 18:15:22. |
|
|
|
10/07/2010 06:19:06 PM · #266 |
Originally posted by sjhuls:
I am in manual mode, otherwise I would not be able to adjust the apeture or the ISO. |
That's not actually correct: you *may* be in "manual mode" ("M" on the mode dial") but you could also be in aperture priority (Av) or shutter priority (Tv) where you can specify the relevant value (aperture or shutter speed, respectively) and the camera will set the other variable to produce the neutral exposure, or the EV-compensated exposure if you have that dialed in. In ALL modes, you can specify your ISO.
R. |
|
|
|
10/07/2010 06:35:02 PM · #267 |
Bear_MusicI guess I am confused, my camera has 5 settings in manual mode. a-dep, M, AV, TV, and P. I usually keep my dial set on the M which I assumed was full manual mode. My camera also has 6 auto modes in which nothing can be adjusted, the camera just does it for you, I rarely use these modes unless I am just shooting snapshots that I don't plan on editing later. I do understand what the other modes in Manual do, but I try not to use them as I am trying to get a feel for what are the right settings for each situation. I think I figured out what is causing all the confusion thought it is because I shot them in RAW and then did some post processing. Mabey it would have been more helpful to post the original unedited shots.
Originally posted by [user:
[user]Bear_MusicOriginally posted by sjhuls:
I am in manual mode, otherwise I would not be able to adjust the apeture or the ISO. |
That's not actually correct: you *may* be in "manual mode" ("M" on the mode dial") but you could also be in aperture priority (Av) or shutter priority (Tv) where you can specify the relevant value (aperture or shutter speed, respectively) and the camera will set the other variable to produce the neutral exposure, or the EV-compensated exposure if you have that dialed in. In ALL modes, you can specify your ISO.
R. |
|
|
|
|
10/07/2010 07:55:21 PM · #268 |
Day 5
Cubs are getting bigger

|
|
|
|
10/07/2010 07:57:35 PM · #269 |
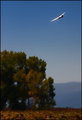
7-Still in the air.
 |
|
|
|
10/07/2010 08:23:12 PM · #270 |

Live it up and visit my Photo-a-Day blog. |
|
|
|
10/07/2010 09:29:26 PM · #271 |
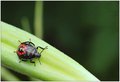
Had a pretty good evening shooting tonight. Found a couple of grasshoppers that let me get real close and take several shots. Then I hung around the butterfly bush trying to get a wasp when I spotted this guy.

First time seeing this insect around here. The color was fascinating. No color adjustment or saturation in this shot. i hope to find it again and get some better shots. I only managed 3 before he flew off. |
|
|
|
10/07/2010 10:06:59 PM · #272 |
#7

Message edited by author 2010-10-07 22:07:09. |
|
|
|
10/07/2010 11:34:17 PM · #273 |
|
|
|
10/07/2010 11:56:06 PM · #274 |
Originally posted by sjhuls:
MelonMusketeerI have just now been researching EV on my camera and I don't think it has a very sofisticated system. I would love to try, bracketing some shots but don't have the software to process it, do you know if this can be done in photoshop?
Originally posted by MelonMusketeer:
sjhuls, Some of the impressive sunrise and sunset shots here are done by shooting a "bracket" of exposures at + 0 and - EV's, then layering them in processing to get the best parts of all three blended into one finished image. It's tough for a camera to get all the levels of light that are in a scene like the one you posted with one shot. |
|
Try "HDR processing" in Google for tons of info about it.
Have a look at the manual for you camera about shooting bracketed shots. Some cameras, mine included, have a setting that automatically shoots three or five shots with bracketed exposures. If your's does not have that feature, you will have to find out how to manually set both aperture and shutter speed in order to bracket. When you bracket, change only the shutter speed, because depth of field changes with aperture, and the photos will not "layer" very well at all if you change the aperture.
|
|
|
|
10/08/2010 12:04:08 AM · #275 |
I goofed off all day today. It was nice : )
|
|
Home -
Challenges -
Community -
League -
Photos -
Cameras -
Lenses -
Learn -
Prints! -
Help -
Terms of Use -
Privacy -
Top ^
DPChallenge, and website content and design, Copyright © 2001-2024 Challenging Technologies, LLC.
All digital photo copyrights belong to the photographers and may not be used without permission.
Current Server Time: 04/24/2024 08:11:52 PM EDT.


