| Author | Thread |
|
|
11/13/2012 08:22:45 PM · #1 |
Major improvements. Nice job!!!
|
|
|
|
11/13/2012 06:59:29 PM · #2 |
|
|
|
11/13/2012 03:37:37 PM · #3 |
| I think NIK has a video tutorial series you can buy. I've always been curious as to how helpful they would be. |
|
|
|
11/13/2012 03:09:33 PM · #4 |
| Lookin' good. Keep plugging away at it. |
|
|
|
11/13/2012 02:59:31 PM · #5 |
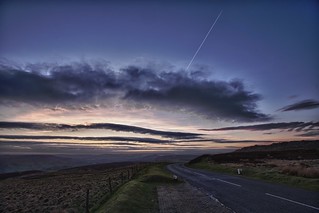
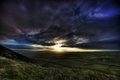
i have taken what robert said and reworked some earlier hdr attempts,
i also got nik hdr efex 2 which i prefer to the previous version
before
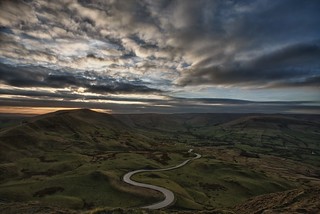
IMG_9355_HDR by gilesbert, on Flickr
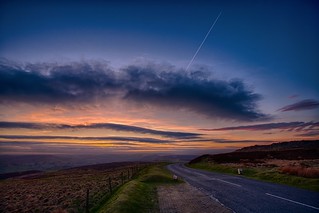
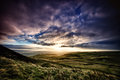
after
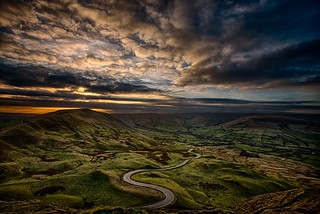
IMG_9355_HDR by gilesbert, on Flickr
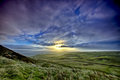
before
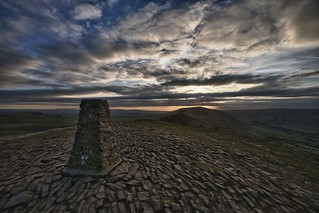
IMG_9326_HDR by gilesbert, on Flickr
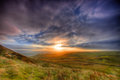
after
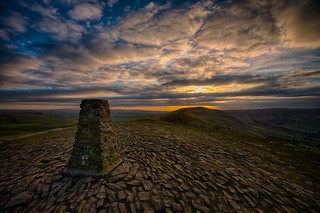
IMG_9324 (3)_HDR by gilesbert, on Flickr
before
IMG_9370_HDR by gilesbert, on Flickr
after
IMG_9370 (1)_HDR by gilesbert, on Flickr
before

IMG_9331_HDR by gilesbert, on Flickr
after
IMG_9329 (3)_HDR by gilesbert, on Flickr
thanks for the help everyone
|
|
|
|
11/08/2012 04:17:09 PM · #6 |
My quick take:
Photomatix pro 3.1
PE10 for some levels and dodge and burn
Canon DPP for final touch up and exposure
 |
|
|
|
11/08/2012 02:14:20 PM · #7 |
Originally posted by Bear_Music:
Originally posted by EL-ROI:
Robert handled the sun very well! I have no idea how to bring out the darker areas in Photomatix or lightroom. If he would care to elaborate for the sake of learning, that would be great! |
Nik's products have "control points"; you can "place" control points anywhere in the image, define how large a diameter they have, and then adjust the image parameters locally as a subset of all the variables in the global menu. The localized effects act on whatever tonalities within the defined area match the tonality that the actual control point is placed on. So I can, for example, place a chain of diminishing , tangent circles down that little ridge on the left, each placed in one of the darker parts of the ridge, and I can link them all together so one set of adjustments affects all of them. Then I can lighten the tonality, add structure and contrast, adjust saturation, all that sort of stuff, for the shadowed portion of that ridge separately from the rest of the image.
And I can do this anywhere within the image for any areas I choose to localize. These are great tools, they have completely changed my processing workflow. |
That is pretty amazing! I am really enjoying the HDR processing, especially now that I have lightroom which makes tracking all the files and importing/exporting from Photomatix very easy. I would love to have that localized control! I will have to look into the Nik products. I did look at the topaz line of products and wasn't thoroughly impressed, except for Denoise. |
|
|
|
11/08/2012 12:47:49 PM · #8 |
Here's my attempt
Message edited by author 2012-11-08 13:03:22. |
|
|
|
11/08/2012 06:54:35 AM · #9 |
Here's my go:
 |
|
|
|
11/08/2012 04:34:26 AM · #10 |
Originally posted by Brent_S:
So thanks for the UK journey, cracking open a Guinness now (only UK brew I have in the house presently). Cheers! |
i shall clean my sensor tonight and incase youve offended any of our irish family her eon dpc Guiness is from the republic of ireland not UK :) haha
i was drinking andechs weissbier at the time last night, throw back to my days in munich
if anyone ever up north in the uk and wants showing rd the peak district drop me a line
Message edited by author 2012-11-08 04:34:59. |
|
|
|
11/08/2012 04:07:08 AM · #11 |
A bit more color:
 |
|
|
|
11/08/2012 02:16:12 AM · #12 |
The sensor dust is more than likely dust on my graduated nds I had 3 on a .8 and .4 on the sun and a .2 upside down on the lower portion, but yeah they are a bit filthy.
I did a sensor dust mapping the other day, and it wasn't to bad but this image doesn't show how bitter it was I had two coats on and was blowing a 50/60 mph gusts, I had my biggest aluminium manfroto and my Bosch 24v hammer drill box hanging off the bottom, nice heavy weight about 15kg
I didn't know about about linking control points I'd used them individually
I didn't think to throw it into colour efex either ill give this a go :)
taking on roberts tips i quickly did this over breakfast

IMG_5803 by gilesbert, on Flickr
thanks everyone for the help and i hope its helped others, might have to make some notes till it becomes second nature :)
do most ppl do (canon 3 stop HDR, or 5 stop nikon) or manual ones say 10 stops etc
i like this group learning
Message edited by author 2012-11-08 04:29:42. |
|
|
|
11/07/2012 11:52:01 PM · #13 |
Hey, this was kind of fun to edit as I got to pretend I was transported to the UK! :)
But Giles, clean your sensor mate! ;)
So Nik has HDR Efex Pro 2 out now. Here's my whack at it using that. I like the new plug-in version, but haven't gotten it dialed in yet. I probably could have pulled this into Lightroom after Nik and done a little fine tuning, but this is pretty much as far as I can go with the new plug-in so far.
I also tried using CS6 to merge to HDR and then saving it as a 32-bit tiff to be opened by Color Efex Pro (version 1 to simulate software you own) for flavoring. A single merged 32-bit tiff will have all the info that the three tiffs going into Nik would have and Nik flavors images better than CS6. I didn't like the look though. This might be a method for you to use if you ever want to freeze the motion of one frame in several though. CS6 can do that MUCH better than HDR Efex 1, but HDR Efex 2 does that great now too and it's worth the upgrade just for that feature in my view.
So thanks for the UK journey, cracking open a Guinness now (only UK brew I have in the house presently). Cheers! |
|
|
|
11/07/2012 11:50:01 PM · #14 |
It's been a while since I did something like this. Thanks for sharing - details are in the comments.
 |
|
|
|
11/07/2012 10:29:40 PM · #15 |
This is what I came up with.
rookery9.aviary.com.s3.amazonaws.com/16077500/16077562_423f.jpg
I used two of the files (excluded the one with longest exposure). I felt it was not in the tonal range I wanted to use.
Message edited by author 2012-11-07 22:33:44. |
|
|
|
11/07/2012 09:58:01 PM · #16 |
Here's my edit....
Dave |
|
|
|
11/07/2012 09:32:16 PM · #17 |
Originally posted by EL-ROI:
Robert handled the sun very well! I have no idea how to bring out the darker areas in Photomatix or lightroom. If he would care to elaborate for the sake of learning, that would be great! |
Nik's products have "control points"; you can "place" control points anywhere in the image, define how large a diameter they have, and then adjust the image parameters locally as a subset of all the variables in the global menu. The localized effects act on whatever tonalities within the defined area match the tonality that the actual control point is placed on. So I can, for example, place a chain of diminishing , tangent circles down that little ridge on the left, each placed in one of the darker parts of the ridge, and I can link them all together so one set of adjustments affects all of them. Then I can lighten the tonality, add structure and contrast, adjust saturation, all that sort of stuff, for the shadowed portion of that ridge separately from the rest of the image.
And I can do this anywhere within the image for any areas I choose to localize. These are great tools, they have completely changed my processing workflow. |
|
|
|
11/07/2012 09:26:54 PM · #18 |
Gave it a go. Probably too dark for most but I like the moodiness to it.
Let me know if you want to know the steps.
 |
|
|
|
11/07/2012 08:03:46 PM · #19 |
Robert handled the sun very well! I have no idea how to bring out the darker areas in Photomatix or lightroom. If he would care to elaborate for the sake of learning, that would be great!
Here is my go:

I typically start by setting a common white balance on each exposure then adjust noise and try to deal with any chromatic abberation prior to converting to tif. I am assuming you did just that.
Imported to photomatix pro.
Performed an exposure fusion - adjust in Photomatix.
Adjusted sliders to suit. Was hoping for a more natural look.
Took it into lightroom to adjust noise, unsharp mask, adjusted exposure and saturation/vibrance/clarity.
slight tone curve adjustments
brought down the saturation on the blue channel for the sky.
lens correction last.
As a note: I noticed a lot of sensor dust spots in your image which you can probably see and did not correct.
Thanks for the opportunity to play with your beautiful shots!
ETA: Ran another one real quick through Photomatix using the Details enhancer and got a better adjustment on the sun. Pretty much same method in lightroom as above.

Message edited by author 2012-11-07 20:23:20. |
|
|
|
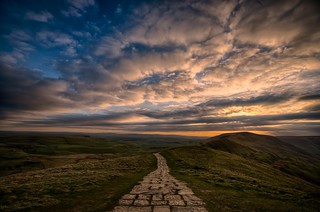
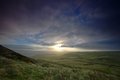
11/07/2012 07:22:42 PM · #20 |
Here's a more heavily romantic go at it:

3-image HDRI with Nik HDR Efex Pro, considerable control-point editing in the hills left/right and in the sky. I have the basic parameters set as a preset but can't save the control points.
HDR image run through Topaz Denoise.
Then a touch of structure and warmth in Nik Viveza, and then a little drama added in Nik Color Efex Pro with "darken/lighten center" and a little tweaking of "pro contrast".
Some final tweaking of color (mainly blue/cyan) with a hue/say layer in CS6. |
|
|
|
11/07/2012 07:10:41 PM · #21 |
| Great shot, I opened it up and played with it but scrapped the editing. I am just not much for landscapes :) |
|
|
|
11/07/2012 06:49:07 PM · #22 |
Merge to HDR in CS6:
 |
|
|
|
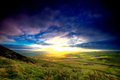
11/07/2012 06:39:36 PM · #23 |
Not sure what you want to achieve. I went for the emphasis on luminence with muted colors:

Single image toning in Photomatix and adjustments in LR4.
I think there are DPCers who can do wonders with luminance. It would be nice if one of them posted a tutorial on how to do it. |
|
|
|
11/07/2012 06:36:54 PM · #24 |
Not sure which version you have I am using v5.0
 |
|
|
|
11/07/2012 06:26:21 PM · #25 |
i have topaz and photomatix pro ill try photomatix as well, i stopped using topaz when i got the nik plugins
upload it here...
Message edited by author 2012-11-07 18:26:42. |
|
Home -
Challenges -
Community -
League -
Photos -
Cameras -
Lenses -
Learn -
Prints! -
Help -
Terms of Use -
Privacy -
Top ^
DPChallenge, and website content and design, Copyright © 2001-2024 Challenging Technologies, LLC.
All digital photo copyrights belong to the photographers and may not be used without permission.
Current Server Time: 04/24/2024 02:49:46 PM EDT.


